background image

GB

5

4

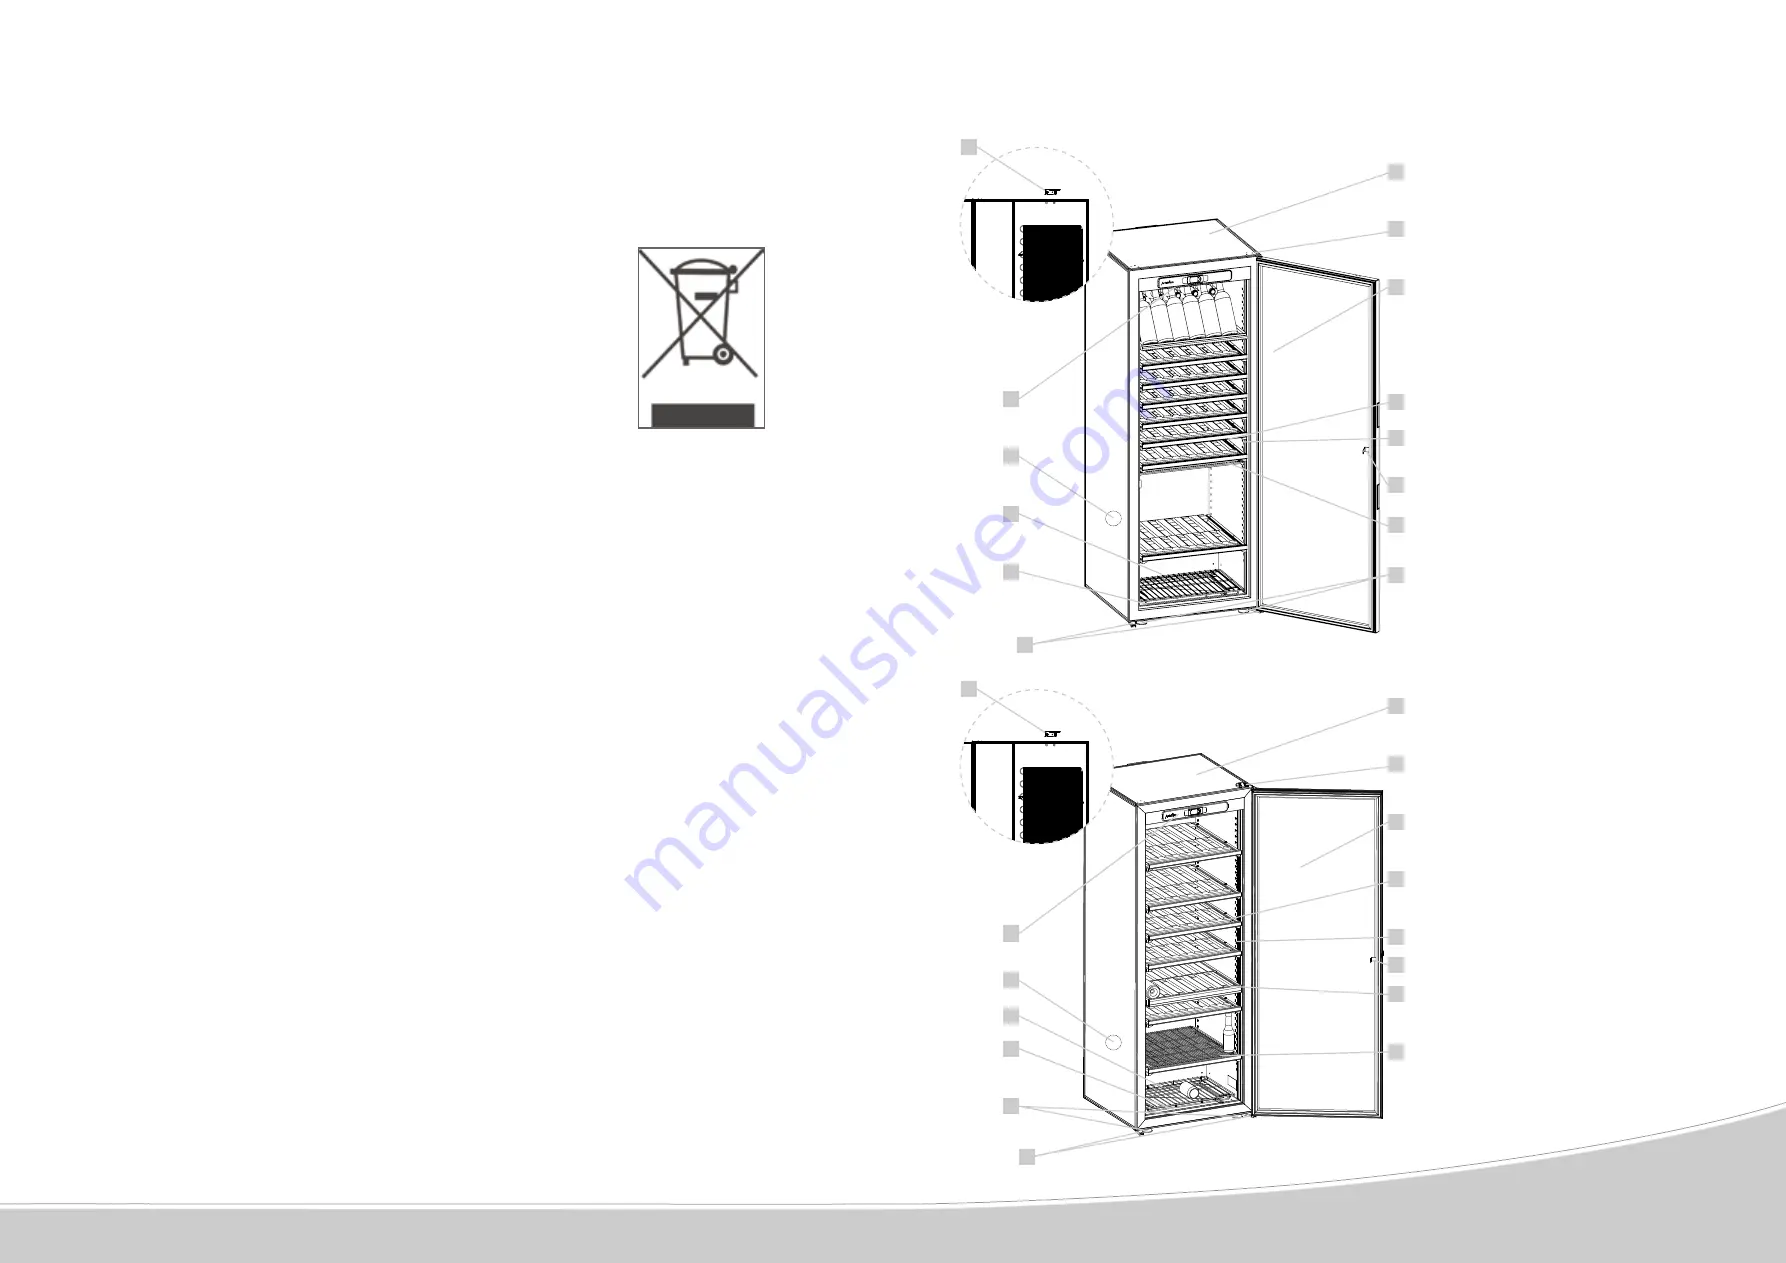
Description of your wine cabinet

Cabinet body

Upper hinge

Glass door

Cabinet bracing bar

 (do not remove)

Universal shelf 

(storage, sliding, presentation)

Support strip for fixing shelf

Lock

Adjustable feet (x2)

Lower hinge (x2)

10 

Condensation collection tray

11 

Grid

12 

Breather hole

13 

Control panel

14 

Rear spacer

1

2

3

4

5

6

7

8

14

13

12

11

10

Protecting the environment

Disposing of packaging:

All packaging used by ARTEVINO is made from recyclable materials (except the 
expanded polystyrene high density base and the lower hinge protector).
After unpacking your cabinet, take the packaging to a refuse collection point.  For 
the most part, it will be recycled.
In compliance with legislation relating to protecting and caring for the environment, 
your wine cabinet does not contain C.F.C.s or H.C.F.Cs.

To save energy:

- Install your wine cabinet in a suitable location (see pages 6/7) and observe the recommended temperature 
ranges.
- Keep the door open for as short a time as possible.
- Ensure that the door seal is in good working order and that it is not damaged.  If it is, contact your 
ARTEVINO retailer.

N.B.: Caring for the environment:

When replacing your wine cabinet, enquire at your local municipal refuse department in order to find out 
the suitable recycling procedure.
The refrigerant gases, substances and some parts contained in ARTEVINO wine cabinets are made up of 
recyclable materials which require a special disposal procedure to be followed.
Seal the lock to prevent children accidentally locking themselves inside the cabinet.
Disable any unusable appliances by unplugging them and cutting off the power lead.

9

OXYVD8WCOUS/ OXYVG8WCOUS

Cabinet body

Upper hinge

Glass door

Universal shelf 

(storage, sliding, presentation)

Support strip for fixing shelf

Compartment separation shelf

Specific grid for beverages

Lock

Adjustable feet (x2)

10 

Lower hinge (x2)

11 

Condensation collection tray

12 

Grid

13 

Breather hole

14 

Control panel

15 

Rear spacer

1

2

3

4

5

6

7

8

15

14

13

11

9

10

OXY2TVD6COUS

12

Summary of Contents for ArteVino OXY2TVD6COUS

Page 1: ... A brand of EuroCave Group User manual OXYVD8WCOUS OXYVG8WCOUS OXY2TVD6COUS ...

Page 2: ...e appliance s cavity and the flush fitting structure are unobstructed Do not use mechanical devices or other means to speed up the defrosting process other than those recommended by the manufacturer Do not damage the refrigeration circuit Do not use electrical appliances inside the wine storage compartment unless they have been recommended by the manufacturer Do not store in this appliance explosi...

Page 3: ...e recommended temperature ranges Keep the door open for as short a time as possible Ensure that the door seal is in good working order and that it is not damaged If it is contact your ARTEVINO retailer N B Caring for the environment When replacing your wine cabinet enquire at your local municipal refuse department in order to find out the suitable recycling procedure The refrigerant gases substanc...

Page 4: ...stalling your wine cabinet When unpacking your cabinet check that it is not damaged signs of impact buckling marks Remove the protective elements found inside and outside your cabinet including the lower hinge protector see diagram 1 Fit the cap see diagram 2 found in the accessories bag used for sealing the hole in the lower hinge Open the door and check that the various elements are intact Arran...

Page 5: ... the upper hinge 3 Carefully remove the caps using a thin blade 4 Remove the cabinet door by opening it slightly then lifting it upwards 11 Put in place the upper hinge 12 Screw the hinge so that the door is completely parallel to the cabinet Check that the door seal adheres well to the cabinet by closing the door to ensure that it is completely air tight 13 Put in place the caps 7 Unscrew the two...

Page 6: ... the runner and prevent any unwanted movement 4 Start by placing bottles in each recess of the back row with the base of the bottle towards the back 6 traditional Bordeaux bottles 5 Continue stacking the bottles on the back row 6 6 6 6 24 traditional Bordeaux bottles ensuring that no bottles touch the back wall 6 To display your bottles place them vertically at the front of the shelf maximum capac...

Page 7: ...T button for a few seconds This confirms the temperature setting of the lower compartment of the cabinet Beverage center and allows you to access the temperature setting ST2 of the upper compartment aging compartment Aging compartment top The default temperature is 54 F However the temperature can be set from 50 F to 57 F Set the desired temperature using the and buttons Confirm your setting by pr...

Page 8: ...n T Max T 100 0 700 115 60 32 F 86 F Annual energy consumption AEc Kwh year Useful volume litres Acoustic emissions dB A 256 460 38 Model Temperature Height mm Width mm Depth mm Weight Kg Accuracy 2 temperatures model OXY2TVD6COUS 2 1825 680 690 92 3 F Electrical power Watts Consumption kWh 24hrs Voltage V Frequency Hz Recommended T range Min T Max T 110 0 900 115 60 54 F 86 F Annual energy consum...

Page 9: ...05 2018 10005055 ...

Reviews: