11
GB
1
2
2
Layout advice
Your EuroCave wine cabinet has been designed to safely hold a maximum
number of bottles. We recommend that you observe the following advice
to optimize loading.
•
Distribute your bottles as uniformly as possible over the various cabinet
shelves, in order to spread the weight. Also ensure that none of the bottles
is touching the rear wall of the cabinet.
•
Spread the load over the entire cabinet rather than placing bottles all at
the top or all at the bottom.
•
Observe the loading instructions for the specific storage layout of your
cabinet and never stack bottles on a sliding shelf.
•
If you have sliding shelves, it is preferable to position them in the upper
section of your cabinet to facilitate daily access.
•
In the same way, place one or two bottles of each of your
different wines on the sliding shelves and keep spare
bottles on the storage shelves. You then simply replace
bottles when they are consumed.
•
When using your wine cabinet, never pull out more than
one sliding shelf at a time.
NB: Never modify the position of the stiffener in your V-Pure-L
cabinet (see description page 6) without first consulting your
retailer and never handle this part when the cabinet is loaded.
Note: adjusting an ACMS/ACHH/ACGMS
sliding shelf
When you purchase your cabinet, the sliding shelves are already adjusted
to ideally suit the internal dimensions of your appliance. If you purchase
a new sliding shelf, you may have to carry out this adjustment. To do so,
unscrew the screws 1 of the first right or left runner 2 (2 screws) then
position the runner at the desired width and tighten the screws. Repeat
this process for the second runner (if necessary).
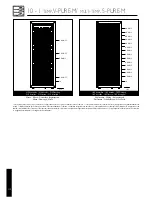
The layout of your cabinet can be modified according to your requirements. Refer to pages 111-112 to see storage simulations.
5 - A
menAgement
- r
Angement
Wall
Guide
If the sliding shelf is already in place in your cabinet:
•
Completely unload the sliding shelf.
•
Then remove the sliding shelf by sliding it towards you whilst lifting the front section.
•
Remove the slide guides from the walls, marking off the right guide and the left guide.
•
Refit the slide guides (see diagram below).
Adding or changing the position of a sliding shelf
Guide
Sliding shelf
Wall
Guide
Wall
Guide
A. Putting in place the back section of the guide
B. Putting in place the front section of the guide
Wall
Guide
C. Then place the sliding shelf
Summary of Contents for Premiere Range
Page 2: ......


