55
1
Installing the standpipe and pole mount
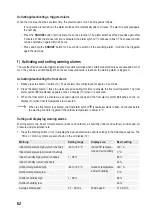
1. Insert the top of the standpipe (E) into the square opening on the weather sensor.
2. Ensure that the arrow marks on the standpipe and the upper part of the sensor are in
correct alignment with one another.
3. Insert the supplied nut into the hexagonal hole on the sensor. Insert the screw on the
other side and tighten it with a suitable screwdriver.
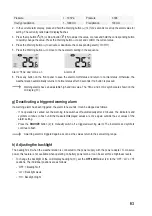
4. Insert the other side of the standpipe into the square hole on the plastic stand. Ensure
that the arrow marks on the standpipe and pole mount (H) are aligned correctly.
5. Insert the supplied nut into the hexagonal hole on the pole mount. Insert the screw on
the other side and tighten it with a suitable screwdriver.
2
Setting up and aligning the outdoor sensor (pole mounting)
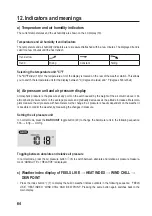
Northern hemisphere
Rubber
pads
North
1.5 m to
the ground
1. Place the outdoor sensor in a free, non-wind protected place without covering,
e.g. canopies or similar. This will allow you to measure rain and wind speed
accurately.
2. The wind vane and the rotor on the outdoor sensor must point towards north
‘N’. When setting up the outdoor sensor, align the wind vane (G) towards north.
3. Secure the outdoor sensor to a suitable round pipe of up to approx. Ø 30 mm
using the pole mount (H) and clamp (I).
4. Insert the rubber pads into the clamp before securing.
5. The wind vane should be placed at least 1.5 m above the ground.
6. Fix the supplied pole mount (round pipe) vertically in a suitable outdoor location,
e.g. on an upright pole, long pipe end. Please refer to Chapter ‘8. Preparations
for setup and installation’ for how to select a suitable installation location and the
special safety information that must be observed during installation.
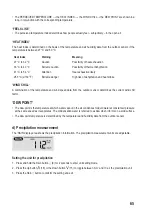
7. The circular level (B) is used to align the outdoor sensor horizontally. Ensure
that the bubble in the circular level is positioned in the very centre of the circle
so that the outdoor sensor is precisely horizontal.

