background image


00114933, Version 1.2 

18/24

INSTALLATION 

1)  Attach the LED curtain via its Velcro loops, e.g. to a truss element. Smoothen the curtain fabric and take 

care not to bend the inner cables. Do not step on the curtain to avoid damaging the installed LEDs and 
electronics. 

2)  Plug the LED curtain’s connection cable into the corresponding jack on the controller. Lock the connector 

with the retaining ring.  

3)  Connect the supplied power supply cable to the corresponding input on the controller and the mains plug 

to an outlet. The unit is designed for 100-240V~, 50/60 Hz. Switch on the device. 


Important notes 

1)  The  LED  curtain  must  be  installed  in  a  professional  and  safe  manner.  Never  block  any  escape  routes 

with the LED curtain! 

2)  Do not to bend the inner cables of the LED curtains when disassembling and packing. 

3)  Do not step on the curtain to avoid damaging the installed LEDs and electronics. 

4)  Carefully fold the LED curtain and place it in the designated transport bag. 


OPERATION 

After  switching  on  the  display  indicates  the  last  operating  mode.  The  operating  modes  can  be  selected  by 
means  of  the  display  and  the  control  buttons.  All  settings  remain  stored  even  if  the  device  is  disconnected 
from the mains. The device can be operated in stand-alone mode via the control board or in DMX-controlled 
mode via any commercial DMX controller. 


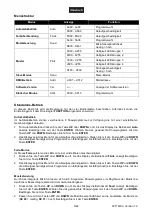
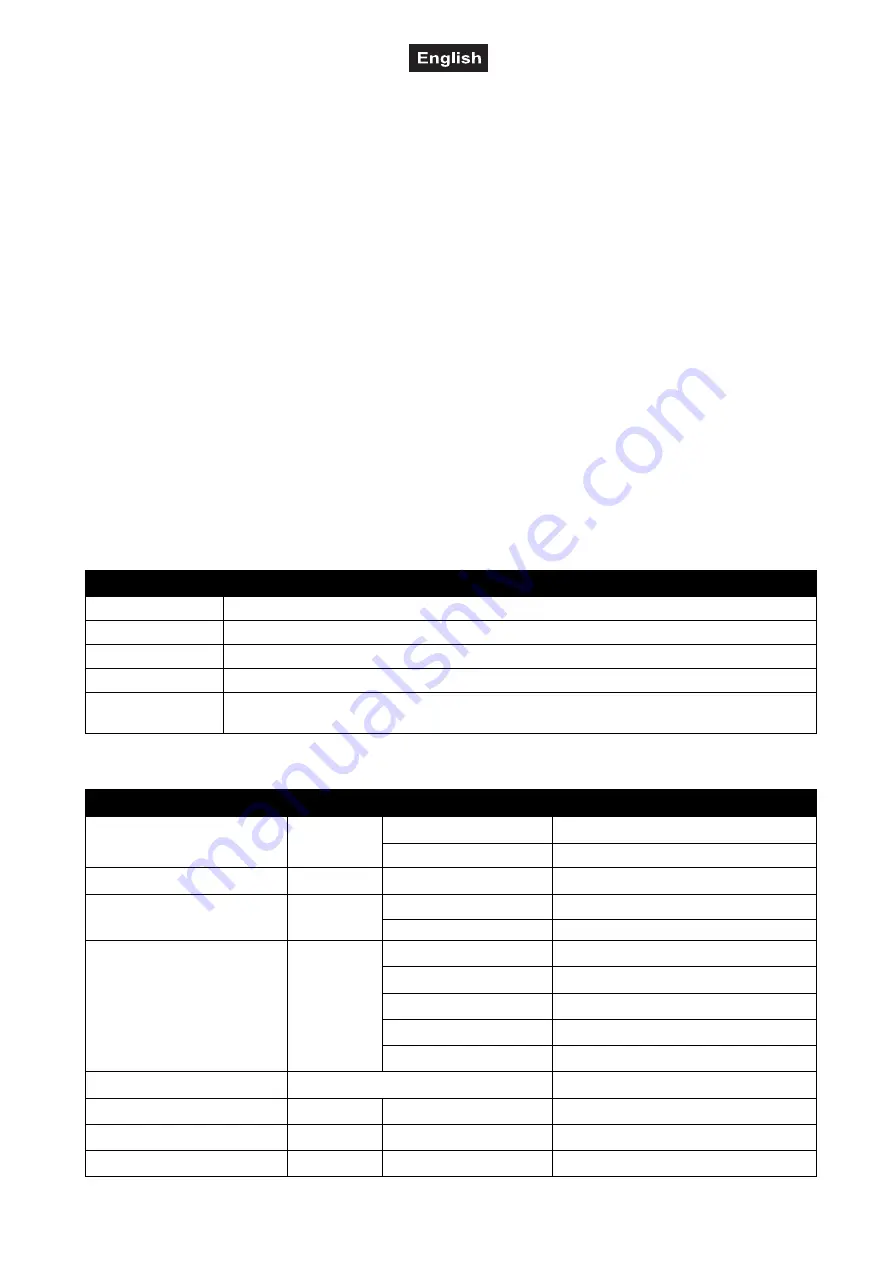
Operating buttons 


Element 

Function 

ESC 

Exits the current level and returns to the start display. 

ENTER 

Activates a value to be modified. 

UP 

Selects the next menu item and increases values when modifying. 

DOWN 

Selects the previous menu item and decreases values when modifying. 

FUNCTION 

Turn to select menu items and modify values. Push shortly to confirm. Press 3 seconds 
to exit the current level. 


Menu structure 


Modus 

Display 

Function 

Auto Mode 

Auto 

Au00 - Au08 

Program selection 

A500 - A599 

Running speed 

Fade 

FAde 

F500 - F599 

Running speed 

Sound control 

Soud 

So00 - So08 

Program selection 

Se00 - Se31 

Microphone sensitivity low > high 

Pattern 

PAtt 

A000 – A255 

Brightness LED group 1 

B000 – B255 

Brightness LED group 2 

C000 – C255 

Brightness LED group 3 

D000 – D255 

Brightness LED group 4 

Cf00 – Cf99 

Strobe speed low > high 

Slave mode 

SLAu 

Slave mode 

DMX operation 

Addr 

d.001 – d.512 

Starting address  

Software version 

Ver 

u - - - 

Viewing the software version 

Static mode 

StAt 

S000 – S015 

Program selection 

Summary of Contents for CRT-190

Page 1: ......

Page 2: ......

Page 3: ...es 14 SAFETY INSTRUCTIONS 15 OPERATATING ELEMENTS AND CONNECTONS 17 INSTALLATION 18 OPERATION 18 Operating buttons 18 Menu structure 18 Stand alone mode 19 Interconnecting several devices master slave operation 20 DMX operation 20 CLEANING AND MAINTENANCE 21 Replacing the fuse 21 PROTECTING THE ENVIRONMENT 22 TECHNICAL SPECIFICATIONS 22 Diese Bedienungsanleitung gilt für die Artikelnummer This use...

Page 4: ...Benutzer des Produkts weitergeben sich die letzte Version der Anleitung im Internet herunter laden EINFÜHRUNG Wir freuen uns dass Sie sich für eines unserer Produkte entschieden haben Wenn Sie nachfolgende Hinweise beachten sind wir sicher dass Sie lange Zeit Freude an Ihrem Kauf haben werden Produktmerkmale LED Vorhang mit 190 RGBA LEDs und passendem DMX Controller 6 x 4 m Schwarzer Vorhangstoff ...

Page 5: ...s Benutzers führen Die Steckdose muss gut zugänglich sein damit Sie im Bedarfsfall den Netzstecker schnell ziehen können Fassen Sie den Netzstecker niemals mit nassen Händen an da die Gefahr eines Stromschlags besteht Das Netzkabel darf nicht geknickt oder gequetscht werden Halten Sie es von heißen Oberflächen und scharfen Kanten fern Ziehen Sie den Netzstecker nie am Kabel aus der Steckdose fasse...

Page 6: ...etzungen und oder zur Beschädigung von Eigentum führen Der Hersteller haftet nicht für Schäden die durch unsachgemäße Installation und unzureichende Sicher heitsvorkehrungen verursacht werden Bei einer Montage über Kopf ist das Gerät immer durch eine zweite Befestigung z B Fangseil oder Fangnetz zu sichern Während Montage und Wartungsarbeiten muss der Bereich unterhalb des Geräts abgesperrt sein B...

Page 7: ...1 Display mit Bedientasten 2 Betriebsanzeige 3 Signalanzeige 4 Netzanschluss 5 Sicherungshalter 6 Netzschalter 7 Druckregler für Menüeinstellungen 8 Mikrofon für die Musiksteuerung 9 DMX Ausgang 10 DMX Eingang 11 Anschluss LED Vorhang 10 1 2 3 4 5 6 7 8 9 11 ...

Page 8: ...en LEDs und die Elektronik nicht zu beschädigen 4 Legen Sie den LED Vorhang sorgfältig zusammen und verstauen Sie ihn in die dafür vorgesehene Transporttasche 5 Legen Sie beim Transportieren und Lagern keine schweren Gegenstände auf die Transporttasche BEDIENUNG Nach dem Einschalten zeigt das Display die zuletzt eingestellte Betriebsart Nehmen Sie nun die notwendigen Menüeinstellungen für die jewe...

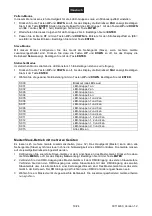
Page 9: ...Taste ENTER Wählen Sie das gewünschte Showprogramm mit den Tasten UP und DOWN Bestätigen Sie mit der Taste ENTER 2 Das Display zeigt das Menü für die Ablaufgeschwindigkeit an Stellen Sie mit den Tasten UP und DOWN die Ablaufgeschwindigkeit des Programms von 00 langsam bis 99 schnell ein Bestätigen Sie mit der Taste ENTER Fade Modus Im Modus Fade pulsieren die LEDs mit einer einstellbaren Geschwind...

Page 10: ...gen Sie mit ENTER S000 Blackout alle LEDs aus S001 LED Gruppe 1 an S002 LED Gruppe 2 an S003 LED Gruppe 3 an S004 LED Gruppe 4 an S005 LED Gruppen 1 und 2 an S006 LED Gruppen 1 und 3 an S007 LED Gruppen 1 und 4 an S008 LED Gruppen 2 und 3 an S009 LED Gruppen 2 und 4 an S010 LED Gruppen 3 und 4 an S011 LED Gruppen 1 2 und 3 an S012 LED Gruppen 1 2 und 4 an S013 LED Gruppen 1 3 und 4 an S014 LED Gru...

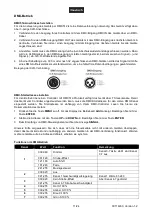
Page 11: ...rotokoll verfügt das Gerät über 7 Steuerkanäle Damit das Gerät vom Controller angesteuert werden kann muss die DMX Startadresse für den ersten DMX Kanal eingestellt werden Die Startadresse ist abhängig von Ihrem DMX Controller Lesen Sie hierzu die Dokumentation des Geräts 1 Drücken Sie die Taste MENU so oft bis das Display die Betriebsart Addr anzeigt Bestätigen Sie mit der Taste ENTER 2 Stellen d...

Page 12: ...ne Sicherung gleichen Typs 1 Trennen Sie das Gerät vom Netz und lassen Sie es abkühlen 2 Öffnen Sie den Sicherungshalter am Netzanschluss mit einem passenden Schraubendreher 3 Entfernen Sie die defekte Sicherung aus dem Sicherungshalter und setzen Sie die neue Sicherung ein 4 Setzen Sie den Sicherungshalter wieder im Gehäuse ein Danach kann das Gerät wieder mit dem Netz verbunden werden UMWELTSCHU...

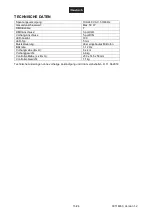
Page 13: ...nschluss 3 pol XLR Vorhang Anschluss 5 pol DIN LED Anzahl 190 LED Typ 5 mm Musiksteuerung über eingebautes Mikrofon Blitzrate 1 12 Hz Vorhangmaße B x H 6 x 4 m Vorhanggewicht 6 6 kg Controller Maße L x B x H 230 x 145 x 59 mm Controller Gewicht 1 1 kg Technische Änderungen ohne vorherige Ankündigung und Irrtum vorbehalten 11 04 2018 ...

Page 14: ... or user of the product download the latest version of the user manual from the Internet INTRODUCTION Thank you for having chosen one of our products If you follow the instructions given in this manual we are sure that you will enjoy this device for a long period of time Product features LED curtain with 190 RGBA LEDs and matching DMX controller 6 x 4 m Black curtain with 190 colored 5 mm LEDs red...

Page 15: ...e so that you can unplug the device quickly if need be Never touch the mains plug with wet or damp hands There is the risk of potentially fatal electric shock The mains cable must not be bent or squeezed Keep it away from hot surfaces or sharp edges Never pull the mains cable to disconnect the mains plug from the mains outlet always seize the plug Unplug the device during lighting storms when unus...

Page 16: ...e to property The manufacturer cannot be made liable for damages caused by incorrect installations or insufficient safety precautions For overhead use always secure the device with a secondary safety attachment such as a safety bond or safety net Make sure that the area below the installation place is blocked when rigging derigging or servicing the device For commercial use the country specific ac...

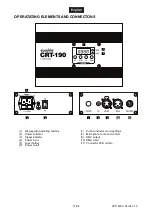
Page 17: ...CTONS 1 Display with operating buttons 2 Power indicator 3 Signal indicator 4 Power input 5 Fuser holder 6 Power on off 7 Push control for menu settings 8 Microphone for sound control 9 DMX output 10 DMX input 11 Connector LED curtain 10 4 5 6 7 8 9 11 1 2 3 ...

Page 18: ... modes can be selected by means of the display and the control buttons All settings remain stored even if the device is disconnected from the mains The device can be operated in stand alone mode via the control board or in DMX controlled mode via any commercial DMX controller Operating buttons Element Function ESC Exits the current level and returns to the start display ENTER Activates a value to ...

Page 19: ... the ENTER button Use the buttons UP and DOWN to select the desired show program Confirm with the ENTER button 2 Use the buttons UP and DOWN to adjust the microphone sensitivity to the volume of the music SE 00 low SE 31 high Confirm with the ENTER button Pattern mode This menu allows adjusting the brightness for the 4 LED groups and selecting a strobe effect 1 Press the buttons UP and DOWN so man...

Page 20: ... control the device via DMX The device provides 3 pin XLR connectors for DMX connection 1 Connect the output of your DMX controller to the DMX input DMX IN of the light set with a DMX cable 2 Connect the DMX output DMX OUT of the light set to the DMX input of the next unit in the chain Always connect one output to the input of the next unit until all units are connected 3 At the last unit the DMX ...

Page 21: ...etc 1 Disconnect the device from power and allow it to cool before cleaning 2 Clean the surface with a soft lint free and moistened cloth Never use alcohol or solvents as these may damage the surface Make sure that no liquids can enter the device 3 The device must be dry before reapplying power There are no serviceable parts inside Do not open the housing Do not try to repair the device by yoursel...

Page 22: ...Disposing of them in the household waste is prohibited You may return your used batteries free of charge to collection points in your municipality and anywhere where batteries rechargeable batteries are sold By disposing of used devices and batteries correctly you contribute to the protection of the environment TECHNICAL SPECIFICATIONS Power supply 100 240 V AC 50 60 Hz Power consumption Max 50 W ...

Page 23: ...00114933 Version 1 2 23 24 ...

Page 24: ...Eurolite is a brand of Steinigke Showtechnic GmbH Andreas Bauer Str 5 97297 Waldbüttelbrunn Germany D00114933 Version 1 2 Publ 11 04 2018 ...

Reviews: