00119420, Version 1.0
18/20
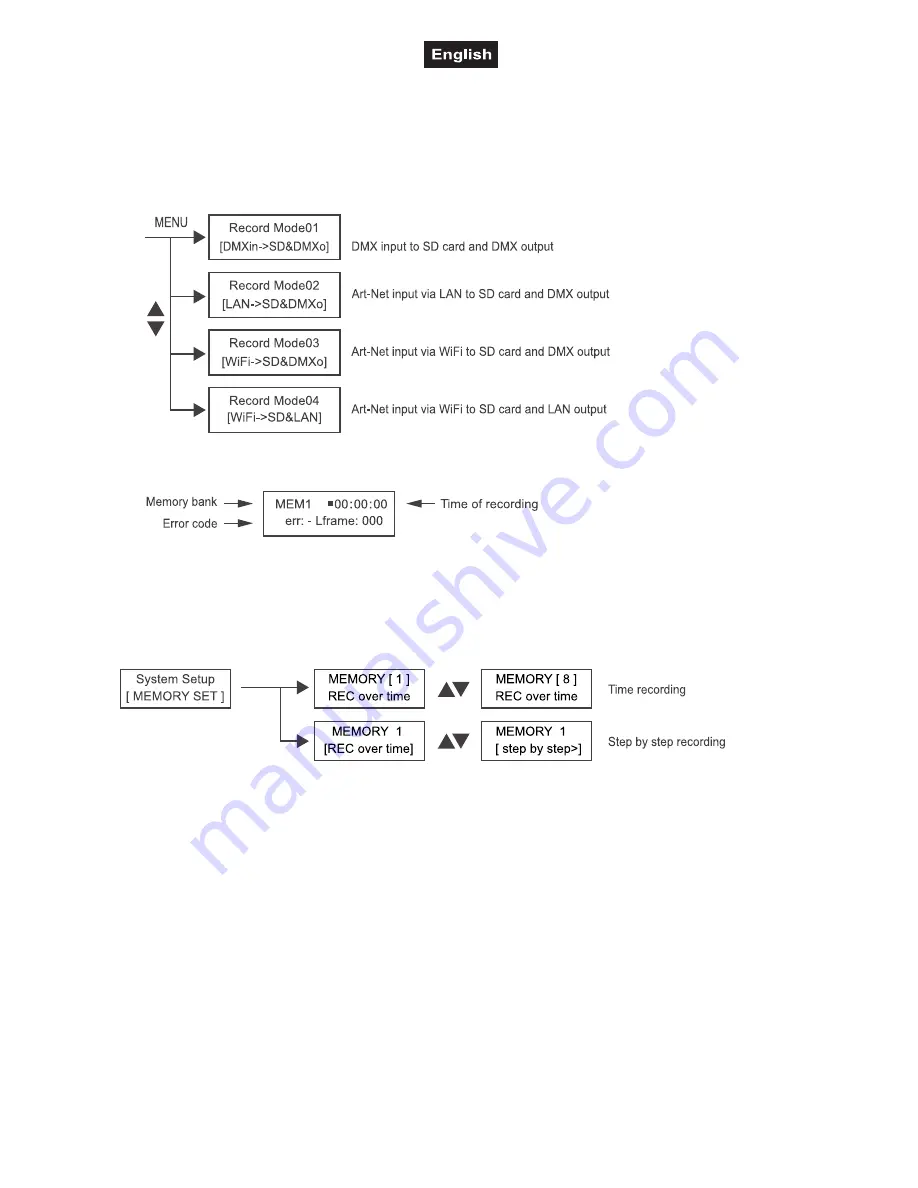
Record mode
Data of a light show can be recorded via Ethernet (LAN), WiFi or the two DMX inputs. 8 memory locations
with up to 20 hours recording capacity each are available. The recordings are stored on the included SD
card.
1. Press the button RECORD. The respective LED lights.
2. Use the buttons UP/DOWN to select the desired recording mode:
3. Select one of the memory banks MEMORY 1-8 to store your recording. The LED next to the respective
MEMORY button lights and the display indicates the selected memory bank.
“err: -“ = no error during recording, “err: x“ = recording error (x = code)
4. Press ► to begin with the recording. Press
II
to pause and ◄ to finish the recording.
Memory mode
Recordings can be made as time recording or step-by-step recording. Navigate to menu item [Memory Set]
in the system settings to determine the desired mode for each memory location individually.
Replay mode
Your recordings can be replayed individually or in a loop, using either the recorder or your iOS or Android
device.
1. For replay on the recorder, press the button REPLAY. The respective LED lights. The device
automatically returns to the previously used replay mode.
2. Select the desired memory location with the buttons MEMORY 1-8. The respective LED is flashing. The
respective LED lights for memory locations with data. Unused memory locations cannot be selected
when in replay mode.
3. Use the button
II
to replay your recording individually or use the arrow buttons ◄ and ► to replay the
memory locations in a loop. The arrow buttons indicate the replay direction for the memory locations.
Press the button again to stop the replay.
4. With the fader SPEED you can adjust the running speed from 25 % to 200 %.
5. With the fader DIMMER you can adjust the brightness from 0 % to 100 %.
Summary of Contents for DMX AIO Recorder
Page 1: ......


