background image


10 

 DE 

ANSCHLÜSSE  


Das  System  lässt  sich  über  einen  handelsüblichen  DMX-Controller  steuern.  Der  Hebezug  verfügt  dazu  über  8 
Steuerkanäle. Für die DMX-Verbindung sind 3-polige XLR-Anschlüsse vorhanden. 


Befestigen Sie die Beleuchtungseffekte sicher an der Traverse wie zuvor beschrieben. 

Stellen  Sie  alle  Datenverbindungen  her,  solange  die  Hebezüge  ausgeschaltet  sind.  Verbinden  Sie  dazu  den 
Ausgang  Ihres  Controllers  mit  dem  DMX-Eingang  DMX  IN  des  ersten  Hebezugs  über  ein  DMX-Kabel. 
Verbinden  Sie  dann  den  DMX-Ausgang  DMX  OUT  des  Hebezugs  mit  dem  DMX-Eingang  des  nächsten 
Hebezugs  in  der  Kette.  Verbinden  Sie  immer  einen  Ausgang  mit  dem  Eingang  des  nächsten  Geräts  bis  alle 
Geräte angeschlossen sind. 

Am letzten Gerät muss die DMX-Leitung durch einen Abschlusswiderstand abgeschlossen werden. Dazu wird 
ein XLR-Stecker in den DMX-Ausgang am letzten Gerät gesteckt, bei dem zwischen Signal (–) und Signal (+) 
ein 120-Ω-Widerstand eingelötet ist.


Ab einer Kabellänge von 300 m oder nach 32 angeschlossenen DMX-Geräten sollte das Signal mit Hilfe eines 
DMX-Aufholverstärkers verstärkt werden, um eine fehlerfreie Datenübertragung zu gewährleisten.


Verbinden Sie die Hebezüge zum Schluss mit dem Stromnetz, um den Betrieb zu starten.


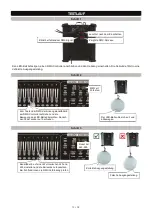
Gerät

1

Startadresse 1

Gerät

2

Startadresse 9

Gerät

3

Startadresse 17

DMX-Controller

Program
Chase32 Step100

Summary of Contents for LED SPACE BALL 35

Page 1: ......

Page 2: ......

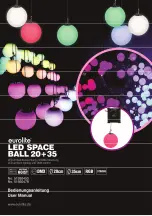
Page 3: ...haffen Sie völlig neue Beleuchtungskonzepte in Diskotheken Clubs Hotels Museen und Freizeitparks mit dieser Effektbeleuchtung Sowohl Farbe und Intensität als auch die Bewegung kann per DMX gesteuert werden ...

Page 4: ...rsion 1 0 Stand 25 11 2021 Produkt Updates Dokumentation Software und Support erhalten Sie unter www eurolite de Die neueste Version der Bedienungsanleitung finden Sie im Downloadbereich des Produkts 2021 Eurolite Alle Rechte vorbehalten Dieses Dokument darf ohne schriftliche Genehmigung des Copyrightinhabers weder ganz noch teilweise reproduziert werden Der Inhalt dieses Dokuments kann ohne vorhe...

Page 5: ...e Ihr neues Produkt von Eurolite installieren in Betrieb nehmen und nutzen Damit Sie sich und andere keinen Gefahren aussetzen beachten Sie bitte unbedingt alle Sicherheitshinweise und verwenden das Produkt nur wie in dieser Anleitung beschrieben Bitte bewahren Sie diese Bedienungsanleitung für weiteren Gebrauch auf und geben Sie sie ggf an nachfolgende Besitzer weiter Produktmerkmale 20 oder 35 c...

Page 6: ...e Sicherheits vorkehrungen verursacht werden Sollen die Geräte über Personen betrieben werden bestehen besondere Gefährdungen Es muss eine auf Ort und Anwendung bezogene Gefährdungsanalyse durchgeführt werden um Dimensionierungen und Maßnahmen für einen sicheren Betrieb zu gewährleisten Alle Geräte erfüllen die berufsgenossenschaftlichen Anforderungen an Sicherheit und Bedienung Bei einer Montage ...

Page 7: ...bare Schäden am Gerät oder am Netzkabel vorhanden sind Flüssigkeiten oder Objekte in das Gerät gelangt sind das Gerät Regen ausgesetzt war das Gerät heruntergefallen ist oder wenn Funktionsstörungen auftreten Die Reinigung beschränkt sich auf die Oberfläche Dabei darf keine Feuchtigkeit in Anschlussräume oder an Netzspannung führende Teile gelangen Wischen Sie das Produkt nur mit einem fusselfreie...

Page 8: ...REIBUNG 1 Hebezug 2 Montagebügel 3 Fangseilöse 4 Netzanschluss Sicherung 5 Netzschalter 6 DMX Anschlüsse IN OUT 7 Display und Bedientasten 8 Seilwinde Karabiner 9 LED Steuerleitung 10 Befestigungsöse 11 LED Ball Ø 35cm ...

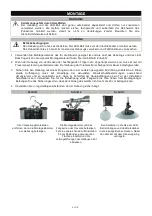
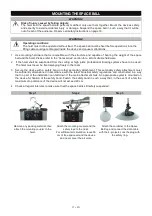
Page 9: ...zug darf niemals frei schwingend im Raum befestigt werden 3 Sichern Sie den Hebezug mit einem Fangseil oder einer anderen geeigneten Einrichtung zusätzlich ab Diese zweite Aufhängung muss auf Grundlage der aktuellsten Arbeitsschutzbestimmungen ausreichend dimensioniert und so angebracht sein dass im Fehlerfall der Hauptaufhängung kein Teil der Installation herabfallen kann Verwenden Sie für die Be...

Page 10: ...chsten Hebezugs in der Kette Verbinden Sie immer einen Ausgang mit dem Eingang des nächsten Geräts bis alle Geräte angeschlossen sind 3 Am letzten Gerät muss die DMX Leitung durch einen Abschlusswiderstand abgeschlossen werden Dazu wird ein XLR Stecker in den DMX Ausgang am letzten Gerät gesteckt bei dem zwischen Signal und Signal ein 120 Ω Widerstand eingelötet ist 4 Ab einer Kabellänge von 300 m...

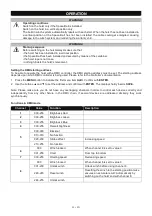
Page 11: ... die Taste MENU um den ersten Menüpunkt Addr anzuzeigen Bestätigen Sie mit der Taste ENTER 2 Stellen die Adresse mit den Tasten und ein Bestätigen Sie erneut mit ENTER Das Display blendet kurz SAVE ein Hinweis Bitte vergewissern Sie sich dass sich die Steuerkanäle nicht mit anderen Geräten überlappen damit das Gerät korrekt und unabhängig von anderen Geräten in der DMX Verbindung funktioniert Werd...

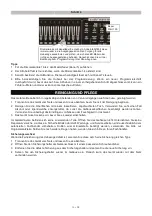
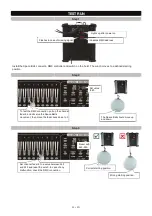
Page 12: ...t bei fehlendem DMX Signal Zum Testen der DMX Verbindung Kanalfader 6 am DMX Controller aufziehen und die Bewegung des LED Balls überprüfen Danach den Fader wieder auf 0 schieben Der LED Ball sollte sich auf und abbewegen Kanalfader 8 auf einen Wert zwischen 240 und 245 einstellen und die Seilwinde zurücksetzen Bei Fehlfunktionen die DMX Verbindung prüfen Korrekte Ausgangsstellung Falsche Ausgangs...

Page 13: ...evor Sie es wieder einschalten Im Geräteinneren befinden sich keine zu wartenden Teile Öffnen Sie das Gehäuse nicht Unternehmen Sie keine Reparaturversuche da dies ein Sicherheitsrisiko darstellt Wartungs und Servicearbeiten sind ausschließlich dem autorisierten Fachhandel vorbehalten Sollten einmal Ersatzteile benötigt werden verwenden Sie bitte nur Originalersatzteile Sollten Sie noch weitere Fr...

Page 14: ...ühlung Passive Konvektionskühlung Ansteuerung System Controller Gehäusefarbe Weiß Maße Durchmesser Ø 35 cm Gewicht 1 30 kg HST 200 Hebezug Spannungsversorgung 230 V AC 50 Hz Gesamtanschlusswert 50 W Schutzklasse SK I Sicherung T 1 5 A DMX Kanäle 8 DMX Eingang 3 pol XLR M DMX Ausgang 3 pol XLR W Ansteuerung EUROLITE LED PC Control 512 Software Maße Breite 23 5 cm Tiefe 11 cm Höhe 21 cm Gewicht 6 40...

Page 15: ...Create brand new lighting concepts for discotheques clubs hotels museums and amusement parks with this light effect Color intensity and movement can be controlled via DMX ...

Page 16: ... 0 publ 25 11 2021 For product updates documentation software and support please visit www eurolite de You can find the latest version of this user manual in the product s download section 2021 Eurolite All rights reserved No part of this document may be reproduced in any form without the written permission of the copyright owner The contents of this document are subject to revision without notice...

Page 17: ...t for a long period of time This user manual will show you how to install set up and operate your new Eurolite product Users of this product are recommended to carefully read all warnings in order to protect yourself and others from damage Please keep this manual for future needs and pass it on to further owners Product features 20 or 35 cm light effect ball with 6 high power RGB LEDs and hoist Al...

Page 18: ...al risks arise A hazard analysis based on the location and application must be performed in order to ensure dimensioning and measures for a safe operation All devices meet the professional association safety regulations regarding safety and operation For overhead use always secure the spot with a secondary safety attachment such as a safety bond or safety net Make sure that the area below the inst...

Page 19: ...equired when the device or the mains cable is visibly damaged liquid has been spilled or objects have fallen into the device when the device has been exposed to rain or moisture has been dropped or malfunctions occur Cleaning of the device is limited to the surface Make sure that moisture does not come into contact with any areas of the terminal connections or mains voltage control parts Only wipe...

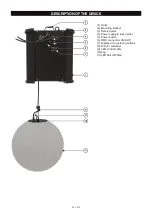
Page 20: ... OF THE DEVICE 1 Hoist 2 Mounting bracket 3 Safety eyelet 4 Power supply fuse holder 5 Power switch 6 DMX connectors IN OUT 7 Display and operating buttons 8 Winch carabiner 9 LED control cable 10 Lug 11 LED ball Ø 35cm ...

Page 21: ...ms have to be used The hoist must never be fixed swinging freely in the room 3 Secure the device with a safety bond or other secondary attachment This secondary safety attachment must be sufficiently dimensioned in accordance with the latest industrial safety regulations and constructed in a way that no part of the installation can fall down if the main attachment fails An appropriate eyelet is mo...

Page 22: ... the DMX input of the next unit in the chain Always connect one output with the input of the next unit until all units are connected 3 At the last unit the DMX cable has to be terminated Plug the terminator with a 120 Ω resistor between signal und signal in the DMX output of the last unit 4 If the cable length exceeds 300 m or the number of DMX devices is greater than 32 it is recommended to inser...

Page 23: ...er s documentation 1 Press the MENU button to indicate the first menu item Addr Confirm with ENTER 2 Use the buttons and to set the address and confirm with ENTER The display shortly inserts SAVE Note Please make sure you do not have any overlapping channels in order to control each device correctly and independently from any other fixture in the DMX chain If several devices are addressed similarl...

Page 24: ...signal To test the DMX connection pull up the channel fader 6 and observe the Space Ball s movement then move the fader back down to 0 The Space Ball should move up and down Set channel fader 8 to a value between 240 and 245 and reset the winch In case of any malfunction check the DMX connection Correct starting position Wrong starting position Set value to 20 Reset with 240 245 Lights up after po...

Page 25: ...placing the fuse If the fine wire fuse of the device fuses only replace the fuse by a fuse of same type and rating 1 Disconnect the device from power and allow it to cool 2 Open the fuse holder of the mains connection with a fitting screwdriver 3 Remove the old fuse from the fuse holder and replace it with a new fuse 4 Carefully push the fuse holder back into its position before reapplying power P...

Page 26: ... 7 W 3in1 TCL RGB homogenous color mix DMX channels 8 Cooling Passive convection Control System controller Housing color White Dimensions Diameter Ø 35 cm Weight 1 30 kg HST 200 Hoist Power supply 230 V AC 50 Hz Power consumption 50 W Protection class Class I Fuse T 1 5 A DMX channels 8 DMX input 3 pin XLR M DMX output 3 pin XLR F Control EUROLITE LED PC Control 512 software Dimensions Width 23 5 ...

Page 27: ......

Page 28: ...Eurolite is a brand of Steinigke Showtechnic GmbH Andreas Bauer Str 5 97297 Waldbüttelbrunn Germany D00136357 Version 1 0 Publ 25 11 2021 ...

Reviews: