background image

www.eurolube.com

EUROLUBE EQUIPMENT 

205245 R1

PART NO / ART.NR. 10400, 10422, 10452, 10471, 10472, 10491

PRE-SET METER / MÄTARE FÖRINSTÄLLBAR

6


STEP

DISPLAY

DESCRIPTION

BESKRIVNING

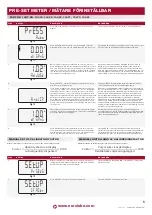
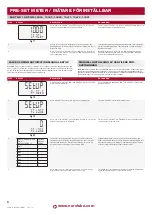
3

1000

CFACtr

Fig 17

Press and hold “SELECT” until “Cfactr” flashes in second line 
and the current calibration factor is displayed.

Tryck och håll "SELECT" tills "Cfactr" blinkar på andra raden och 
den aktuella kalibreringsfaktorn visas.

4

Set the value of the new calibration factor. Pressing the “0.1” 
quantity button increments the units and the “10” button decre-
ments the units.

Ställ in värdet på den nya kalibreringsfaktorn. Genom att trycka 
på "0,1"-kvantitetsknappen ökar enheterna och "10"-knappen 
minskar enheterna.

5

Confirm the selection by pressing the “ON” button, the display 
returns to the main menu. Pressing the “ON” button again exits 
the configuration menu.

Bekräfta valet genom att trycka på “ON”-knappen, displayen 
återgår till huvudmenyn. Genom att trycka på "ON"-knappen 
igen avslutas konfigurationsmenyn.

STEP

DISPLAY

DESCRIPTION

BESKRIVNING

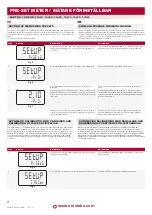
1

SEtUP

PrSEtS

Fig 18

Simultaneously press the “ON” and “SELECT” buttons until the 
setup menu is displayed.

Tryck samtidigt på knapparna “ON” och “SELECT” tills inställn-
ingsmenyn visas.

2

SEtUP

FCLOSE

Fig 19

Press “SELECT” until the following screen is displayed:

Tryck på "SELECT" tills följande skärm visas

3

0

FCLOSE

Fig 20

Press and hold “SELECT” until “FCLOSE” flashes on second line 
and the current factor is displayed.

Tryck och håll "SELECT" tills "FCLOSE" blinkar på andra raden 
och den aktuella faktorn visas.

4

MEASUREMENT DEVIA-
TION /  
MÄTAVVIKELSE (l)

FCLOSE 
VALUE /  
VÄRDE

0,01

1

0,02

2

0,03

3

0,04

4

0,05

5

0,06

6

0,07

7

The default value displayed is zero. Set the value of the new 
calibration factor. Pressing the quantity button “0.1” increases 
the units and the button “10” decreases the units. Set an ap-
proximate value according to the following table:

Standardvärdet som visas är noll. Ställ in värdet på den nya 
kalibreringsfaktorn. Genom att trycka på kvantitetsknappen "0.1" 
ökar antalet enheter och knappen "10" minskar antalet enheter. 
Ställ in ett ungefärligt värde enligt följande tabell:

5

Press ON to save the new value and return to the main menu. 
Repeat the measurement and adjust if necessary.

Tryck på ON för att spara det nya värdet och återgå till huvudme-
nyn. Upprepa mätningen och justera vid behov.

VALVE CLOSING ANTICIPATION MANUAL SETUP

WARNING: Under normal operating conditions, do not change this value. Only at very high flow 
rates you may notice that the dispensed value slightly exceeds the preset value due to the valve 
closing delay time. Remember that you can automatically calibrate this factor within the calibra-
tion menu or manually by following the procedure below:

MANUELL INSTÄLLNING AV VENTILENS FÖR-
AVSTÄNGNING

VARNING: Under normala flödesförhållanden behövs inte detta värde ändras. Endast vid mycket 
höga flöden kan du märka att den tappade volymen något överstiger det förinställda värdet på 
grund av ventilens stängningsfördröjning. Kom ihåg att du automatiskt kan kalibrera denna faktor i 
kalibreringsmenyn eller manuellt genom att följa proceduren nedan:

Summary of Contents for 10400

Page 1: ...he polarity of batteries and follow its order of place ment as indicated in the batteries cover If a leakage is detected in the batteries protect your eyes and skin Cover the batteries housing with a cloth before opening it to avoid that acid get sprayed onto your skin or eyes If acid should spray into your eyes rinse immediately with clear water for several minutes Consult a doctor immediately af...

Page 2: ...följ stegen nedan för installation eller byte Ta bort gummikåpan 1 och lossa sedan skruvarna 2 och ta bort batterikåpan 3 Installera de medföljande batterierna 4 eller motsvarande batterier se tekniska specifika tioner enligt polariteten som anges i batterifacket 5 Sätt tillbaka locket 3 och dra åt skruvarna 2 Montera slutligen gummiskyddet 1 FUNKTIONER OCH KNAPPAR Displayen stängs av automatiskt ...

Page 3: ...R 5 återgår displayen till utgångsläget 3 När den önskade förinställda positionen visas tryck på AUTO knappen Driften kommer att vara identisk med den som beskrivs i början av avsnittet Tappning av vätska Se avsnittet Ställa in sparade förinställningar i konfigurationsmenyn för att spara förinställningar KONFIGURATION NAVIGERINGSMENY Följande inställningar kan justeras Ställ in fördefinierade värd...

Page 4: ...nde siffra Om du vill ställa in fler förinställningar upprepa processen från steg 3 5 Confirm the selection by pressing the ON button the display returns to the main menu Pressing the ON button again exits the configuration menu Bekräfta valet genom att trycka på ON knappen displayen återgår till huvudmenyn Genom att trycka på ON knappen igen avslutas konfigurationsmenyn STEP DISPLAY DESCRIPTION B...

Page 5: ... return to the main menu and the new calibration factor will be saved If you wish to calibrate the anticipation press SELECT and proceed to the next step Du kommer då att tillfrågas om du vill kalibrera för avstängning fig 13 Tryck på SELECT för ja och ON för nej Kom ihåg att det inte kommer att vara nödvändigt att utföra denna process under normala driftsförhållanden endast om du arbetar med myck...

Page 6: ... tills FCLOSE blinkar på andra raden och den aktuella faktorn visas 4 MEASUREMENT DEVIA TION MÄTAVVIKELSE l FCLOSE VALUE VÄRDE 0 01 1 0 02 2 0 03 3 0 04 4 0 05 5 0 06 6 0 07 7 The default value displayed is zero Set the value of the new calibration factor Pressing the quantity button 0 1 increases the units and the button 10 decreases the units Set an ap proximate value according to the following ...

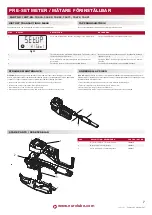
Page 7: ...essure operating the gun into an appropiate container To inspect strainer or make replacement read the following procedure Remove the protection 1 of the swivel and loosen the nut 2 of the hose Remove the o ring 3 fixing the filter 4 and then filter Check the filter clean it or replace as necessary Place again the filter with the o ring and install the hose with the swivel cover TAPPNINGSHISTORIK ...

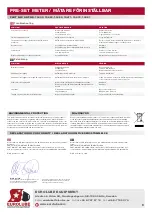
Page 8: ...n strainer Increase pump air pressure Dispensed quantity exceedes preset value Very high flowrate Adjust valve anticipation closing factor SYMPTOM MÖJLIG ORSAK LÖSNING Displayen startar ej Urladdade batterier Standbyläge Lösa batterilock Byt ut batterierna Tryck på ON knappen Dra åt skruvarna till batterilocket Vätska kan inte tappas AUTO läget är inte aktiverat Tryck på AUTO läge Vätska kan inte ...

Reviews: