background image


10 

INSTALLING THE HEATER 
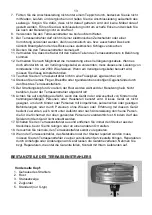
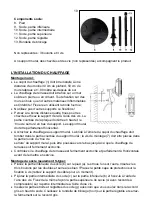
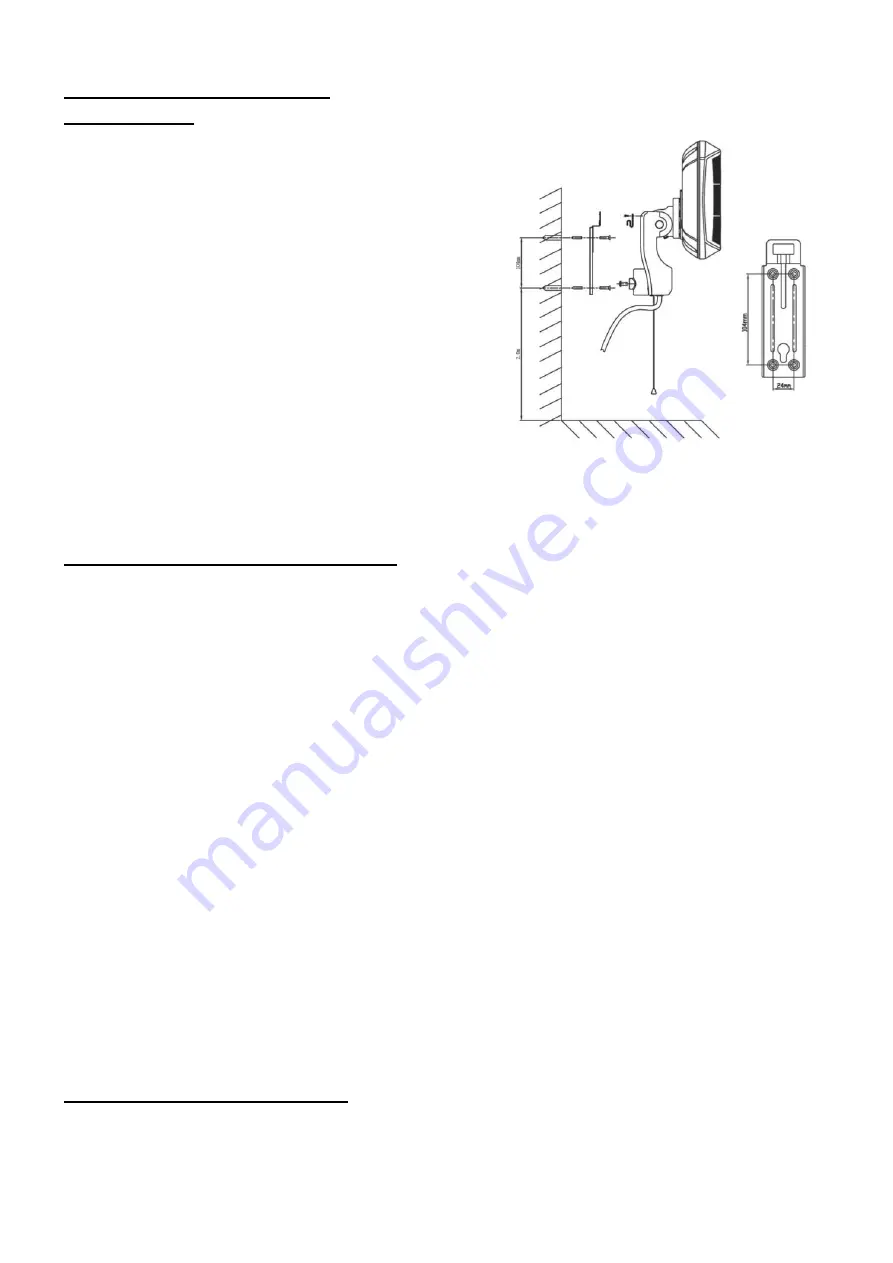
 

Wall mounting: 

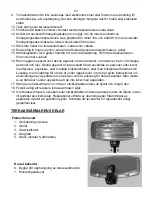
  The housing of the heater (1) must be at least 30 

cm from the ceiling, 50 cm from side-walls and 1.80 
m above the floor. 

  The patio heater must be affixed to a sturdy wall 

made of stone or cement. Never attach to walls 
made of wood or other flammable material! Attach 
using the bracket supplied; do not use any other 
supports or attachments! 

  Drill four holes in the correct places for the plugs 

and attach the wall support to the wall using the 
screws. The curved part of the plate must be 
uppermost and the ‘keyhole’ must be located at the 
bottom of the support. The wall support must be 
horizontal.  

  Hang the heater onto the wall support. The bracket 

at the back of the heater unit must fall into the curved part of the wall support; the attachment 
screw (7) must be placed into the round part of the ‘keyhole’ on the wall support and then 
pushed gently downwards until the patio heater is firmly affixed. 

  Check that the patio heater is attached firmly and fully horizontally before use. 


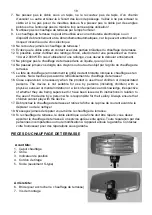
Assembling the stand (only S version):  


Place the bottom section of the stand (9, with the fastening plate) on the base (8), in 

such a way that the screw holes are aligned. Insert the 3 bolts through the double holes and 
tighten them firmly. Place the protective cover over the screw connection (for that reason, 
remove the cable holder for a moment).. 


Push the central section of the stand (10) over the bottom part (9) and fasten it in place 

with one of the screws. You then attach the top part of the stand (11, with the compression 
coupling) to the middle section in the same manner with a screw. 


Insert the thinner, adjustable section of the stand (12) as far as you wish into the grey 

part of the compression coupling on top of the stand. Slide the locking ring down over the 
thin section of the stand and screw it firmly to the grey compression coupling. 


Unscrew the mounting screw (7) almost completely out of the mounting bracket. Place 

the head of the terrace heater over the top of the adjustable stand section in such a way that 
the screw falls precisely into the hole in the stand. Now tighten the screw firmly (the screw 
must disappear into the thin section of the stand and may not protrude!). The thin section of 
the stand can rotate 360°, enabling the head of the terrace heater to point in any direction. 
The electrical cable can be secured in the cable holders on the stand. 


Check that all connections are completely secure and that the terrace heater is securely 
positioned before using it.  
The terrace heater must be placed at a distance of at least 1 metre from the nearest wall. 
The box with the radiator lights must be at least 30 cm from a ceiling and 1.80 metres 
above the ground. The terrace heater must be placed firmly on an even and completely 
horizontal surface. 


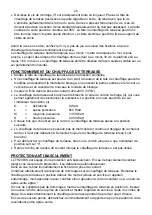
PATIO HEATER FUNCTIONS 

  Point the head of the terrace heater in the correct direction. 

  If the terrace heater is fitted with a base the height of the heating head can be adjusted by 

unscrewing the locking ring, pushing the curved section higher or lower, and then securing it 
again. 

Summary of Contents for TH2003

Page 1: ...Instruktionsbok N vod k obsluze N vod na obsluhu Manual de instruc iuni TH2003 S Terrasstraler kwarts Patio heater Quartz Terrassenstrahler Quarz Chauffage de terrasse quartz Terrassv rmare kvarts Ter...

Page 2: ...olen betyder f r ej vert ckas NO Dette symbolet p apparatet betyr M ikke dekkes til FI T m laitteessa oleva symboli tarkoittaa ei saa peitt HU A k sz l k n l v szimb lum jelent se ne takarja le CS Ten...

Page 3: ...voor het doel waarvoor hij in oorsprong is bedoeld het verwarmen van een terras of een daarmee vergelijkbare plaats Gebruik hem dus niet om textiel te drogen De terrasstraler is verder niet bedoeld v...

Page 4: ...ruikt in de aanwezigheid van kinderen handelingsonbekwame personen of huisdieren Dit apparaat is niet geschikt om te worden gebruikt door personen incl kinderen met een fysieke zintuiglijke of mentale...

Page 5: ...oet in het ronde deel van het sleutelgat van de muursteun worden geplaatst en naar beneden worden geduwd tot de terrasstraler stevig hangt Controleer of de terrasstraler onwrikbaar en geheel horizonta...

Page 6: ...terrasstraler heeft geen thermostaat en blijft warmte afgeven totdat hij wordt uitgeschakeld Houdt de terrasstraler altijd in de gaten wanneer hij ingeschakeld is Als u de terrasstraler uit wilt scha...

Page 7: ...nt bij u in de buurt CE VERKLARING Hierbij verklaart Euromac bv Genemuiden NL dat de terrasstraler kwart merk EUROM type TH2003 voldoet aan de LVD richtlijn 2006 95 EG en aan de EMC richtlijn 2004 108...

Page 8: ...elderly babies and the infirm and animals are not exposed to direct heat 6 The patio heater may not be installed or used in the immediate vicinity of flammable objects such as curtains furniture etc I...

Page 9: ...patio heater off and unplug before moving or cleaning 18 Never try to repair the patio heater yourself 19 If the patio heater the electricity cable or the plug needs to be repaired take the device to...

Page 10: ...n it in place with one of the screws You then attach the top part of the stand 11 with the compression coupling to the middle section in the same manner with a screw Insert the thinner adjustable sect...

Page 11: ...ly for the first fifteen minutes if any defects occur unplug immediately and take it to your dealer service point to be repaired CLEANING Always switch the patio heater off and unplug before cleaning...

Page 12: ...an die falsche Netzspannung verf llt die Garantie 2 Der Terrassenstrahler darf ausschlie lich f r den Verwendungszweck benutzt werden f r den er konstruiert wurde die Erw rmung einer Terrasse oder ei...

Page 13: ...rgendwelchen sonstigen Gegenst nde durch den Rost des Terrassenstrahlers 15 Der Strahlungskopf und vor allem der Rost werden w hrend der Benutzung hei Nicht ber hren bevor der Terrassenstrahler abgek...

Page 14: ...en brennbaren Materialien ist verboten Befestigen Sie ihn unter Verwendung des mitgelieferten kleinen B gels Verwenden Sie keine anderen St tzen oder Befestigungen Bohren Sie im korrekten Abstand vier...

Page 15: ...es St nders befestigt werden Pr fen Sie ob alle Anschl sse richtig fest sind und ob der Terrassenstrahler als ganzer fest an seinem Platz steht bevor Sie ihn in Gebrauch nehmen Der Terrassenstrahler m...

Page 16: ...en Sie niemals bei ende oder scheuernde Reinigungsmittel Nach einer Nutzungsphase k nnen sich Staub und Schmutz hinter dem Rost sammeln 2 Der Rost kann entfernt werden indem die vier kleinen Schrauben...

Page 17: ...ion incorrecte entra ne un danger et annule la garantie 2 Le chauffage de terrasse doit tre utilis exclusivement pour sa destination initiale chauffer une terrasse ou un endroit comparable Par cons qu...

Page 18: ...ille devient br lante lorsque le chauffage est en service Ne la touchez pas avant le refroidissement du chauffage de terrasse 16 Close supervision is necessary when the product is used near children o...

Page 19: ...le chauffage au support mural La bride l arri re du capot du chauffage doit tomber dans la partie courb e du support mural la vis de montage 7 doit tre plac e dans la partie ronde du trou de serrure...

Page 20: ...du cordon de tirage 4 qui vous permet galement de s lectionner la puissance La position en cours peut tre lue sur l indicateur de position 3 O d branch 0 Watt L basse puissance 650 Watt M moyenne pui...

Page 21: ...r flecteur Remettez la grille en place et fixez la fermement INFORMATIONS SUR LA MISE AU REBUT ET LE RECYCLAGE DE CET APPAREIL Attention ce produit est dot du symbole de poubelle barr e Cela signifie...

Page 22: ...v rmning av en terrass eller j mf rbar plats Anv nd den allts inte f r att torka textilier med Terrassv rmaren r dessutom inte avsedd f r permanent bruk och inte f r uppv rmning av byggnader v xthus f...

Page 23: ...av barn of rm gna personer och djur Denna apparat r inte avsedd f r att anv ndas av personer inkl barn med fysiska psykiska eller mentala funktionshinder eller med bristande erfarenhet och kunskap med...

Page 24: ...sv rmaren h nger fast ordentligt Kontrollera att terrassv rmaren h nger stadigt och sitter helt horisontalt innan du b rjar anv nda den Montering av stativ endast S utf rande Placera stativets nedre d...

Page 25: ...s indikator st r p 0 Dra ur stickkontakten ur uttaget om apparaten inte anv nds FALLSKYDD TH2003S r utrustad med ett fallskydd Om den nd skulle falla trots v ra s kerhets tg rder st nger den automatis...

Page 26: ...tervinningsstationer f r detta v nd dig till de lokala myndigheterna f r tervinning n ra dig CE F RS KRAN H rmed f rklarar Euromac bv Genemuiden NL att terrassv rmaren kvarts varum rke EUROM typ TH200...

Page 27: ...elu pro kter je p vodn ur en vyt p n terasy nebo podobn ho m sta Nesm se pou vat k su en textilu Terasov z i tak nen ur en pro obchodn ely i pro vyt p n budov sklen k hospod sk ch staven atd 3 Topn k...

Page 28: ...il ch osob nebo dom c ch zv at Tento oh va nen ur en pro pou v n osobami v etn d t s omezen mi fyzick mi smyslov mi nebo du evn mi schopnostmi nebo bez pat i n ch zku enost a znalost bez ohledu na to...

Page 29: ...st nn ho dr ku mont n roub 7 mus zapadnout do kulat sti kl ov d rky na n st nn m dr ku a je t eba zatla it ji dol dokud terasov z i nebude pevn viset P ed pou v n m zkontrolujte zda terasov z i pevn...

Page 30: ...terasov z i vypnout mus te zat hnout za ovl dac rku dokud indik tor stavu neuk e 0 Kdy terasov z i nepou v te vyt hn te z str ku ze z suvky BEZPE NOSTN VYP N N P I P DU Oh va TH2003S je opat en bezpe...

Page 31: ...se ve va em okol sb rna nach z PROHL EN CE Euromac bv Genemuiden NL t mto prohla uje e terasov z i k em kov zna ky EUROM typ TH2003 spl uje ustanoven Sm rnice EP a Rady 2006 95 ES t kaj c se n zkonap...

Page 32: ...platnos z ruky 2 Terasov iari sa smie pou va v lu ne na el na ktor je p vodne ur en vykurovanie terasy alebo podobn ho miesta Nesmie sa pou va na su enie textilu Terasov iari taktie nie je ur en na ob...

Page 33: ...r ak sa ohrieva pou va v pr tomnosti det nesp sobil ch os b alebo dom cich zvierat Tento ohrieva nie je ur en pre pou vanie osobami vr tane det s obmedzen mi fyzick mi zmyslov mi alebo du evn mi schop...

Page 34: ...m dr iaku a je potrebn zatla i ju nadol a k m terasov iari nebude pevne visie Pred pou van m skontrolujte i terasov iari pevne a plne vodorovne vis na svojom mieste Mont stojana iba pri modeli S Spodn...

Page 35: ...potiahnu za ovl daciu n rku a k m indik tor stavu neuk e 0 Ke sa terasov iari nepou va vytiahnite z str ku zo z suvky BEZPE NOSTN VYPNUTIE PRI P DE Ohrieva TH2003S je vyroben s bezpe nostn m vypnut m...

Page 36: ...a om okol VYHL SENIE CE Euromac bv Genemuiden NL t mto vyhlasuje e terasov iari krem kov zna ky EUROM typ TH2003 sp a ustanovenia Smernice EP a Rady 2006 95 ES t kaj cej sa n zkonap ov ch zariaden a S...

Reviews: