background image

USER MANUAL

PG 27

MANUFACTURER 

GUARANTEE

4. How to make a claim.

You may make a claim under this warranty through our website, contacting our customer care line or 
via email. Contact details for Glen Dimplex Australia and New Zealand can be found at the end of this 
document
To make a valid claim under this warranty, you must:
a) Lodge the claim with us as soon as possible and no later than 14 days after you first become aware of 
the breakdown;
b) Provide us with the product serial number;
c) Provide us with reasonable proof of purchase for the product. This can take the form of a store receipt, 
new home handover form or other payment receipt documentation; and
d) If required by us, provide us (or any person nominated by us) with access to the premises at which the 
product is located at times nominated by us (so that we can inspect the product).
Washing

5. Warranty claims

If you make a valid claim under this warranty and none of the exclusions set out in
•  section 2 apply, we will, at our election, either repair the product or replace the
product with a product of identical specification (or where the product is superseded
or no longer in stock, with a product of as close a specification as possible).

Goods presented for repair may be replaced by refurbished goods of the same type
rather than being repaired. Refurbished parts may be used to repair the goods.
Products are designed and supplied for normal domestic use. We will not be liable to
you under this warranty for business loss or damage of any kind whatsoever.

Glen Dimplex Australia Pty Ltd

www.glendimplex.com.au

Australia

Ph: 1300 556 816

customer.care.ha@glendimplex.com.au

Glen Dimplex New Zealand Ltd

www.glendimplex.co.nz

New Zealand

Ph: 09 274 8265

nztechserv@glendimplex.co.nz

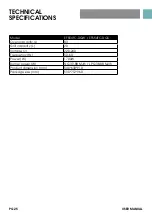
Summary of Contents for EFS54FC-DGS

Page 1: ...USER MANUAL PG 1 User Manual Description 54cm Freestanding Gas Cooker MODEL NO EFS54FC DGW EFS54FC DGS euromaid com au ...

Page 2: ......

Page 3: ...nections 19 Installing the gas cooker 20 Testing the operation of the gas cooker 21 Installing your new cooker 24 Technical specifications 25 Manufacturer s guarantee 26 CONTENTS We recommend that you read the instructions in this manual carefully before use for the best performance and to extend the life of your appliance as it will provide you with all the instructions you require to ensure its ...

Page 4: ...supervised A short term cooking process has to be supervised continuously To ensure your safety all electric appliances should only be installed or service by qualified staff If the supply cord when fitted is damaged it must be replaced a service agent or similarly qualified person in order to avoid a hazard Do not spray aerosols in the vicinity of this appliance while it is in operation Do not st...

Page 5: ... liner Use of olive oil and other poly unsaturated oils vegetable oils when roasting uncovered food causes deposits inside the oven which are very difficult to remove If you have an upright cooker with a gas oven that does not light within about in 5 8 seconds allow 1 minute for gas to disperse clear before trying again GAS BURNER WARNINGS DO NOT allow pots to boil dry as damage to hotplate may re...

Page 6: ...f withstanding 85º Only authorised personnel should carry out servicing Certificate of Compliance to be retained WARNING Always ensure the appliance is switched off before cleaning or any maintenance is carried out such as changing of light globes DO NOT use abravise type cleaner or caustic sodabased cleaners Using warm soapy water after the appliance has cooled somewhat followed by a dry cloth is...

Page 7: ...djustable anti slip feet 2 16 Anti tilt floor bracket 17 Kick panel stability bolt located behind kick panel 18 Front adjustable anti slip feet 2 1 Hotplate Burner Control Knob Sets the hotplate cooking temperature 2 Grill Indicator Light Comes on when grilling 3 Grill Temperature Control Knob Adjusts grilling temperature 4 Oven Control Knob Sets Oven temperature 5 120 Minute Timer Sets reminder a...

Page 8: ...may have oils left on the grill during manufacture Before you cook on the grill for the first time turn on for 15 minutes with 10mm of water in the bottom of the grill dish FITTING OVEN SHELVES Ensure shelf orientation is correct refer picture Slide into oven at an angle until raised back of shelf is past the stop on side runners Lower front of shelf and push in until stop is reached NOTE The top ...

Page 9: ...e timer will ring at the same time 3 Gas Oven Function Using the gas oven Electronic spark ignition Completely open the oven door and press the thermostat knob while turning it anti clockwise to the maximum temperature setting this automatically activates the electric spark ignition device Once the burner has ignited keep the knob pressed down for a few seconds to allow the thermocouple to heat up...

Page 10: ... 170 Any 10 15 Spooned biscuits 190 Any 12 15 Shortbread biscuits 150 Any 30 35 Hard individuals meringues 100 Any 90 Soft individual meringues 165 Any 15 20 Pavlova 100 Any 75 Patty cakes 180 Any 15 20 Sponge 170 Any 20 30 Plain butter cake 170 Any 25 40 Rich fruit cake 130 Any 180 Shortcrust cornish pastry 160 190 Any 40 45 10 35 Shortcrust custard tart 170 200 Any 20 30 10 25 Cream puffs 200 An...

Page 11: ... the ooking time has passed Cakes have a cracked thick crust Baking temperature too high Lower the temperature Oven tray blocking heat below themostat Use higher shelf position for oven tray Baking temperature too high Lower the temperature Food too low in oven Cook one shelf higher Cake batter over mixed Mix just long enough to combine the ingredients Baking tin too deep or wrong size Check size ...

Page 12: ...e meats to reduce any risk of fire Do not store flammable materials near the grill The grill function is suitable for tender cuts of meat steak chops sausages fish bread cheese toasties and other quick cooking foods Preheat for 3 minutes Place food in the grill after pre heating is finished The grill door must be closed during grilling USING THE GRILL Ensure grill wire rack is turned over to high ...

Page 13: ...ose the hotplate you want to use 2 Push in burner control knob and rotate to 3 Hold control knob for 2 3 seconds them release and rotate knob to adjust the flame height If flame goes out the knob was not held in for suffcient time repeat step 2 BURNER 1 Wok burner Used for fast heating Used with WOK large size pots and pans For rounded bottom woks use WOK adapter 2 Small Burner Used for simmering ...

Page 14: ...a soft cloth dipped in warm soapy water Rub difficult stains with a nylon scourer or creamed powder cleanser Do not use abrasive cleaners dry powder cleaners steel wool or wax polishes If you use an oven cleaner then follow the instructions on the product carefully CLEANING THE CONTROL PANEL Make sure control knobs are in off position Clean the control panel by wiping it with a soft cloth dipped i...

Page 15: ...and crowns are removable for cleaning Flame port blockage should be removed by means of a match stick or brush If the caps crowns and cups are heavily soiled use a non abrasive cleaning compound Do not clean them with abrasive or caustic type cleaners or put in a dishwasher as they will be damaged Refitting the burner crowns and caps The burner crown must be fitted correctly into the burner cup or...

Page 16: ...eplace the door repeat the above steps in reverse order Removing the Inner Pane of Glass Triple Glazed oven door Remove the top frame G by unscrewing the 2 screws located on the left and right sides Gently pull out the inner pane of glass fig 2 Also remove the centre pane of door glass not shown here Clean the glass panes with an appropriate cleaner Dry thoroughly and place on a soft surface Now y...

Page 17: ...y be difficult to remove if there is a build up of oil and grease created during cooking In this case the glass may need to be cleaned with hot soapy water to break this build up Remove the lamp and replace with a lamp resistant to high temperatures 300ºC with the following characteristics Voltage 220 240V Wattage 25W Type E 14 Replace the glass cover Reconnect the appliance to the mains power sup...

Page 18: ... on Switch on electricity Household fuse blown Check fuses Circuit breaker tripped Check circuit breaker Lamp blown or loose in socket Replace or tighten globe Oven not hot enough Heat escaping through incorrectly sealed door Check shelves or dishes are not preventing door closing properly Check that door is fitted properly after door removal for cleaning Door seal is worn or has moved Replace sea...

Page 19: ... accessible position close to the appliance itself If a socket and plug connection is used check that they are of the same type Do not use reducers adapters or junctions since they may cause overheating or burns Operation at 220 240 V use a type H05RR F three wire cable Cable of 3 x 1 5 mm WARNING Installation MUST ONLY be carried out by a qualified approved installer ie an Electrician NOTE REFER ...

Page 20: ...cal combustible surface covered with toughened glass or sheet metal is less than 200 mm the surface shall be protected to a height C of not less than 150 mm above the hob for the full dimension width or depth of the cooking surface area Where the gas cooking appliance is fitted with a splashback protection of the rear wall is not required Additional requirements for freestanding and elevated gas c...

Page 21: ...ECTION The gas inlet connection of the appliance has a male thread When making the connection take care not to apply stresses of any kind to the appliance A Inlet pipe joint B Gasket C Stable union OPERATION ON NATURAL GAS The supplied regulator must be fitted to the appliance inlet connection Gas pressure must be adjusted to 1 0 kPa when the auxiliary semi rapid and rapid burners are set to high ...

Page 22: ... have sufficient loops so the cooker can be moved for service The vents openings and air spaces MUST NOT be blocked The anti tilt floor bracket must be installed to avoid accidental tipping The stability bolt must be installed to avoid accidental moving You must not pull the cooker by the door handles Power socket if provided for gas models and electricity isolation switch for electric models and ...

Page 23: ...Adjust the bypass screw mounted on the body of each hotplate control cock This is accessible when the control knob and the control panel are removed Check the ignition on all burners both separately and in combination Check the operation of the electrical components if applicable If you are satisfied that the cooker is operating correctly then turn it off and show the customer how to use it Make s...

Page 24: ...e cooker into the anti tilt plate to double check And then slide out the cooker Connect Electricity supply but do not turn on until installation is completed Slide the cooker back into the anti tilt plate so that rear cover rests against the rear wall Then check the height and level of the cooker If required pull the cooker back out and adjust the leveling feet as required ...

Page 25: ...FICATIONS Model EFS54FC DGW EFS54FC DGS Oven capacity L 83 Grill capacity L 20 Voltage v 220 240 Frequency Hz 50 60 Power W 1700W Burner power W NG 39 88 MJ h LPG 38 88 MJ h Product dimension mm 540 630 910 Package size mm 590 712 960 ...

Page 26: ...r Law and or other applicable laws 2 Warranty exclusions This express warranty does not apply where a The product has been installed used or operated otherwise than in accordance with the product manual or other similar documentation provided to you with the product b The product requires repairs due to damage resulting from accident misuse incorrect installation insect or vermin infestation impro...

Page 27: ...t is located at times nominated by us so that we can inspect the product Washing 5 Warranty claims If you make a valid claim under this warranty and none of the exclusions set out in section 2 apply we will at our election either repair the product or replace the product with a product of identical specification or where the product is superseded or no longer in stock with a product of as close a ...

Page 28: ...USER MANUAL PG 28 NOTES ...

Page 29: ...ry effort is made to produce up to date literature this document should not be regarded as an infallible guide Actual product only should be used to derive cut out sizes All appliances must be installed by a qualified person s with adherence to the relevant electrical plumbing and building codes with compliance being issued as required by state or national legislation Additionally all upright cook...

Reviews: