background image

EN - 20

5.  CLEANING AND 

MAINTENANCE

5.1 Cleaning

WARNING:

 Switch off the appliance 

and allow it to cool before cleaning is 

to be carried out.

General Instructions

•  Check whether the cleaning materials 

are appropriate and recommended by 

the manufacturer before use on your 

appliance.

•  Use cream cleaners or liquid cleaners 

which do not contain particles. Do not 

use caustic (corrosive) creams, abrasive 

cleaning powders, rough wire wool or 

hard tools as they may damage the 

cooker surfaces.

Do not use cleaners that contain 

particles, as they may scratch the 

glass, enamelled and/or painted parts 

of your appliance.
•  Should any liquids overflow, clean them 

immediately to avoid parts becoming 

damaged.

Do not use steam cleaners for 

cleaning any part of the appliance.

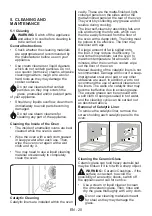
Cleaning the Inside of the Oven

•  The inside of enamelled ovens are best 

cleaned while the oven is warm.

•  Wipe the oven with a soft cloth soaked 

in soapy water after each use. Then, 

wipe the oven over again with a wet 

cloth and dry it.

•  You may need to use a liquid cleaning 

material occasionally to completely 

clean the oven.

Catalytic Cleaning

Catalytic liners are installed within the oven 

cavity. These are the matte-finished, light-

coloured panels on the sides and/or the 

matte-finished panel at the rear of the oven. 

They work by collecting any grease and oil 

residue during cooking.

The liner self-cleans by absorbing fats and 

oils and burning them to ash, which can 

then be easily removed from the floor of 

the oven with a damp cloth. The lining must 

be porous to be effective. The liner may 

discolour with age.

If a large amount of fat is spilled onto 

the liner, it may reduce its efficiency. To 

overcome this problem, set the oven to 

maximum temperature for about 20 - 30 

minutes. After the oven has cooled, wipe 

out the floor of the oven.

Manual cleaning of the catalytic liners is not 

recommended. Damage will occur if a soap-

impregnated steel wool pad or any other 

abrasives are used. In addition, we do not 

recommend the use of aerosol cleaners on 

the liners. The walls of a catalytic liner may 

become ineffective due to excess grease. 

The excess grease can be removed with 

a soft cloth or sponge soaked in hot water, 

and the cleaning cycle can be carried out 

as described above.

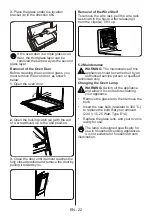
Removal of Catalytic Liner

To remove the catalytic liner, remove the 

screws holding each catalytic panel to the 

oven.

Cleaning the Ceramic Glass

Ceramic glass can hold heavy utensils but 

may be broken if it is hit with a sharp object. 

WARNING :

 Ceramic Cooktops - if the 

surface is cracked, to avoid the 

possibility of an electric shock, switch off 

the appliance and call for service.

•  Use a cream or liquid cleaner to clean 

the vitroceramic glass. Then, rinse and 

dry the glass thoroughly with a dry cloth.

Do not use cleaning materials meant 

for steel as they may damage the 

glass.

Summary of Contents for EMFS60SOCERSS

Page 1: ...Free Standing Cooker User Manual EN EMFS60SOCERSS...

Page 2: ...TION Injury or property damage risk IMPORTANT NOTE Operating the system correctly Thank you for choosing this product This User Manual contains important safety information and instructions on the ope...

Page 3: ...E 10 2 1 Instructions for the Installer 10 2 2 Electrical Connection and Safety 11 2 3 Safety Chain 12 2 4 Adjusting the feet 12 3 PRODUCT FEATURES 13 4 USE OF PRODUCT 14 4 1 Hob controls 14 4 2 Oven...

Page 4: ...f they have been given supervision or instruction concerning use of the appliance in a safe way and understand the hazards involved Children should not play with the appliance Cleaning and user mainte...

Page 5: ...anti tilting kit set guide During use the appliance will get hot Care should be taken to avoid touching heating elements inside the oven Handles may become hot after a short period of time during use...

Page 6: ...liance is designed only for cooking food and is intended for indoor domestic household use only It should not be used for any other purpose or in any other application such as for non domestic use in...

Page 7: ...ay be harmful to children and they should be collected and removed immediately Protect your appliance from the atmosphere Do not expose it to sun rain snow dust or excessive humidity Materials around...

Page 8: ...oils They may catch fire under extreme heating conditions Never pour water on to flames that are caused by oil instead switch the cooker off and cover the pan with its lid or a fire blanket Always po...

Page 9: ...fety of your appliance we recommend you always use original spare parts and to call our authorised service agents when needed Disposal of your old machine This symbol on the product or on its packagin...

Page 10: ...d its accessories ensure that the appliance is not damaged If you suspect any damage do not use it and contact an authorised service person or qualified technician immediately Make sure that there are...

Page 11: ...damaged and needs to be replaced this should be done by a qualified personnel Do not use adaptors multiple sockets and or extension leads The supply cord should be kept away from hot parts of the app...

Page 12: ...all The safety chain should be as short as practically possible to avoid the cooker tilting forward 2 4 Adjusting the feet Your product stands on four adjustable feet For safe operation it is importan...

Page 13: ...arance of your appliance may differ from that shown in the figures below List of Components 1 2 3 4 5 1 Cooktop 2 Control Panel 3 Oven Door Handle 4 Oven Door 5 Adjustable Feet Control Panel 6 Timer 7...

Page 14: ...r the cooking zone which is above this temperature If the power supply to the hob is disconnected while the residual heat indicator is on the warning light will flash when the power is reconnected The...

Page 15: ...heating elements will start operating The static cooking function emits heat ensuring even cooking of food This is ideal for making pastries cakes baked pasta lasagne and pizza Preheating the oven fo...

Page 16: ...ed for 7 seconds symbol will appear and remain illuminated To unlock the timer buttons press and hold the MODE button for 2 seconds The desired operation can then be carried out Audible warning time a...

Page 17: ...current time of day Prepare the food for cooking and put it in the oven 1 Select the desired cooking function and the temperature using the control knobs 2 Press MODE until you see end symbol on the...

Page 18: ...layed press and keys and the dot in the middle of the screen will start to flash Press MODE to display current signal sound After this each time the button is pressed a different signal will sound The...

Page 19: ...essories may vary depending on the model purchased The Wire Grid for Deep Trays Make sure the wire grid is correctly placed within a deep tray It is recommended to use this accessory for grilling stea...

Page 20: ...ase and oil residue during cooking The liner self cleans by absorbing fats and oils and burning them to ash which can then be easily removed from the floor of the oven with a damp cloth The lining mus...

Page 21: ...m cooking Do not leave vinegar coffee milk salt water lemon or tomato juice on the enamel for a long time Cleaning the Stainless Steel Parts if available Clean the stainless steel parts of your applia...

Page 22: ...you Removal of the Wire Shelf To remove the wire rack pull the wire rack as shown in the figure After releasing it from the clips a lift it up a 5 2 Maintenance WARNING The maintenance of this applian...

Page 23: ...emperature will be lower and this may affect the results of your cooking Oven light if available does not operate Lamp has failed Electrical supply is disconnected or switched off Replace lamp accordi...

Page 24: ...52326965...
Reviews: