6
Modular Push Bar Panic Bolt with Vertical Rods Rev.7
Installation – (continued)
4
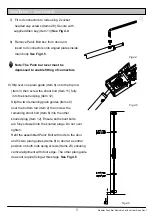
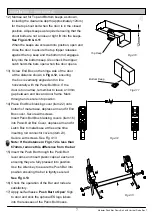
10) With the door in the closed position. Fully depress
the Push bar lever and holding the door in a closed
position, adjust the top shoot bolt (Item 11) until a
3-4mm required clearance is achieved from the
underside of frame to top of shoot bolt. The bevel of shoot
bolt must be facing the door (adjust if necessary)
See Figs 4.7 & 4.8
With the door open, slide the top tripper guide (Item 7)
over the top shoot bolt and close the door. Fully depress
the push bar lever, inset 3mm packer to hold the top
shoot bolt. This now gives the position of the top guide.
Mark through and secure into position.
Fig 4.7
Fig 4.8
Bevelled edge
2-3mm
11) With the rods held into position by the top tripper,
adjust the bottom shoot bolt to obtain a required
clearance of 2-3mm.
See Fig 4.9
Note:
Ensure bevelled edge of shoot bolt is facing the door
Slide the remaining plain guide down into position
maintaining a gap of 19mm between the underside of the
guide and threshold. Mark through and secure into
position
See Fig 4.7
Fig 4.9
2-3mm
Bevelled edge


