


R 3391 / EM3391D-DCF
o
Breng afgedankte batterijen en accu’s naar de speciale punten bij de winkeliers. Zodoende wordt het materiaal gevalor
iseerd en
zullen zo het milieu niet vervuilen.
-
De batterijen dienen goed geplaatst te worde in het apparaat, let goed op de polen.
-
Het verkeerd plaatsen van de batterijen kan breuk veroorzaken aan het elektrisch apparaat , of lekkage veroorzaken, wat in
de extreemste gevallen brand kan veroorzaken of een explosie van de batterij.
-
Om een goed functioneren te garanderen, zorg ervoor dat de batterijen in goed staat zijn. In geval van afwijking, plaats nieuwe
batterijen.
-
Probeer nooit batterijeren op te laden indien ze niet heroplaadbaar zijn. Zij kunnen smelten, opwarmen en brand of een explosie
veroorzaken.
-
Verwissel de batterijen tegelijktijd. Meg nooit saline-batterijen met alcalines of met heroplaadbare batterijen.
-
Gebruikte batterijen dienen uit het apparaat gehaald te worden.
-
Haal de batterijen uit het apparaat indien dit voor een lange tijd niet gebruikt zal worden, de batterijen riskeren namelijk warm te
worden, kunnen smelten en breuk veroorzaken.
-
Probeer nooit om kortsluiting te maken met een batterij.
-
Gooi batterijen nooit op het vuur, ze riskeren te exploderen.
-
Het opladen van accu’s dient gedaan te wordne door volwassenen.
-
Er wordt aangeraden een kind die de batterijen verwisseld te controleren dat de instructies juist worden opgevolgd, of het
verwisselen van de batterijen zelf te doen.
-
Als een batterij ingeslukt wordt, raadpleeg direct een dokter of een vergiftigingen informatie centrum
-
Vergeet niet het apparaat mee te nemen.
ALARM CLOCK WITH PROJECTION EN
Warning:
Please read this instruction manual carefully before using the instrument and keep it for future use.
A.
SAFETY INSTRUCTIONS
1.
The device is intended exclusively for private and not for commercial use. Only use this device as describe in this instruction
manual.
2.
Before to use, make sure that the supply voltage corresponds with the voltage marked on the rating label.
3.
Do not place any part of this appliance in water or any other liquid.
4.
Do not handle the unit or plug with wet hands.
5.
When disconnecting the cable, always pull at the plug; do not pull on the cable itself.
6.
When using the device, always pull the power cord completely from its housing to prevent overheating.
7.
If the cord is damaged, it must be replaced by the manufacturer or its service agent or a similarly qualified person in order to
avoid an electric shock.
8.
Never try to repair it by yourself. It must be repaired by the manufacturer or its service agent or a similarly qualified person in
order to avoid an electric shock.
9.
The power cable must be checked regularly to avoid damage. If the power cable is damaged it must be replaced by a qualified
service center to avoid any danger.
10.
Always place your device on a dry surface.
11.
Do not use outdoors.
12.
Do not let the power cord on the edge of a table or work surface, and prevent it comes into contact with hot surfaces.
13.
Keep it away from heat sources such as radiators, to avoid deformation of plastic parts.
14.
Do not use coarse or abrasive sponges/cloths or steel wool to clean the appliance.
15.
This unit is not designed to be operated by means of an external timer or a separate remote control system.
B.
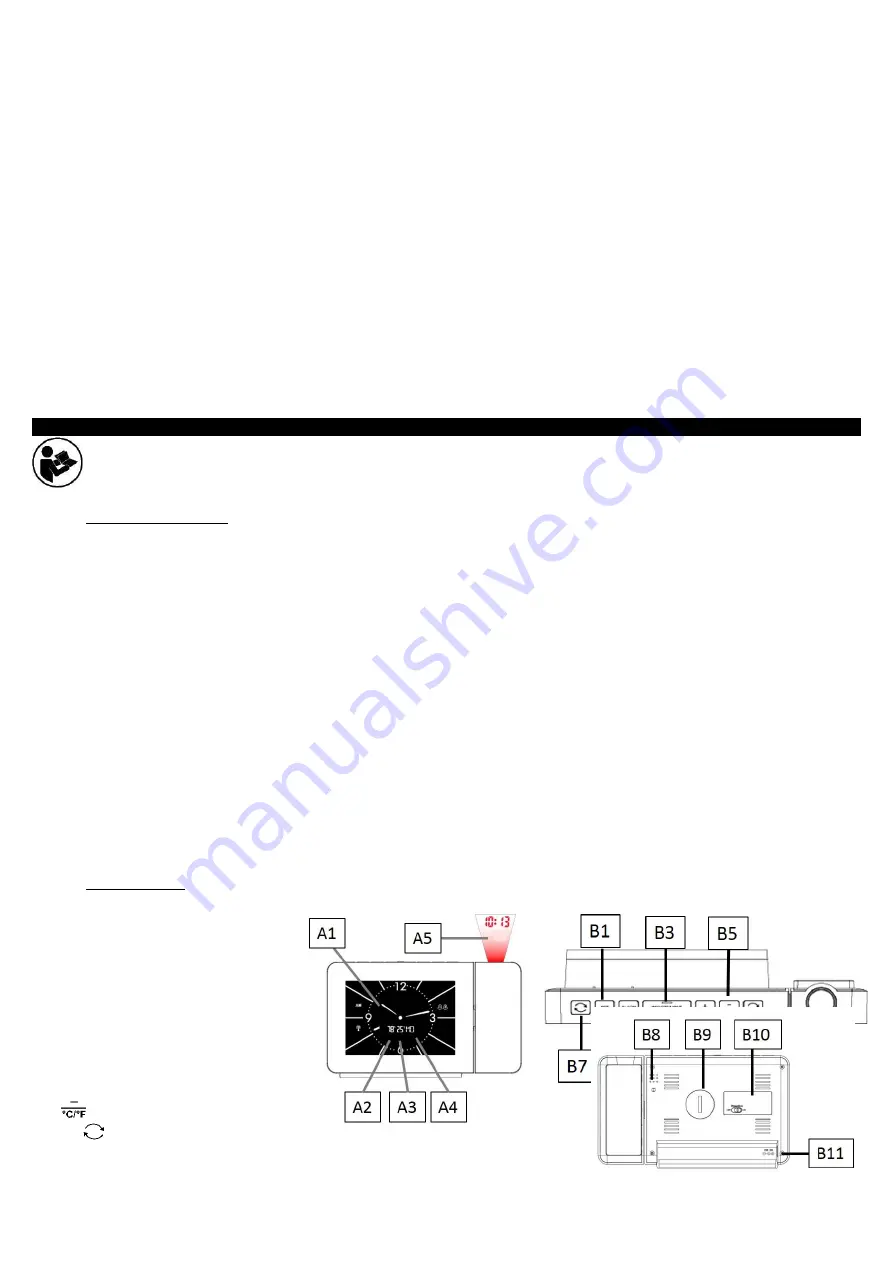
INTRODUCTION
A1: Time
A2: Indoor Humidity
A3: Indoor Temperature
A4: Week day
A5 : Time projection
B1: “
SET
” button
B2: “
ALARM
” button
B3
: “SNOOZE/LIGHT” button
B4
: “
+
” button
B5
: “
” button
B6/B
7: “
” button
B8: Temperature sensor


