background image

R 3391 / EM3391D-DCF


-


Press “

SET

” button to confirm your setting, the Month display starts to flash. Use “

+

” and “

 buttons to set the correct month. 

-


Press “

SET

” button


to confirm your setting, the Date display starts to flash. Use “

+

” and “

 buttons to set the correct date. 

-


Press “

SET

” button


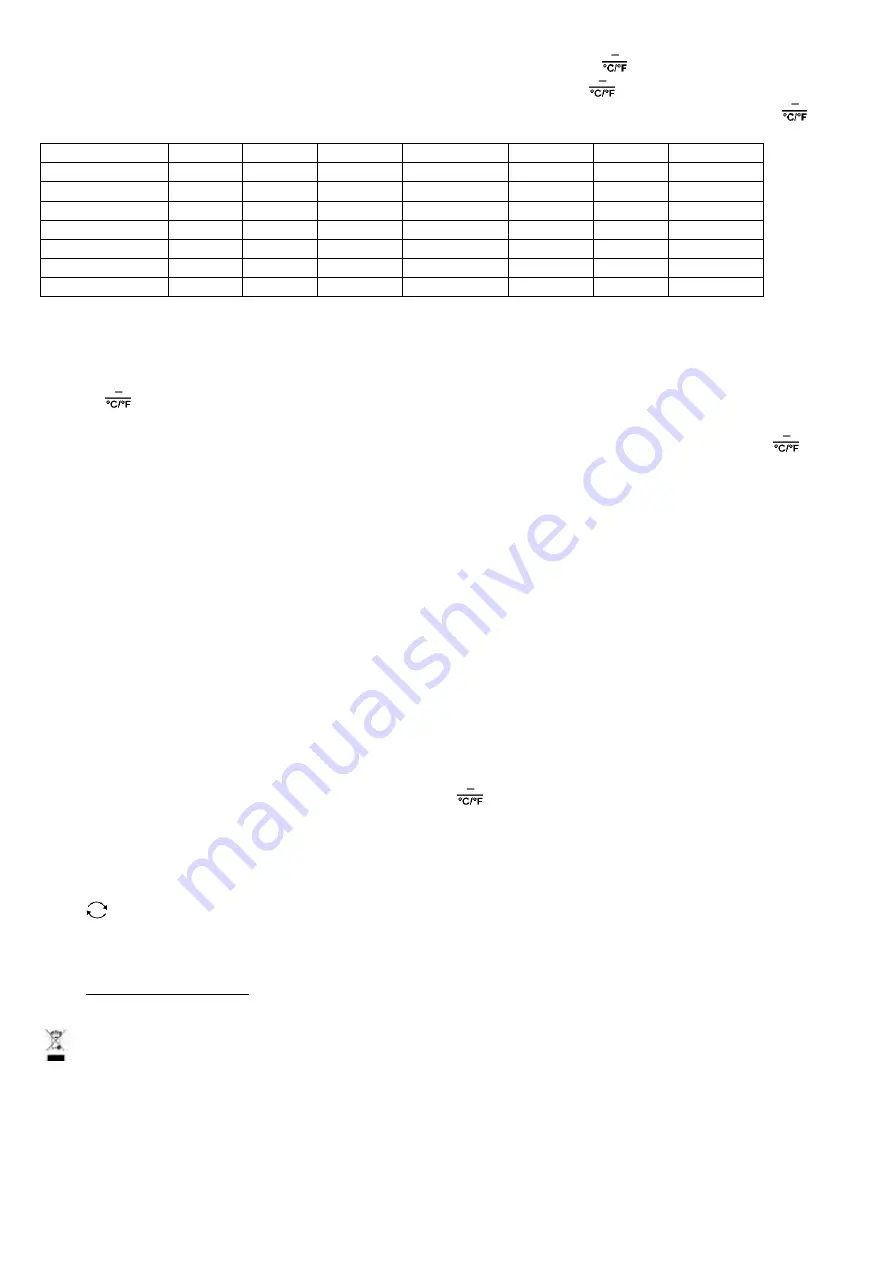
to confirm your setting, the language selection for the Weekday displays st

arts to flash. Use “

+

” and “


buttons to select a language. 

Language 


Sunday 


Monday 


Tuesday 


Wednesday 


Thursday 


Friday 


Saturday 


German, GER  

SON 

MON 

DIE 

MIT 

DON 

FRE 

SAM 

English, ENG  

SUN 

MON 

TUE 

WED 

THU 

FRI  

SAT 

French, FRE 

DIM 

LUN 

MAR 

MER 

JEU 

VEN 

SAM 

Italian, ITA  

DOM 

LUN 

MAR 

MER 

GIO 

VEN 

SAB 

Spanish, SPA  

DOM 

LUN 

MAR 

MIE 

JUE 

VIE 

SAB 

Dutch, DUT 

ZON 

MAA 

DIN 

WOE 

DON 

VRI 

ZAT 

Danish, DAN  

SON 

MAN 

TIR 

ONS 

TOR 

FRE 

LOR 


Press “

SET

” to confirm your setting and to end the setting procedures, enter th

e clock mode. 


After 30 seconds without pressing any button, the clock switches automatically from Set Mode to Normal Time Mode. 

4)


Setting the daily alarms: 

Press and hold down “

ALARM

” button more than 3 seconds until Alarm 1 Time hour display of the Alarm

 1 time starts to flash. Use the 

+

” and “

” 

buttons to set the required hour.  

FYI the time display is “12h” so “AM” will appear on morning hours and “PM” will appear on afternoon hours.


Press “

ALARM

” button to confirm your setting, The Minute display of the Alarm 1 time starts to flash. Use the “

+

” and “

” 

buttons 

to set the required minute.  


Press “

ALARM

” button to confirm your setting, The Hour display of the Alarm 2 time starts to flash. 

Repeat above procedure to set 

the alarm 2. 


Press “

ALARM

” bu

tton to confirm your setting and to end the setting procedure. 

Activation of the alarm : 

To activate or de-

activate the alarm 1 or/and alarm 2 press on “ALARM” button :


1

st

 press : Alarm 1 is activated 

 2

nd

 press : Alarm 2 is activated- 3

rd

 press : Alarm 1 and 2 are activated 

 4

th

 press : alarms are OFF. 

The alarm will sound for 2 minutes if you do not deactivate it by pressing any button. In this case the alarm will be repeated 

automatically after 24 hours. 

Rising alarm sound (crescendo, duration: 2 minutes) changes the volume 4 times whilst the alarm signal is heard. 

 After 30 seconds without pressing any button the clock switches automatically from setting mode to Normal clock mode. 

 The alarm will sound for 2 minutes if you do not deactivate it by pressing any button. In this case the alarm will be repeated 

automatically after 24 hours. 

Snooze function: 


Press the “

SNOOZE/LIGHT

” button the alarm signal sounds to get to SNOOZE mode. After waiting for 

5 minurtes, the alarm signal will 

ring again. 

 In 

snooze mode, press any button except the “

SNOOZE/LIGHT

” button to exit the snooze mode.


5)


Displaying temperature/humidity and temperature/humidity trend 


The temperature is displayed either in °C or °F. Briefly pressing the “

” button allows you to swit

ch between the individual modes. 

6)


Projection description 

 The projection 

shift switch is pushed in the “

ON

” position

, the projection display will light up. 

 The projection 

shift switch is pushed in the “

OFF

” position

, the projection display will be closed. 

 The effective distance of projection display is 1 meters to 3 meters. in the night, there is no light wall or ceiling, can clearly display the 

contents of a projection. 

 Press 

 button To change the projection display direction, 4 angles can be changed. 

F.Y.I.: 

 During the reception of the time radio wave signal, the projection display will be automatically closed to prevent the interference of 

the radio wave.  

E.


CARE AND MAINTENANCE  

Clean the product only with a dry or slightly damp, lint-free cloth.Do not use abrasive cleaners to clean the unit. 

The European directive 2012/19/EC about electronic and electric waste, requires that you can’t throw away defective domestic 

appliance with common waste. Used device has to be collect separately to optimize the recuperation rate and the recycling of the materials 
to reduce the impact on the health and the environment.  

 
This appliance is not intended for use by persons (including children) with reduced physical, sensory or mental capacities, or by persons 

lacking in experience or knowledge, unless they are supervised or instructed on the use of this apparatus by a person responsible for their 
safety.Children should be supervised to ensure they do not play with this appliance.  

Summary of Contents for 44407

Page 1: ...isque de dommages Si le câble d alimentation est endommagé il doit être remplacé par un centre de réparation qualifié afin d éviter tout danger 10 Utilisez toujours l appareil sur une surface sèche 11 N utilisez pas l appareil à l extérieur 12 Ne laissez pas pendre le cordon d alimentation sur le rebord d une table ou d un plan de travail et évitez qu il n entre en contact avec des surfaces chaude...

Page 2: ...éception radio est plus faible dans les pièces avec des murs en béton dans les caves par exemple et dans les bureaux Dans de telles circonstances extrêmes placez le système près de la fenêtre En mode de réception seul le bouton fonctionne les autres boutons sont inactifs si vous souhaitez exécuter d autres fonctions maintenez le bouton enfoncé pour quitter le mode de réception du signal DCF Réglag...

Page 3: ...ituée au dessus de l écran LCD Aussitôt qu elle est activée le symbole Zz s affiche à l écran L alarme sera suspendue pendant 5 minutes une fois cette période écoulée l alarme recommence à sonner Lorsque l alarme retenti appuyez sur n importe quel bouton sauf SNOOZE LIGHT et la fonction snooze sera annulée 5 Indicateur de température La température peut être indiquée en degré Celsius C ou en Fahre...

Page 4: ...s piles o Si une pile est avalée consulter immédiatement son médecin ou le centre antipoison le plus proche N oubliez pas d emporter l appareil avec vous o Pour un fonctionnement optimal nous recommandons d utiliser uniquement des piles haute performance de qualité et récente DIGITALWECKER MIT PROJEKTION DE Hinweis Die Gebrauchsanweisung vor dem Gebrauch des Geräts aufmerksam lesen und für spätere...

Page 5: ...Uhrzeit Automatische Einstellung des Datums und der Uhrzeit Datum und Uhrzeit dieser Wecker werden in europäischen Ländern im Umkreis von ca 1 500 km des sich in Deutschland in der Nähe von Frankfurt befindenden Senders automatisch über Funk eingestellt Auch die Umstellung Sommer Winterzeit erfolgt automatisch Alles wird über Funk gesteuert Die Station empfängt das Signal mehrmals am Tag Das Gerät...

Page 6: ...der Tasten oder den Monat einstellen Durch erneuten Druck der Taste SET die Eingabe bestätigen Der Tag blinkt Durch Druck der Tasten oder den Tag einstellen Durch erneuten Druck der Taste SET die Eingabe bestätigen Die Sprache in der die Wochentage angezeigt werden blinkt Durch Druck der Tasten oder die gewünschte Sprache wählen Sprache Sonntag Montag Dienstag Mittwoch Donnerstag Freitag Samstag D...

Page 7: ...ass sie nicht mit dem Gerät spielen ENTSORGUNG DER BATTERIEN UND SICHERHEITSHINWEISE o Entsorgung Die Batterien bitte in den Batteriecontainer werfen oder im Fachhandel abgeben o Nicht mit dem normalen Hausmüll entsorgen o Begrenzen Sie den Verbrauch von Batterien da die Entsorgung die Umwelt belastet o Ziehen Sie alkaline Batterien vor o Entsorgen Sie gebrauchte Batterien im Fachhandel und den en...

Page 8: ...n 12 Laat de voedingskabel niet van de rand van een tafel of werkblad hangen en vermijd contact met warme oppervlakken 13 Hou het apparaat uit de buurt van warmtebronnen zoals radiators om te voorkomen dat de delen in plastic gaan vervormen 14 Gebruik geen schurende reinigingsproducten om het apparaat schoon te maken 15 Dit apparaat is niet bestemd om ingeschakeld te worden met een externe timer o...

Page 9: ... en in kantoren In dergelijke extreme omstandigheden moet het systeem vlakbij het raam geplaatst worden In de ontvangstmodus is enkel de toets actief De andere toetsen zijn niet actief Als u andere functies wilt uitvoeren drukken op de toets om de ontvangstmodus van het signaal DCF te verlaten Manuele regeling van datum en tijd De tijd kan ook manueel geregeld worden Druk op de toets SET bovenop h...

Page 10: ...n weergegeven worden in graden Celsius C of Fahrenheit F Druk op de toets om van een eenheid op een andere over te schakelen 6 Projectie Zet de schakelaar aan de achterzijde van het weerstation in de stand ON ingeschakeld of OFF uitgeschakeld als u al dan niet wenst dat de tijd geprojecteerd worden op de muur of het plafond Richt de projectie naar wens en kijk nooit rechtstreeks in de lichtbundel ...

Page 11: ...ad this instruction manual carefully before using the instrument and keep it for future use A SAFETY INSTRUCTIONS 1 The device is intended exclusively for private and not for commercial use Only use this device as describe in this instruction manual 2 Before to use make sure that the supply voltage corresponds with the voltage marked on the rating label 3 Do not place any part of this appliance in...

Page 12: ...ed within 7 minutes then the DCF signal search stops the radio mast icon disappears During the radio control time receiving reception to stop searching radio signal press and hold button F Y I A flashing radio mast icon indicates that the DCF signal reception has started A continuously displayed radio mast icon indicates that the DCF signal was received successfully We recommend a minimum distance...

Page 13: ...ion 2 minutes changes the volume 4 times whilst the alarm signal is heard After 30 seconds without pressing any button the clock switches automatically from setting mode to Normal clock mode The alarm will sound for 2 minutes if you do not deactivate it by pressing any button In this case the alarm will be repeated automatically after 24 hours Snooze function Press the SNOOZE LIGHT button the alar...

Page 14: ...on of the battery o To assure a good functioning battery has to be in a good condition If there is a problem put new battery o Never try to recharge battery not made for this It could leak warm up cause fire or explode o Replace all the battery at the same time Never mix up alkaline battery with saline battery o Used battery has to be removed o Also remove the battery if you re not using the appar...

Reviews: