background image

13

 svenska 

english

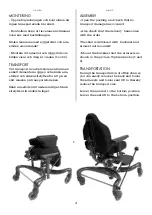
LADDNING AV BATTERIER

För att erhålla batteriets fulla prestanda 
så länge som möjligt är det viktigt att det 
laddas regelbundet. Oftast räcker det att 
ladda batteriet en gång per vecka, lämpli-
gen på natten då stolen inte används.  
Avbryt ej laddningen innan den är färdig. 
Laddning kan ske inomhus i bostaden utan 
problem.

Vid förvaring bör batteriet laddas cirka en 
gång i månaden för att ej tömmas till den 
kritiska nivån då laddaren ej längre startar 
laddningen. Lämna ej laddningen på långa 
perioder utan avbrott då detta ej är bra för 
batteriet. Låt ej heller laddkontakt (2) sitta 
kvar i uttag (4) efter avslutad laddning. Då 
fungerar ej de elektriska sitsfunktionerna. 
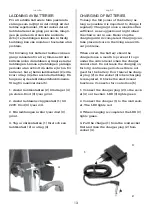
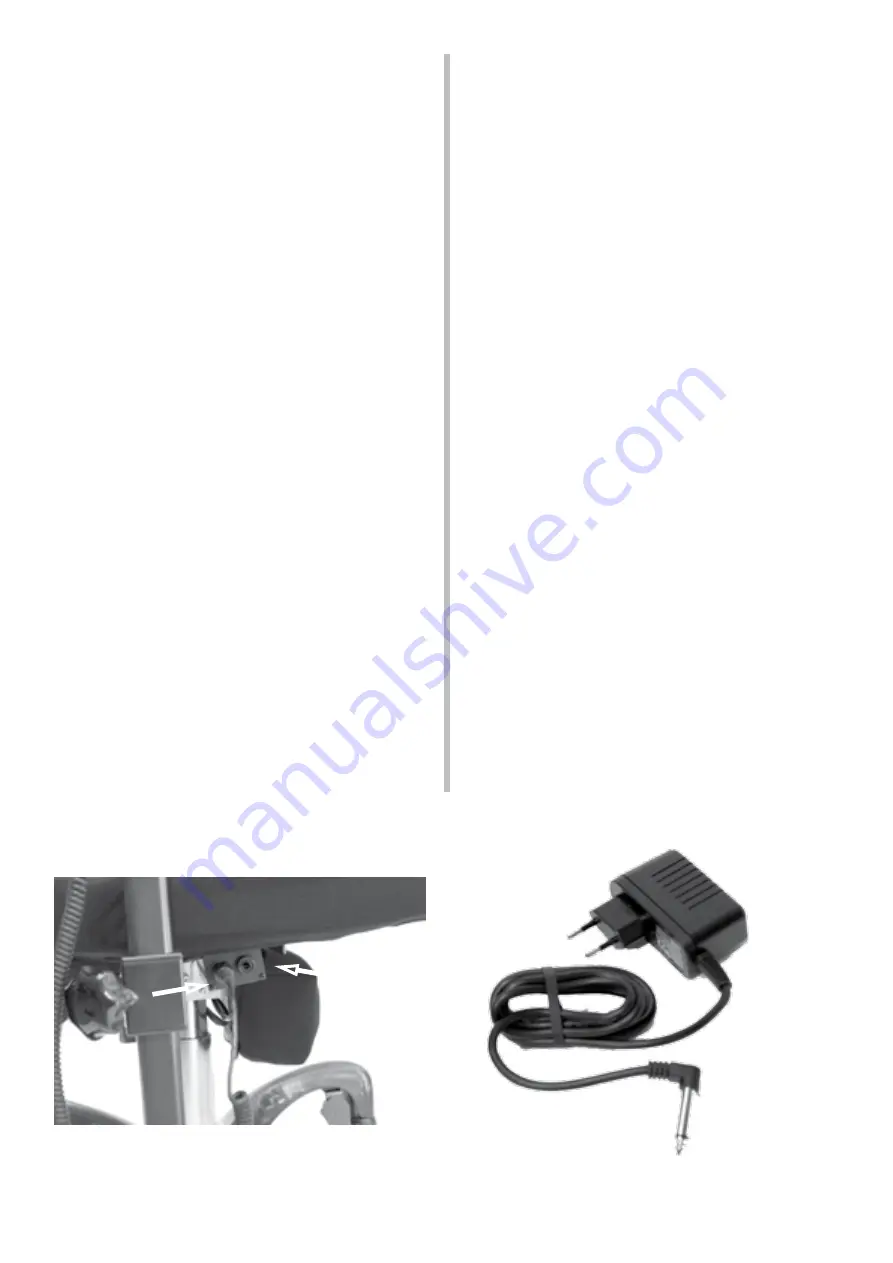
Uttag för manöverdosa (5).

1. Anslut laddkontakten (2) till uttaget (4) 
på stolen. Diod (3) lyser grönt.

2. Anslut laddarens väggkontakt (1) till 
220V. Diod (3) lyser rött.

3. När laddningen är klar lyser diod (3) 
grönt.

4. Tag ur närkontakten (1) först och sen 
laddkontakt (2) ur uttag (4).

CHARGING OF BATTERIES

To keep the full power of the battery as 
long as possible it is important to charge it 
regularly. Charging it once a week is often 
sufficient, as a suggestion at night when 
the chair is not in use. Never stop the 
charging until its completed. Charging can 
take place indoors in the living area with-
out problems. 

When stored, the battery should be 
charged once a month to prevent it to go 
under the critical level when the charger 
cannot start. Do not leave the charging on 
for long continuous periods as this is not 
good for the battery. Don´t leave the charg-
er plug (2) in the socket (4) when charging 
is completed. It blocks the electric seat 
functions. Connector for control box (5).

1. Connect the charger plug (2) to the sock-
et (4) on the chair. LED (3) lights green.

2. Connect the charger (1) to the wall sock-
et. The LED lights red.

3. When charging is completet the LED (3) 
lights green.

4. Pull the charger(1) from the wall socket 
first and then the charger plug (2) from 
socket (4).

3

5

4

1

2

Summary of Contents for Euroflex ABC

Page 1: ...1 svenska english Bruksanvisning Manual ABC Rev 201409 5...

Page 2: ...t llning 11 Benst d hel fotplatta 11 Rotation 12 Laddning av batterier 13 Teknisk fakta 14 Garanti 15 CE m rkning 15 Sk tsel 15 CONTENTS Contents 2 Introduction 3 Contact 3 Assembly 4 Transportation 4...

Page 3: ...mma i kontakt med tillverkaren se information nedan Eurovema AB Tel 46 371 390 100 Fax 46 371 189 82 E post info eurovema se Baldersv gen 38 SE 332 35 Gislaved Sverige www eurovema se INTRODUCTION We...

Page 4: ...minska p transportstorleken S nk armst den till nedersta l get S nk sitslyften till nedersta l get ASSEMBLY Open the packing and check that no transport damage has occured Also check that the deliver...

Page 5: ...rid inte angiven max brukarvikt p stolen Undvik kontakt med skadade eller l ckande batterier Uttj nta batterier skall l mnas f r tervinning SAFETY Carefully read the manual before using the wheel chai...

Page 6: ...ng 12 bromsspak 13 rotation v nster sida 14 fotplatta 15 ryggvinkling OVER VIEW 1 seat 2 armrest 3 back support standard 4 armrest height adjustment 5 rear castors with brake 6 depth adjustment upper...

Page 7: ...och fr n den sker Se till att inga l sa mat tor eller dylikt ligger under hjulen d det kan f rs mra bromsverkan BRAKES Brake Push the brake lever 2 forward down The rear wheels are locked Release Pul...

Page 8: ...n 2 Dra t skruvarna 1 och 2 n r nskad vinkel uppn tts Skruva fast skruven BACK REST adjustments Angling of back rest Loosen lever 3 Set the desired angle Tighten the lever Setting the height of the ba...

Page 9: ...ttenheten ned mot golvet L gg ett moth ll mellan st lldon och golv SEAT HEIGHT gas Raising Pull the gas lift mechanism lever 1 up ward Do not load the seat Release the lever at the required seat heigh...

Page 10: ...jer med sitsen tilt Nedre inf st ning 3 endast sitsvinkling ryggen f ljer ej med SEAT ANGLE manual Forward angling Clockwise CRANKSHAFT AND RELATED PARTS on the control 1 Max 20 forward Backward angli...

Page 11: ...tillval Vinkel fotplatta Skruva spaken 3 medurs f r att minska vinkeln moturs f r att ka ARMREST adjustments Height Loosen the knob 1 and set the desired heigth Tighten the knob Width Loosen the knob...

Page 12: ...otationsspaken upp t f r att l sa i r tt l ge Spaken 3 kan ven monteras p h ger sida ROTATION option At the rotary 3 requires the chair to be braked For the locking lever down 4 to apply the brakes Fo...

Page 13: ...3 gr nt 4 Tag ur n rkontakten 1 f rst och sen laddkontakt 2 ur uttag 4 CHARGING OF BATTERIES To keep the full power of the battery as long as possible it is important to charge it regularly Charging...

Page 14: ...sitsh jd l ng gaskolv 50 70 cm 2 cm seat height long gas spring sitsh jd extra kort gaskolv 41 49 cm 3 cm seat height short gas spring sitsh jd elsitslyft kort 46 63 cm 3 cm seat height actuator short...

Page 15: ...och skru var r ordentligt tdragna efter att justerin gar av stolen r gjorda WARRANTY We give a 2 year warranty on our products for fabrication fault damage Exceptions are fabric wheels and batteries...

Reviews: