background image

9

FAN: 

D12BM-12 120mm x 120mm x 25mm (Part No: FAN-C)

We use the above mentioned fan, for the reliability and longevity of a ball bearing fan . The 

air flow is good at 72 CFM and is an acceptable noise level for the customer . 

REPLACEMENT: 

(Part No: FAN-C) 

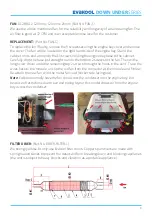
To replace the fan if faulty, remove the 9 screws securing the engine bay cover andremove 

the cover . The fan will be located on the right hand side of the engine bay . Stand the 

cabinet on its end and undo the 10 screws holding the engine bay base to the cabinet . 

Carefully drop the base just enough to undo the bottom 2 screws on the fan . Then with a 

long screw driver undo the remaining top 2 screws through the holes in the vent  . Trace the 

wires back to the module, unclip the old fan from the connector at the module and fit new . 

Re-attach the new fan, with the metal fan cowl (sticker side facing out) . 

Note: 

Evakool normally have the fan cool across the condenser into the engine bay, but 

because of restrictions due to size and piping layout, this model draws air from the engine 

bay across the condenser. 


FILTER DRIER:

 (Part No . DRIER-FILTER-1)


We strongly advise to only use Evakool filter driers . Copper spun driers are made with 

spring loaded sieves to prevent the desiccant from breaking down and blocking capillaries 

(the unit is subject to heavy knocks and vibration as a portable appliance) .

DOWN UNDER

 SERIES

Summary of Contents for DOWN UNDER Series

Page 1: ...SERVICE MANUAL FOR MODEL DU47 SZ DOWN UNDER SERIES ...

Page 2: ......

Page 3: ... Down Under 47L Single Zone Fridge Freezers Please read this manual carefully to ensure the correct methods are taken to diagnose and service these products If you require more information please contact warranty evakool com or 1300 385 665 Contents 1 Electronic Control Overview 4 2 Spare Parts Classification Service Instructions 7 3 Product Specifications 13 4 Basic Fault Finding 16 5 Product Dra...

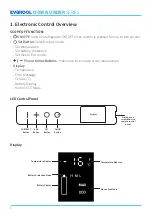
Page 4: ...ax or Eco mode Plus or Minus Buttons Press once to increase or decrease values Display Temperature Error Message Celsius C Battery Display MAX or ECO Mode DOWN UNDER SERIES 4 LED Control Panel Display Battery Protection Mode Battery Display Display On Off Button SUBTRACT Button SET Button ADD Button Notch use a screwdriver to remove control panel Temperature Measure Max or Eco Mode Temperature Dis...

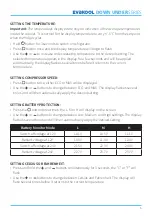
Page 5: ... displayed Use the or buttons to change between ECO and MAX The display flashes several times and will then automatically apply the desired setting SETTING BATTERY PROTECTION Press the button three times the L M or H will display on the screen Use the or buttons to change between Low Medium and High settings The display flashes several times and will then automatically apply the desired setting Ba...

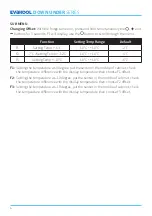
Page 6: ...mp 13 C 10 C 10 C 6 C F1 Setting the temperature as 0 degree put the sensor in the middle of cabinet check the temperature difference with the display temperature then choose F1 offset F2 Setting the temperature as 10 degree put the sensor in the middle of cabinet check the temperature difference with the display temperature then choose F2 offset F3 Setting the temperature as 18 degree put the sen...

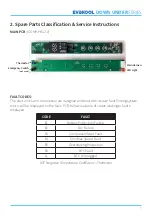
Page 7: ...cs and compressor are designed and built with its own fault finding system which will be displayed on the Main PCB below is a table of codes relating to faults displayed CODE FAULT E1 Battery Protection Failure E2 Fan Failure E3 Compressor Start Fault E4 Min Max Speed Fault E5 Overheating Protection E6 NTC Fault LL NTC Unplugged NTC Negative Temperature Coefficient Thermistor ...

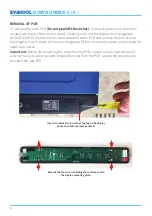
Page 8: ...ontrol panel to the mounting plate Fit the new control panel and reverse the steps to re install Important Before disconnecting the wires from the PCB make a note or take a photo of which wires go to which sockets remove the wires from the PCB reverse the procedure to re install the new PCB 8 DOWN UNDER SERIES Remove the four screws holding the control panel to the display mounting plate Insert sc...

Page 9: ...he fan Then with a long screw driver undo the remaining top 2 screws through the holes in the vent Trace the wires back to the module unclip the old fan from the connector at the module and fit new Re attach the new fan with the metal fan cowl sticker side facing out Note Evakool normally have the fan cool across the condenser into the engine bay but because of restrictions due to size and piping ...

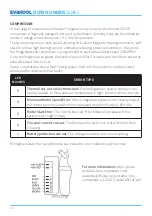
Page 10: ...g system built into the electronic module listed below are the codes and their faults LED FLASHES ERROR TYPE 5 Thermal cut out or electronic unit If the refrigeration system has been too heavily loaded or if the ambient temperature is high the unit will run too hot 4 Minimum Motor Speed Error If the refrigeration system is too heavily loaded the motor cannot maintain minimum speed at approximately...

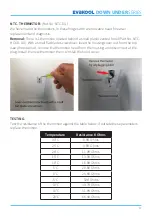
Page 11: ...he housing cover out from the top see photo below remove the thermistor head from the housing and disconnect at the plug Install the new thermistor then re install the hood cover TESTING Test the resistance of the thermistor against the table below if outside these parameters replace thermistor Temperature Resistance K Ohms 30 C 8 8K Ohms 25 C 9 8K Ohms 20 C 11 8K Ohms 15 C 13 9K Ohms 10 C 16 8K O...

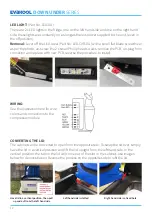
Page 12: ...e with new PCB reverse the procedure to install Left hand side is slotted Right hand side is a fixed hole Have lid in a vertical position then pull up and out from the left hand side CONVERTING THE LID The cabinet can be converted to open from the opposite side To swap the lid over simply have the lid in a vertical position and lift the lid upright from the left hand side In the vertical position ...

Page 13: ...tions Model No DU47 SZ Gas Charge 45 Grams R134a New Weight 16kg Dimensions L W H 697 7 x 399 9 x 467 5 Sound 45dB Temp Range 10 C to 18 C Capacity 47 Litre Power Supply DC12 24 Rated Power Output 50 Watts Foam Thickness 50mm Climate Class T ...

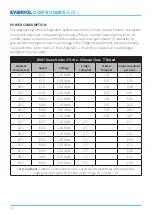
Page 14: ...imate Class T Rated Ambient Temperature Speed Voltage Fridge Temp Set Freezer Temp Set Amps consumed per hour 24 C ECO 12 8 Volts 16 C 1 5 32 C ECO 12 8 Volts 16 C 1 95 38 C ECO 12 8 Volts 16 C 2 38 43 C ECO 12 8 Volts 16 C 2 97 24 C MAX 12 8 Volts 16 C 1 56 32 C MAX 12 8 Volts 16 C 2 11 38 C MAX 12 8 Volts 16 C 2 55 43 C MAX 12 8 Volts 16 C 3 27 24 C ECO 12 8 Volts 2 C 0 7 32 C ECO 12 8 Volts 2 C...

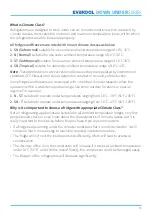
Page 15: ...the operation within a wider temperature range like some outdoor locations or special regions For example 1 N ST suitable to operate under temperatures ranging from 16 C 38 C 61 F 100 F 2 SN T suitable to operate under temperatures ranging from 10 C 43 C 50 F 109 F Why is it so important to choose a fridge with appropriate Climate Class Not all refrigerating appliances are suitable for all ambient...

Page 16: ... running Check the condenser to see if blocked Display not showing the right temperature Probable cause Thermistor or Main PCB Test thermistor see page 11 or replace with a new thermistor If the thermistor is OK then the main PCB may need recalibrating see section SUB MENU page 5 for changing display offset If the above doesn t work then a new PCB is required Note The displayed temperature is only...

Page 17: ...ker of 0 8 Volts this is now showing the fridge cutting out at 11 9 Volts at the battery Now if we include the lead we supply the connection in the customers car and the 5 to 6 metres of cable from the secondary battery to the fridge this could equate to another 1 to 2 Volts of losses between the battery and the compressor module NOW we would measure around 12 9 or 13 9 at the battery and the frid...

Page 18: ...art it will be an E2 Compressor protection error This function was introduced in 2015 by Secop to protect the new PCB compressors from multiple starts Download the service bulletin here https www evakool com au SSP 20Applications NetSuite 20Inc 20 20SCA 202020 1 Development img E2 20FAULT 20OR 20 COMPRESSOR 20PROTECTION E3 Compressor start fault Probable cause overheating multiple starts seized co...

Page 19: ...as stopped or if the fan is still running Check the condenser to see if blocked To do this turn off fridge stand fridge on its end to access the base there is a small inspection panel remove panel and inspect the back section of the condenser If blocked remove the fan and blow compressed air from the front of the condenser to remove fluff build up Replace inspection plate and test Ask customer how...

Page 20: ...DOWN UNDER SERIES 20 5 Product Drawings DU47 SZ External Dimensions ...

Page 21: ...DOWN UNDER SERIES 21 DU47 SZ Wiring Display ...

Page 22: ...DU47 1 4 Lighting Panel LED DU 1 15 Rear Cover Base MTR CVR B DU47 1 5 NTC Hood NTC HOOD DU 1 16 DC Socket 1 6 NTC NTC DU 1 17 Control Panel BRD DISP 22 1 7 Box Body 1 18 Display Mounting Plate HOUSE DISP 8 1 8 Handle KHA DU47 2 19 Door Holder LATCH LID 5 1 9 Compressor COMP PBC2 0 1 20 Large Basket BASKET 1 DU47 1 10 Compressor Tray 1 21 Small Basket BASKET 2 DU47 1 11 Condenser 2 ...

Page 23: ......

Page 24: ...For Service and Warranty support contact Evakool T 1300 385 665 EVKOOL E warranty evakool com ...

Reviews: