background image

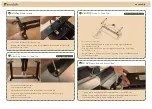
Attaching The Foot

3

S T E P   T H R E E :

Connecting with Center Rails

4

S T E P   F O U R :

• You should have two assembled legs and the Center Rail (5)
• Slide Center Rails (5) into assembled legs to connect both right 

  and left legs

assembly

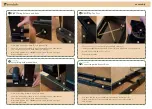
Right Lifting Column and Rails

S T E P   O N E :

Left Lifting Column and Rails

2

S T E P   T W O :

• Place Right Lifting Column (3) to Right Rail (6)
• Use allen wrench provided to insert and tighten two M6x10mm 

  Pan Head Screws (15) on both sides of Right Rail
• Insert and tighten four M6x10mm Pan Head Screws on top of 

  Right Lifting Column

• Place Left Lifting Column (2) to Left Rail (4)
• Use allen wrench provided to insert and tighten two M6x10mm 

  Pan Head Screws (15) on both sides of Left Rail
• Insert and tighten four M6x10mm Pan Head Screws on top of 

  Left Lifting Column

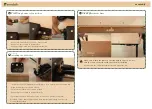
• Place one Foot (1) on top of Right Lifting Column (3)
• Insert four M6x14mm Pan Head Screw (14) and tighten in a cross pattern
• Attach two Foot Glides (13) on Foot 
• Repeat on left side

5

5

5

5

1

1

4

2

4

2

3

3

3

6

6

15

15

15

14

13

4

2

Summary of Contents for Lite Frame

Page 1: ...assembly manual Lite Frame Lite Frame Assembly Information ...

Page 2: ...uminum Transfer Bar 8 1 Long Hexagon Rod 1 9 Side Bracket 10 2 Control Box 11 1 Controller 12 1 M6x14mm Pan Head Screw 14 8 13 Foot Glide 4 M6x10mm Pan Head Screw 12 15 M6x20mm Countersunk Screw 4 16 ST5x20mm Wood Screw 10 17 ST5x16mm Wood Screw 18 2 M4x10mm Pan Head Screw 20 2 19 M6x12mm Pan Head Screw 4 Cable Clip 10 21 Parts Qty Parts Qty Parts Qty Tools ...

Page 3: ...t and tighten two M6x10mm Pan Head Screws 15 on both sides of Right Rail Insert and tighten four M6x10mm Pan Head Screws on top of Right Lifting Column Place Left Lifting Column 2 to Left Rail 4 Use allen wrench provided to insert and tighten two M6x10mm Pan Head Screws 15 on both sides of Left Rail Insert and tighten four M6x10mm Pan Head Screws on top of Left Lifting Column Place one Foot 1 on t...

Page 4: ...from outwards in Use 6mm wrench to fine tune and push Short Hexagon Rod through the hexagonal hole Push Short Hexagon Rod through the hexagonal hole as far as possible or until it is no longer sticking out from Left Leg Insert Long Hexagon Rod 9 into Right Leg from outwards in Connect end of Long Hexagon Rod to Aluminum Transfer Bar 8 Push Long Hexagon Rod through Right Leg as far as possible or u...

Page 5: ...to secure frame to table top Repeat for the other side For Pre Drilled Table Tops Attaching Frame To Table Top 7b S T E P S E V E N b For Non Pre Drilled Table Tops If your table is not pre drilled Lock the position of the Center Rails 5 using eight M6x10mm Pan Head Screws 15 Double check the Frame is properly positioned on the underside of the Table Top Attach Frame to underside of Table Top usin...

Page 6: ...ller 12 upside down and place it on underside of the table top Align Controller to desired position Secure Controller with Screws provided Connect power cable to Control Box 11 If your table has pre drilled holes do use the Pan Head Screws 20 provided If your table top does not have pre drilled holes do use Wood Screws 18 provided 11 20 12 Make sure to turn the table on the side with the Notch do ...

Page 7: ...jury and electric shock Do not sit or stand on the desk frame Do not crawl or lie under the desk frame Do not place any objects taller than 20 underneath the desk Do not open or dismantle any of the components the Legs Control Box or Switch There is a danger of electric shock This product is designed with a duty cycle of 10 2 minutes on 18 minutes off i In the event of a power outage or if the pow...

Reviews: