background image


     DESIGNED TO PERFECTION 

 
APPLIANCE DETAILS


Voltage & Frequency: 

220-240V 50Hz 

Lamp Max: 
 

RBES63, RBES91, RBES92, RBES64:2x20W G4 halogen lamps   

RBES65, RBES96: 2x40W E14 lamps   

Rated Input Power: 

RBES63, RBES91, RBES92:230W   RBES64:165W  RBES65, RBES96:205W 


GENERAL INFORMATION 


Before installing and operating the range hood, carefully read the following important information regarding 
installation safety and maintenance. Keep this information booklet accessible for further consultations. 
The appliance has been designed to exhaust cooking fumes externally. Before installation, please ensure that 
the following have been supplied and that the tools listed below are readily available. 


WHAT IS SUPPLIED 


Range hood (including one way valve for flue x 1) x 1. 
Installation kit x 1 – RBES63, RBES65, RBES91 & RBES96: 8mm bolts x 10, 30mm screws x 2, 40mm screws x 7, 
plastic plugs x 9. 
Installation kit x 1 – RBES64: 8mm bolts x 8, 30mm screws x 2, 40mm screws x 7, plastic plugs x 9. 

Installation kit x 1 – RBES92: 8mm bolts x 8, 25mm bolts (with nuts & washers) x 4, 30mm screws x 2, 40mm 
screws x 7, plastic plugs x 9. 
Mounting brackets x 3. 


Instruction booklet x 1. 


WHAT MAY BE NEEDED FOR INSTALLATION 


Electric Drill 

Duct Tape 

Tape Measure 

Jig Saw 

Spirit Level 

Ladder 

Screwdrivers 

Torch (If natural lighting is minimal) 


INSTALLATION INSTRUCTIONS 


Please ensure that before installing the range hood, all power is switched off. 
Installation must be in accordance to the local electrical authority and codes. 
This range hood must be earthed at all times for the operators’ safety. 

The switched power outlet for the range hood should be positioned to enable the user to turn the power off, 
to enable cleaning and any maintenance required. 
The switched power outlet should be installed within 600mm from the rear of the unit. 
Ensure that when installing the range hood, that it is protected from any possible damage from tools etc. 
Ducting for this unit must be installed in accordance to the local authority. 

Ensure that the fixings used for this range hood are suitable. 
Check the area where the range hood is to be fitted, to ensure that it is structurally sound. 
The Everdure RBES63, RBES64, RBES65, RBES91, RBES92 & RBES96 range hoods are intended to be installed 
directly onto a wall. 

Summary of Contents for RBES63

Page 1: ...DESIGNED TO PERFECTION INSTALLATION OPERATION MAINTENANCE INSTRUCTIONS FOR EVERDURE RANGE HOOD Models Included RBES63 RBES64 RBES65 RBES91 RBES92 RBES96 ...

Page 2: ...eded For Installation 4 Installation Instructions 4 7 Operating Instructions 7 8 Cleaning 9 Replacing The Bulbs 9 10 Troubleshooting 10 It is important that you retain these instructions proof of purchase as well as other important documents about this product for future reference Due to continual product development Everdure reserves the right to alter specifications or appearances without notice...

Page 3: ...unplug the appliance from the outlet 13 It is recommended to operate the range hood prior to cooking 14 It is recommended to leave the range hood in operation for 15 minutes after cooking is terminated in order to completely eliminate cooking vapours and odours 15 Turn off the range hood when not in use 16 Don t use the range hood if it is damaged especially the supply cord and the case 17 Don t i...

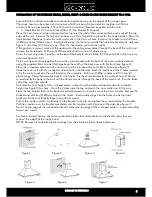
Page 4: ...shers x 4 30mm screws x 2 40mm screws x 7 plastic plugs x 9 Mounting brackets x 3 Instruction booklet x 1 WHAT MAY BE NEEDED FOR INSTALLATION Electric Drill Duct Tape Tape Measure Jig Saw Spirit Level Ladder Screwdrivers Torch If natural lighting is minimal INSTALLATION INSTRUCTIONS Please ensure that before installing the range hood all power is switched off Installation must be in accordance to ...

Page 5: ...ee figure 4 Place the u shaped section onto the main unit and fix in place with two 2 8mm screws see figure 5 Hook the main unit with the u shaped sections back onto the wall Mark the positions of the 2 holes needed to fix the centre bracket to the wall remove the assembly Drill two 2 Ø8mm holes and fit in two 2 plastic plugs Place the assembly back on the hooks Fix the centre bracket to the wall ...

Page 6: ...n and fix into place with 4 bolts nuts washers See fig 4 Fit the u shaped sections together screw the centre bracket onto the back of the outer u shaped section using the supplied 8mm screws this helps keep the width at the back even with the front see figure 5 Place the u shaped sections onto the main unit and mark the hole positions to fix the centre bracket to the wall Remove the u shaped secti...

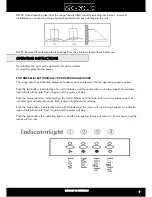
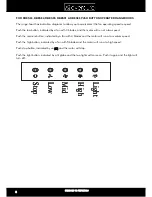
Page 7: ... to easily select the fan operating speed required Push the low button indicated by a fan with 3 blades and the motor will run at a low speed An indicator light will also illuminate Push it again and the motor will stop Push the medium button indicated by a fan with 4 blades and the motor will run at a medium speed An indicator light will also illuminate Push it again and the motor will stop Push ...

Page 8: ...ill run at a low speed Push the medium button indicated by a fan with 4 blades and the motor will run at a medium speed Push the high button indicated by a fan with 5 blades and the motor will run at a high speed Push stop button indicated by an O and the motor will stop Push the light button indicated by a lit globe and the two lights will come on Push it again and the light will turn off Low Mid...

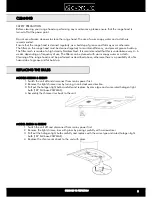
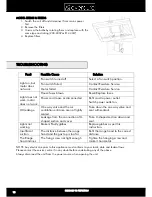
Page 9: ...eaned with warm soapy water or a cloth Cleaning of the range hood must be performed as described above otherwise there is a possibility of a fire hazard due to grease and fat build up REPLACING THE BULBS MODELS RBES63 RBES91 1 Switch the unit off and disconnect from mains power first 2 Remove the light chrome rims by turning in anti clockwise direction 3 Pull out the halogen light bulb carefully a...

Page 10: ...tlet on Oil leakage One way valve and the air ventilation entrance are not tightly sealed Take down the one way valve and seal with sealant Leakage from the connection of U shaped section and cover Take U shaped section down and seal Lights not working Broken Faulty globes Replace globes as per this instruction Insufficient suction The distance between the range hood and the gas top is too far Ref...

Page 11: ...DESIGNED TO PERFECTION 10 11 ...

Page 12: ...vice and Assembly Enquiries 1300 766 066 A division of Shriro Australia Pty Ltd 104 Vanessa St Kingsgrove NSW 2208 In Australia 1300 355 541 In New Zealand 09 414 5755 www everdure com IM Ref RBES63 21 2014 02FC FOR INDOOR USE ONLY ...

Reviews: