background image

14

Product Drawings

Product Drawings

REFRIGERATION

29 1/4"

31 5/8"

58 3/4"

74 1/4"

5"

79 1/4"

28 1/4"

ESR1

29 1/4"

31 5/8"

3/8"

58 3/4"

74 1/4"

5"

79 1/4"

28 1/4"

ESF1

49 5/8"

31 5/8"

54 1/2"

74 1/4"

5"

79 1/4"

24"

24"

ESR2

49 5/8"

31 5/8"

3/8"

54 1/2"

74 1/4"

5"

79 1/4"

24"

24"

ESF2

ESRF2A

59"

31 5/8"

58 3/4"

74 1/4"

5"

79 1/4"

28 1/4"

28 1/4"

ESWR2

59"

31 5/8"

3/8"

58 3/4"

74 1/4"

5"

79 1/4"

28 1/4"

28 1/4"

ESWF2 

74 3/4"

31 5/8"

54 1/2"

74 1/4"

5"

79 1/4"

24"

24"

24"

ESR3 / ESF3

29 1/4"

31 5/8"

58 3/4"

74 1/4"

5"

79 1/4"

28 1/4"

ESRH2 / ESFH2

29 1/4"

31 5/8" 

58 3/4"

74 1/4"

5"

79 1/4"

28 1/4"

ESRFH2

59"

31 5/8"

58 3/4"

74 1/4"

5"

79 1/4"

28 1/4"

28 1/4"

ESWR2

59"

31 5/8"

58 3/4"

74 1/4"

5"

79 1/4"

28 1/4"

28 1/4"

ESWQ3

74 3/4"

31 5/8"

54 1/2"

74 1/4"

5"

79 1/4"

24"

24"

24"

ESRF3

49 5/8"

31 5/8"

54 1/2"

74 1/4"

5"

79 1/4"

ESRH4

24"

24"

49 5/8"

31 5/8"

3/8"

54 1/2"

74 1/4"

5"

79 1/4"

24"

24"

Summary of Contents for EGSDH2

Page 1: ...anual for models Top Mount Upright Reach Ins ESR1 ESRH2 ESR2 ESRH4 ESWR2 ESR3 ESF1 ESFH2 ESF2 ESWF2 ESF3 ESRFH2 ESRF2A ESWRF2 ESWQ3 ESRF3 ESR1D2 ESR2D2 ESR2D4 ESRF2D2 ESWQ2D2 ESGR1 ESGR2 ESGWR2 ESGR3A EGSH2 EGSDH2 EGSH4 EGSWH4 EGSH6 www EVEREST ref com ISO 9001 US R C ...

Page 2: ...RNING When using your appliance always follow basic precautions including the following Install the unit on a hard and level surface Before cleaning or maintaining the unit please unplug it Do not use any flammable cleaning products on or around the unit Please do not store temperature sensitive items in the unit such as medical or science research related materials If you suspect a refrigerant le...

Page 3: ...y the unit with water Clean the pronges of the electrical plug with a soft cloth or brush before plugging it into an electrical receptacle to prevent a fire hazard WARNING Read and follow all safety notices in this installation guide These notices provide helpful safety and efficient operation information Failure to do so may lead to serious injury and or damage to the unit When it is time to salv...

Page 4: ...to remove or repair any components unless you are an authorized service technician The refrigerator compartment s temperature should be set at 33 F 54 F and 10 F 54 F for the freezer Setting the temperature out of the recommended ranges will void the unit s warranty Do not put your hands under the unit when moving it You could be injured by sharp edges protruding parts crushing etc Avoid touching ...

Page 5: ...ld an enclosure or cabinet around the unit Restricting the airflow around the unit s condenser area will cause the compressor to work harder which can result in compressor failure and the unit not being able to maintain the desired temperature Select a location away from other heat and moisture generating equipment such as stoves ovens dish washers etc High ambient temperatures cause the compresso...

Page 6: ...rranty Interior Cleaning Clean the interior surface of the unit with mild soap and warm water Do not let water accumulate inside the unit To prevent water damage wipe the interior of the unit with a dry cloth as needed Do not use abrasive cleaners concentrated detergents bleaches cleaning waxes solvents or polishes to clean the interior of the unit Condenser Coil Cleaning Poor condensing unit perf...

Page 7: ...r coil at back of the unit See diagrams ES L 001 D1 and ES L 001 D2 3 Use any hard bristled brush in a vertical sweeping motion to remove lint dust and debris from in between the aluminum fins of the condenser coil Do not apply heavy pressure so as not to bend the fins 4 For grease coated fins use any commercial condenser coil cleaner Please follow the specific instructions on the bottle 5 Repeat ...

Page 8: ...Remember that there are two springs the top and the bottom whose tensions must be released 5 Have a second person secure and hold the door E against the unit while the top hinge is removed 6 Remove the top hinge C by removing the 3 screws securing it 7 Remove the door by lifting it until the bottom clears the bottom hinge D Ensure that the top and bottom springs and springs shafts do not fall out ...

Page 9: ...th frequent or prolonged door opening This is normal b The doors might not be closed properly Check door alignment and gaskets for proper seal Condensation on the exterior surface a Condensation on the exterior surface of the unit is perfectly normal during periods of high humidity b Check door alignment and gaskets for proper seal Noisy operation a Check for loose parts b Check for tubing rattle ...

Page 10: ...ience To install a shelf hook the shelf clips into the pilasters by inserting the top part of the clips first and then the bottom Each shelf requires 4 clips To remove a shelf start by unloading the shelf Second remove the shelf itself Finally remove the shelf clips by tilting them up and allowing the bottom of the clip to come out first and then remove the top part of the clip from the pilaster S...

Page 11: ...4 x 31 5 8 x 74 1 4 71 3 9 1 3 x 2 115 60 1 615 11 12 23 2 H 3 1 2 115 60 1 23 1 3 1 2 115 60 1 10 54 10 54 10 54 10 54 10 54 10 54 R 404A R 404A R 404A R 404A 300 302 7 57 7 57 48 2 6 1 2 x 2 115 60 1 R 134A 468 14 81 55 2 6 1 2 x 2 115 60 1 507 14 81 ESF1 Freezer ESFH2 Freezer ESF2 Freezer ESWF2 Freezer ESF3 Freezer 29 1 4 x 32 x 74 1 4 29 1 4 x 31 5 8 x 74 1 4 49 5 8 x 32 x 74 1 4 59 x 32 x 74 ...

Page 12: ...nt Crated Weight LBS Amps A Ext Dimensions W x D x H inches 29 1 4 x 31 5 8 x 74 1 4 49 5 8 x 31 5 8 x 74 1 4 49 5 8 x 31 5 8 x 74 1 4 49 5 8 x 31 5 8 x 74 1 4 59 x 31 5 8 x 74 1 4 39 Ref 13 Frz 22 Ref 22 Frz 1 F 1 H 2 DR 4 115 60 1 543 11 94 48 2 8 1 3 115 60 1 23 1 4 1 3 115 60 1 R 134A R 134A R 134A 318 465 5 35 11 00 55 2 8 1 3 115 60 1 514 11 00 ESGR1 ESGR2 ESGWR2 29 1 4 x 31 5 8 x 74 1 4 49 ...

Page 13: ...tton Caution If PS symbol appears on the LED it means that you pressed and held D button too long Release it and then press D button twice to restart the temperature setting While flashing the number set your desired temperature by pressing C high or E low button The number increases or decreases by a decimal point Note Your new setting temperature should be in the range of between 33 and 54 F for...

Page 14: ...urchase them separately Custom pan dividers required to fit standard full sized pans Contact manufacturer for details REFRIGERATION ESR1D2 Standard 1 pan divider per drawer included 6 Depth 1 4 1 3 1 2 1 2 1 4 1 2 1 6 1 3 1 4 1 6 1 2 1 4 ESWQ2D2 Standard 1 pan divider per drawer included 6 Depth ESR2D2 ESR2D4 ESRF2D2 Standard 1 pan divider per drawer included 6 Depth 1 3 ...

Page 15: ... 28 1 4 28 1 4 ESWR2 59 31 5 8 3 8 58 3 4 74 1 4 5 79 1 4 28 1 4 28 1 4 ESWF2 74 3 4 31 5 8 54 1 2 74 1 4 5 79 1 4 24 24 24 ESR3 ESF3 29 1 4 31 5 8 58 3 4 74 1 4 5 79 1 4 28 1 4 ESRH2 ESFH2 29 1 4 31 5 8 58 3 4 74 1 4 5 79 1 4 28 1 4 ESRFH2 59 31 5 8 58 3 4 74 1 4 5 79 1 4 28 1 4 28 1 4 ESWR2 59 31 5 8 58 3 4 74 1 4 5 79 1 4 28 1 4 28 1 4 ESWQ3 74 3 4 31 5 8 54 1 2 74 1 4 5 79 1 4 24 24 24 ESRF3 4...

Page 16: ...5 79 1 4 28 1 4 28 1 4 ESGR2 49 5 8 31 5 8 54 1 2 74 1 4 5 79 1 4 24 24 ESR1D2 29 1 4 31 5 8 58 3 4 74 1 4 5 79 1 4 28 1 4 ESR2D2 49 5 8 31 5 8 54 1 2 74 1 4 5 79 1 4 24 24 ESR2D4 49 5 8 31 5 8 54 1 2 74 1 4 5 79 1 4 24 24 ESRF2D2 Dual Temp 49 5 8 31 5 8 54 1 2 74 1 4 5 79 1 4 24 24 ESWQ2D2 Dual Temp 59 31 5 8 58 3 4 74 1 4 5 79 1 4 28 1 4 28 1 4 74 3 4 31 5 8 3 8 54 1 2 74 1 4 5 79 1 4 24 24 24 ...

Page 17: ... 5 79 1 4 28 1 4 EGSWH4 59 31 5 8 58 3 4 74 1 4 5 79 1 4 28 1 4 28 1 4 EGSH2 74 1 4 5 79 1 4 28 1 4 EGSH4 49 5 8 31 5 8 54 1 2 74 1 4 5 79 1 4 24 24 EGSH6 74 3 4 31 5 8 54 1 2 74 1 4 5 79 1 4 24 24 24 29 1 4 31 5 8 58 3 4 29 1 4 31 5 8 58 3 4 EGSDH2 Dual Temp ...

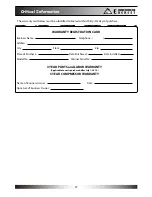
Page 18: ...el No Cabinet Serial No 3 YEAR PARTS and LABOR WARRANTY Applicable to units purchased after July 1 2014 5 YEAR COMPRESSOR WARRANTY Name of Business Owner Date Signature of Business Owner Critical Information Critical Information REFRIGERATION The warranty card below must be submitted to Everest within thirty 30 days of purchase ...

Page 19: ...aintain product as set forth in the user s manual provided with this unit All EVEREST products are designed for commercial usage not for residential use Therefore the warranty will not be honored if product is installed in a residential house D WARRANTY IS NOT TRANSFERABLE Warranty is limited to only the original purchaser user to whom delivered It is not transferable E ALTERATION NEGLECT MISUSE A...

Page 20: ...201 W Artesia Blvd Compton CA 90220 Tel 310 323 6586 800 444 6285 Fax 310 323 7524 310 761 1127 Visit our website at www EVERESTref com REFRIGERATION A Step Above the Standard REFRIGERATION ...

Reviews: