25
3.1
Time/Date Setup Menu
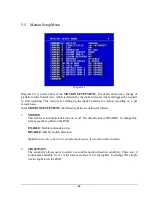
Diagram 3.2
Diagram 3.2 is a screen shot of the TIME/DATE SETUP MENU. This menu is used to set up the
correct time and date for your region of the world. You are able to setup daylight savings as well as
synch it with an internet based time server. In the TIME/DATE SETUP MENU the following fields
are defined as follows:
1.
TIME FORMAT: This field represents the time format on the DVR. You can select between
12 HOUR and 24 HOUR format.
2.
TIME: This field represents the current time on the DVR. To change this, simply use the Jog
Dial on the DVR.
The Time is represented as follows:
Hour: 00~23 (1~12 if TIME FORMAT is 12 HOUR): Minute: 00~59: Second: 00~59
3.
DATE FORMAT: This field represents the date format on the DVR. To change this, simply
use the Jog Dial on the DVR. There are three date formats which are YYYY-MM-DD, MM-
DD-YYYY and DD-MM-YYYY to be selected.
4.
DATE: This field represents the date on the DVR. To change this, simply use the Jog Dial on
the DVR.
The date is represented as follows:
Year: 2000~2099 / Month: 01~12 / Date: 01~31 / Day of Week (automatically changes)
Summary of Contents for 920
Page 1: ...Instruction Manual E ED DR R1 16 64 40 0 1 16 62 20 0 9 92 20 0 ...
Page 99: ...89 ...
Page 100: ...90 ...
Page 101: ...91 ...
Page 104: ...94 ...
Page 138: ...128 CAMERA setup menu RECORD setup menu ALARM setup menu ...
Page 141: ...131 SCHEDULE setup menu CONTROL setup menu ...
Page 153: ...143 AppendixC AlarmBoardConfiguration Appendix C ...


