background image


2.  Installation 

1.


Stick the supplied Mounting Sticker to the surface to mark the 4 screw 
positions. Drill four holes on the surface and insert the supplied 4 Screw 
Anchors 
into the screw holes. If you want to run the cable through the 
surface, drill a hole within the 4 screw area. 

2.


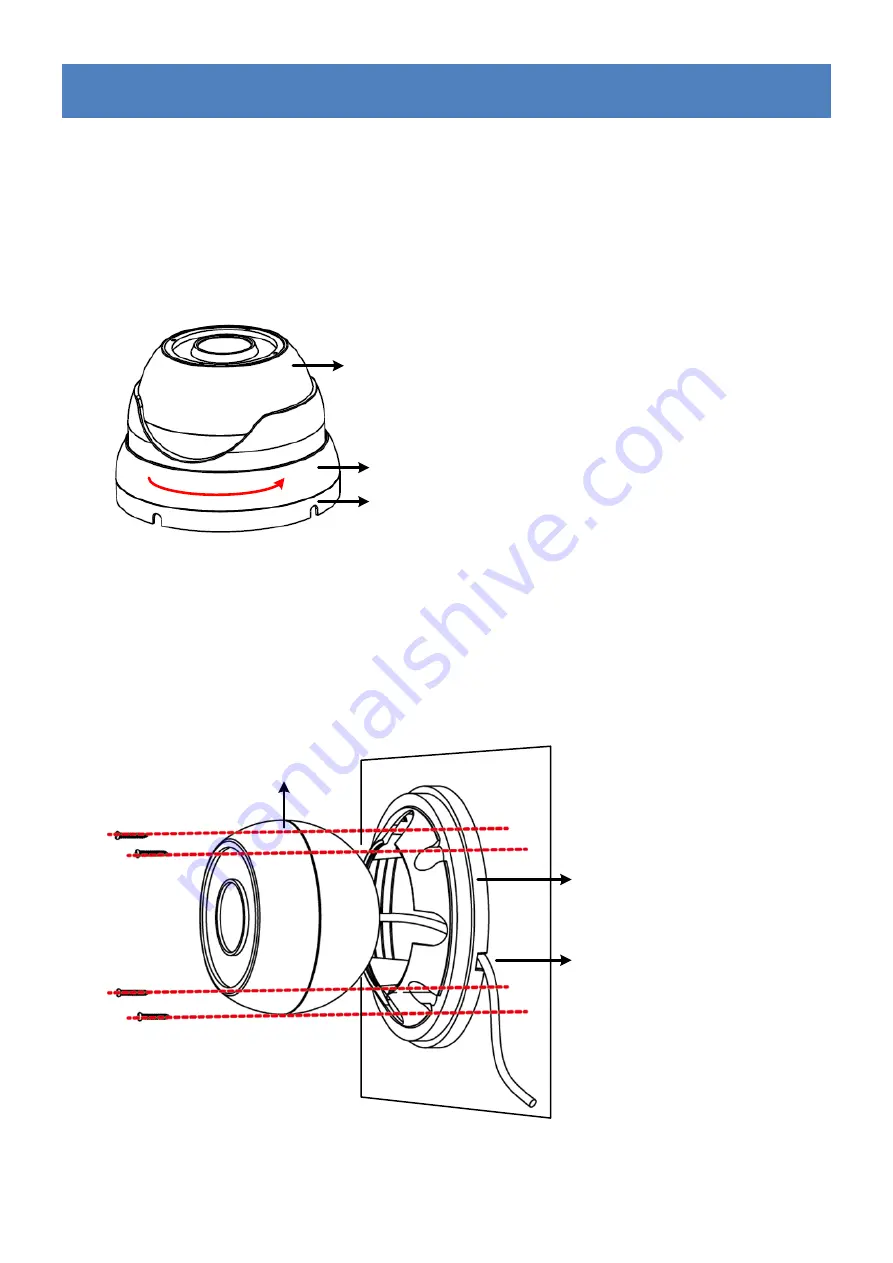
Unscrew the Outer Housing by twisting it counterclockwise and then 
remove it from the Camera Base

Outer Housing

Camera Base

Camera Body


3.


Screw the Camera Base to the surface with the supplied four Screws

a.


If you want to wire the cables from the Side Cut on the Camera Base: 
Attach the Camera Body to the Camera Base and run the cables through 
the Camera Base first, and then place the cable under the Side Cut. 
Finally, screw the Camera Base to the surface with the supplied 4 
Screws. 

Side Cut

Wall

Camera Base

Camera Body


Summary of Contents for EBA1240 eZ.HD Series

Page 1: ...pictures or screen shots in this document are for example only The images may vary depending on the product and software version Information contained in this document is subject to change without no...

Page 2: ...1 Packing List Camera x 1 Mounting Sticker x 1 L Type Wrench x 1 Screw Screw Anchor x 4 User Manual x 1 1 2 Features Equipped with 1080p Full HD CMOS sensor to deliver stunning image quality 3 6mm fi...

Page 3: ...98 x2 Weight 540g 1 2lb BA E173 Color Material White Metal Size W x D x H 173 x 111 x 114mm 6 81 x4 37 x4 49 Weight 700g 1 5lb 1 5 Cable Description Power Cable Video Output Cable 1 2 No Name Descript...

Page 4: ...ousing by twisting it counterclockwise and then remove it from the Camera Base Outer Housing Camera Base Camera Body 3 Screw the Camera Base to the surface with the supplied four Screws a If you want...

Page 5: ...ll Camera Base Camera Body 4 Screw back the Outer Housing and adjust the camera angle simultaneously 360 180 180 5 Connect the Power Cable to a 12VDC power source Connect the Video Output Cable to a m...

Page 6: ...to TVI Push the joystick down for 5 sec to switch to CVI Push the joystick left for 5 sec to switch to CVBS Configuring OSD Settings Push the Joystick up down to select among menu items Push the Joys...

Page 7: ...al 0 20 3DNR Auto Manual 0 20 2DNR Auto Manual 0 20 DWDR Close Open Return 5 Video Setting AHD 1080P25 1080P30 720P25 720P30 TVI 1080P25 1080P30 720P25 720P30 CVI 1080P25 1080P30 720P25 720P30 CVBS PA...

Page 8: ...7 Color Red Green Blue Transparency On Off Return Return 8 Version 9 Reset 10 Save Exit 11 Exit...

Reviews: