background image


            EZN268 

37


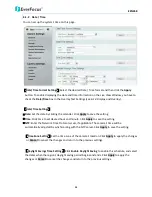
Format

: Select the encoding format – H.264, MJPEG or MPEG4. 

Resolution

: Select the most suitable resolution for your needs. 

Frame Rate

: This function can only be set up in the 

Advanced

 tab. Select from 1 to 30 fps.   

Bit Rate:

 This function can only be set up in the 

Advanced

 tab. If required, select whether you want 

the stream to stream a

 Constant Bit Rate 

or a

 Variable Bit Rate

, and set the values of whichever 

option you choose. 

Click 

Apply

 to apply the changes or 

Cancel

 to cancel the changes and return to the previous settings.


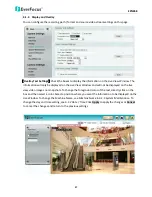
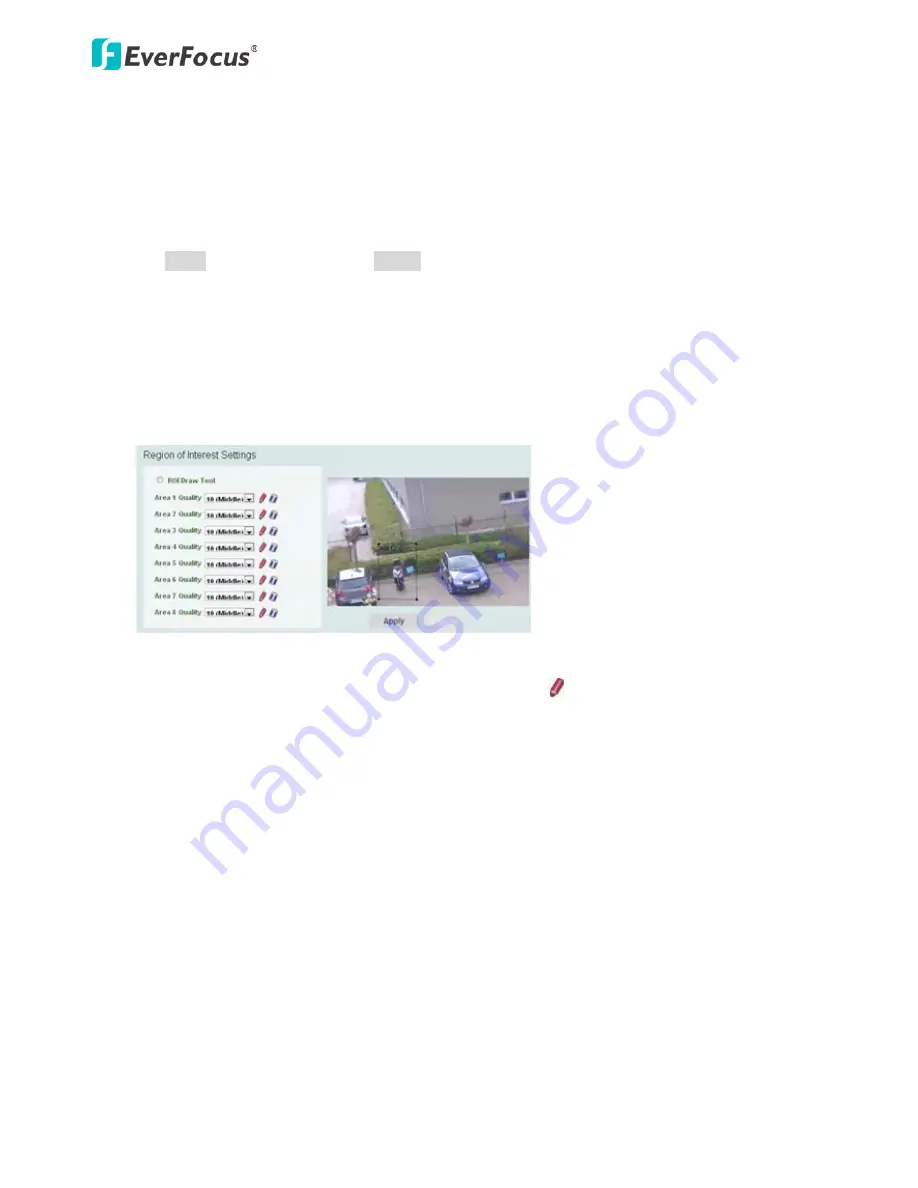
Region of Interest Settings

This function can only be set up in the 

Advanced

 tab. The Region of 

Interest (ROI) function allows users to set up multiple regions within an image with better quality 
and less distortion than the rest of the image. You can also use this function together with the Digital 
Zoom function on the Live View window to get a better image result. Up to eight ROIs can be 
configured in this field. 


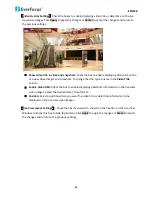
To set up an ROI region: 

1.


Enabled the 

ROI Draw Tool 

and click the 

Draw

 button . 

2.


On the left-side live image, move the cursor to the position where you want the ROI rectangle 
to start and then click. Move the cursor to the position (diagonally opposing corner) where 
you want the ROI rectangle to end and then click. 

3.


Select a quality value for the ROI from the Quality drop-down list. 

4.


Click the 

Apply

 button to apply the settings, or click the 

Cancel

 button to reset without saving 

the settings. 


Summary of Contents for EBN268

Page 1: ...EZN268 Outdoor Mini Bullet Network Camera 2 Megapixel IR WDR User s Manual Copyright EverFocus Electronics Corp Release Date November 2014...

Page 2: ...this manual may be reproduced or transmitted in any form or by any means without written permission of the EverFocus Electronics Corporation EverFocus 12F 1 No 79 Sec 1 Shin Tai Wu Road Hsi Chih New...

Page 3: ...occur in a particular installation If this equipment does cause harmful interference to radio or television reception which can be determined by turning the equipment off and on the user is encourage...

Page 4: ...ent failure electric shock or in extreme cases fire 6 Cleaning For cameras with interchangeable lenses do not touch the surface of the sensor directly with the hands Use lens tissue or a cotton tipped...

Page 5: ...k 12 5 4 Live View Window 14 6 Settings 17 6 1 System Settings 18 6 1 1 Network 18 6 1 2 Date Time 25 6 1 3 Storage 26 6 1 4 Display and Overlay 27 6 1 5 System Maintenance 29 6 1 6 System Information...

Page 6: ...iv 8 Specifications 58 9 Troubleshooting 60 Appendix 63 Enabling the Multicast Function 63...

Page 7: ...eliminating the need for power cables and reducing installation costs EZN268 conforms to ONVIF PSIA for compatibility with other network video devices even from other manufacturers You can also use Ev...

Page 8: ...amera 5 RJ 45 Connector Cable Used to connect to a LAN PoE cable 6 12 VDC Cable Used to connect to the power supply Cable Connection Cable Name Description Power Cable Connects to the 12 VDC power sou...

Page 9: ...tic IR filter operation Multi profiles settings for allows choice of image quality to fit the environment High performance noise filter improves image quality IP66 Weather Resistant Extended IR range...

Page 10: ...the inner stopper Screw Anchor x 3 Sticker x 1 Software CD x 1 Waterproof Ring x 1 Quick Installation Guide x 1 Power Adapter Pigtail x 1 Note 1 Equipment configurations and supplied accessories vary...

Page 11: ...oles on the wall ceiling according to the supplied Sticker and push the supplied three Anchors into the three holes on the wall ceiling 2 Place the camera s base against the anchoring surface so that...

Page 12: ...Rotate the camera by 360 to the desired position and screw the Set Screw until it locks against the Camera Base Tilt Adjustment Loosen the Screw using the provided Hexagon Key and adjust the angle by...

Page 13: ...or on the one end through the Cable Gland and Screw Cap c Place the Waterproof Ring into the LAN PoE cable Connect the RJ 45 cable to the RJ 45 Connector Cable Tightly screw the Cable Gland and Screw...

Page 14: ...wnload Please connect the IP camera in the same LAN of your computer 1 Save IP Utility Setup AutoRun exe in your computer Double click the exe file and follow the on screen instructions Check Run IPUt...

Page 15: ...d model and then click the Log in icon The Log in dialog box appears b Type the Username and Password Click the OK button the Login status displays Note 1 The default user ID is user1 and the default...

Page 16: ...teps below 1 On the computer click Start Control Panel System and Security Action Center click Change User Account Control Settings the User Account Control Settings window appears Adjust the slide ba...

Page 17: ...ield select Prompt In the Include local directory path when uploading files to a server field select Enable Click OK 4 In the Internet Options window click the Advanced tab and then disable Enable mem...

Page 18: ...mera is connected to a router and allows multiple users on and off site to see the IP camera on a LAN WAN Internet The camera must be assigned an IP address that is compatible with its LAN By setting...

Page 19: ...your ISP If you have a dynamic IP address this connection may require that you use DDNS for a reliable connection Please refer to 6 1 1 Network DDNS Settings One to One Connection Directly from PC to...

Page 20: ...Click the Record button to start stop recording the current video stream By default this icon is only for one minute video recording and the recordings will be saved at C EverFocus To change the reco...

Page 21: ...allway corridors and aisles Note To achieve the best 9 16 display effect it s recommended to 1 Install the camera sideways by rotating the camera to the left or right by 90 90 2 Select a 16 9 View Siz...

Page 22: ...fied window Clicking on the magnified image will re center the image around that point 11 Status Display info line that can be placed above video box or at bottom of page This shows the name of the ca...

Page 23: ...are two tabs Basic and Advanced on the left side bar You can set up the basic camera settings in the Basic tab To further set up comprehensive camera settings click the Advanced tab which includes al...

Page 24: ...EZN268 18 6 1 System Settings 6 1 1 Network...

Page 25: ...es used for the other network cameras and PCs with unique IP addresses Static IP The user can manually set the Static IP address This type of address is stable and cannot change but the user has to ma...

Page 26: ...Time To Live TTL value The TTL value specifies the number of routers hops that multicast traffic is permitted to pass through before expiring on the network DDNS Settings This function can only be set...

Page 27: ...often known as Port Forwarding To set up Port Forwarding please consult the manual of the router 2 In certain router models it is possible that you will not be able to access the camera using DDNS whi...

Page 28: ...Property button a pop up window appears to display the details of the certificate 4 To optionally create and install other certificates remove the existing one by clicking the Remove button to erase t...

Page 29: ...button a pop up window appears to display the details of the certificate 4 To optionally create and install other certificates or request remove the existing one by clicking the Remove button to eras...

Page 30: ...Once the certificate has been uploaded this field will show the subject line of the certificate QoS Settings This function can only be set up in the Advanced tab used to set up the priority of packag...

Page 31: ...esired hour and minute Click Apply to save the setting NTP Enter the Network Time Protocol server if applicable The camera s time will be automatically adjusted by synchronizing with the NTP server Cl...

Page 32: ...r When a single recording file exceeds the time you set the system will create a new file to save that data to Enable Overwrite Check the box for overwriting recording snapshot file when the disk stor...

Page 33: ...w and will not be displayed on the live view video images nor snapshots To change the foreground color of the text directly click on the box and then select a color Select a position where you want th...

Page 34: ...hange the title type a name in the Video Title column Enable Video OSD Check the box to enable displaying date time information on the live view video images Select the desired Date Time format Positi...

Page 35: ...l be visible in the Machine Name field of the IP Utility software which is included in the software CD or from the Website of EverFocus click here to download Please refer to 5 Accessing the User Inte...

Page 36: ...ced tab This button should be used with caution Clicking this button will return all of the camera s settings including the IP address to the factory default values The camera will then have to be rec...

Page 37: ...ss all event recording actions will be stopped Event recording actions will resume after the camera is rebooted 3 If the File Error Please re login warning message appears when upgrading the firmware...

Page 38: ...08 represents the camera has been powered on for 3 hours and 8 minutes System Log Displayed the sequence number date time and event messages of the log event The log will display the last 256 log eve...

Page 39: ...ccount name password and description Select an authority level for the user account The deault setting is Supervisor when using user1 account to log in Administrator The only difference between a supe...

Page 40: ...of access which only allows the user access to the live view page 3 Select Active or Disable to active or disable the user account 4 Click the Edit button to save the changes The button is only activa...

Page 41: ...ion is only relevant if you ve set up at least one Deny item configured with Network or Range network rule from the Rule drop down list Rule Select a network rule and then fill in the IP information i...

Page 42: ...treams the user can set the compression format resolution bit rate and frame rate individually Stream 1 is always enabled for live view To enable disable Stream1 or Stream2 check the Enable Stream 1 E...

Page 43: ...ion of Interest ROI function allows users to set up multiple regions within an image with better quality and less distortion than the rest of the image You can also use this function together with the...

Page 44: ...lored rectangles on the screen or select B W to make the masks appear as gray rectangles on the screen 3 Select a color if you select Color from the color drop down list Select a level of grayness if...

Page 45: ...tings You can further configure the camera settings on the Camera setup page if required Note that selecting the Standard mode will lock grayed out some Camera Settings on the Camera setup page such a...

Page 46: ...e that selecting the Standard mode will lock grayed out some Camera Settings on the Camera setup page such as Exposure Settings AE Noise Reduction Settings and Monitor Settings More Detail Select More...

Page 47: ...n Day mode color images with IR LED off even in nighttime Night Select to keep the camera in Night mode black and white images with IR LED on even in daytime Schedule Select to let the camera to switc...

Page 48: ...2 Profile This setting is used to adapt to the amount or type of light used by the camera Click Apply to apply the changes or Cancel to cancel the changes and return to the previous settings Mode Sele...

Page 49: ...vel the more the reduction 2D DNR Select Manual to enable the 2D DNR function and use the slide bar to set up the level The greater the value the more the reduction Select Auto for the system to autom...

Page 50: ...n the Camera setup page Select Night and then move the cursor on the desired time square click and drag the cursor over the time squares to configure them to the Night mode green color Select Day and...

Page 51: ...Sharpness for daytime or nighttime IR Smart Settings Select ON and set up the level to enhance the image quality when the images are over exposure This function is useful when the camera is in the Ni...

Page 52: ...e Push Select to enable the Push button next to the Mode drop down field This will allow you to force the camera to readjust the white balance every time you push the Push button The lens will hold th...

Page 53: ...nt to automatically notify the users when an event occurs You can also set up a schedule to automatically record the videos when an event occurs 6 3 1 Event Wizard The Event Wizard allows users to eas...

Page 54: ...EZN268 48 6 3 2 Event This function can only be set up in the Advanced tab Except the Event Wizard you can also configure the event settings along with the Recording Schedule on this page...

Page 55: ...ing Detection trigger events only one event under this trigger type can be enabled The option of Enable This Event for the rest of two Tampering Detection events will be grayed out and display This Tr...

Page 56: ...he duration for the buffer This will determine the amount of footage length of time before the event trigger moment that will be included in an event triggered video recording if that buffer and video...

Page 57: ...ser This function can also be linked with correctly configured Events to trigger Event reactions like the activation of video recording periods snapshots etc To set up the Motion area 1 Check the Enab...

Page 58: ...EZN268 52 6 3 3 Notification This function can only be set up in the Advanced tab...

Page 59: ...er when an event message is received Attach Image Check the box if you want to attach an image when events occur SSL Connection Check the box to enable the SSL function Enable this function means you...

Page 60: ...to apply the changes or Cancel to cancel the changes and return to the previous settings Network Alarm Settings This function works with EverFocus CMS software The camera can send a network alarm sign...

Page 61: ...camera live view or take a snapshot via your smart phone This page is designed for users to download the mobile app to your mobile phone by scanning the QR code MobileFocus for iPhone MobileFocusPlus...

Page 62: ...exe in your computer Double click the exe file and follow the on screen instructions Check Run IPUtility exe and click the Finish button the IP Utility will be launched to search the IP devices connec...

Page 63: ...Up to 10 cameras can be simultaneously upgraded to the latest firmware If you connect the cameras to a PoE switch please make sure the Power Consumption of the PoE switch is sufficient 4 Click the Up...

Page 64: ...ns 3 6mm 6mm Aperture Ratio F1 4 Day Night Yes with removable IR cut filter IR Distance 30 m 98 4 ft IR LED Quantity 30 Video Video Compression H 264 MJPEG MPEG4 optional Resolution NTSC 1920 x 1080 1...

Page 65: ...Connector Power 12 VDC PoE Ethernet RJ 45 General Power Source 12 VDC PoE IEEE802 3af Max Power Consumption 6W Max Operating Temperature 10 C 50 C 14 F 122 F Humidity 20 80 no condensation Safety CE...

Page 66: ...When these error messages pop up follow the steps below to fix the problem 1 To enter the Registry Editor of your computer Click Start and type regedit in the Search Program and Files field 2 Click t...

Page 67: ...pAlive Timeout Dword by following the path HKEY_CURRENT_USER Sofware Microsoft Windows CurrentVersion Internet Settings 4 Double click KeepAlive Timeout and this window appears 5 Change the Value data...

Page 68: ...For Microsoft IE10 and above users you may have the above error message pop up when you click the Snapshot button on the Live View window You can simply solve this problem by setting up your Microsoft...

Page 69: ...ticast Function is a technique for one to many communication over an IP infrastructure in a network that is designed to share IP camera loading and reduce network bandwidth Note that for this function...

Page 70: ...nd Wireshark to download 3 Access to the Web UI of the IP camera to enable the Multicast function Click the Apply button to save the setting Advanced tab Network Multicast Settings Enable Multicast 4...

Page 71: ...focus co jp info everfocus co jp EverFocus China Shanghai Room 403 Ruijin Business Center No 96 Zhaojiabang Road Luwan district Shanghai 200020 China TEL 86 21 6471 2229 6471 2291 FAX 86 21 6471 0566...

Reviews: