background image


EverFocus Electronics Corp. 


EverFocus Taiwan: 
12F-1, No.79, Sec. 1, Shin-Tai Wu Road, 
Hsi-Chih, New Taipei City, Taiwan 
TEL: +886 2 2698 2334 
FAX: +886 2 2698 3943 
www.everfocus.com.tw 

marketing@everfocus.com.tw


EverFocus Europe - Germany: 
Albert-Einstein-Strasse 1, D-46446   
Emmerich, Germany 
TEL: +49 2822 93940 
FAX: +49 2822 939495 
www.everfocus.de 

sales@everfocus.de


EverFocus China - Beijing: 
Room 609, Technology Trade Building,   
Shangdi Information Industry Base,   
Haidian District, Beijing 100085, China 
TEL: +86 10 6297 3336~39 
FAX: +86 10 6297 1423 
www.everfocus.com.cn 

marketing@everfocus.com.cn


EverFocus China - Shenzhen: 
3F,Building 7,Longcheng Industrial 
Park,No.440,Longguan Road, Dalang Street, 
Longhua, Shenzhen, Guangdong, China 
TEL: +86 755 2765 1313   
FAX: +86 755 2765 0337   
www.everfocus.com.cn 

marketing@everfocus.com.cn


EverFocus USA - California: 
1801 Highland Avenue, Unit A, Duarte,   
CA 91010, USA 
TEL: +1 626 844 8888 
FAX: +1 626 844 8838 
www.everfocus.com 

sales@everfocus.com


EverFocus Japan: 
3F, Kuramochi, Building II 
2-2-3 Koto-Bashi, Sumida-Ku, 
Tokyo, 130-0022, Japan 
TEL: +81 3 5625 8188 
FAX: +81 3 5625 8189 
www.everfocus.co.jp 

info@everfocus.co.jp


Your EverFocus product is designed 

and manufactured with high quality 

materials and components which can 

be recycled and reused. 

This symbol means that electrical and 

electronic equipment, at their 

end-of-life, should be disposed of


separately from your household waste. 

Please, dispose of this equipment at 

your local community waste 

collection/recycling centre. 

In the European Union there are 

separate collection systems for used 

electrical and electronic product. 

Please, help us to conserve the 

environment we live in!


Ihr EverFocus Produkt wurde entwickelt 

und hergestellt mit qualitativ 

hochwertigen Materialien und 

Komponenten, die recycelt und wieder 

verwendet werden können. 

Dieses Symbol bedeutet, dass 

elektrische und elektronische Geräte am 

Ende ihrer Nutzungsdauer vom 

Hausmüll getrennt entsorgt werden 

sollen. 

Bitte entsorgen Sie dieses Gerät bei 

Ihrer örtlichen kommunalen 

Sammelstelle oder im Recycling Centre. 

Helfen Sie uns bitte, die Umwelt zu 

erhalten, in der wir leben


Summary of Contents for EBN288

Page 1: ...68M 468M EMN468W EZN288 368 468 EMN468 EZN288M 368M 468M Copyright EverFocus Electronics Corp Release Date November 2017 All the images including product pictures or screen shots in this document are...

Page 2: ...tibility List http www everfocus com tw 5 Reset Button Press the button to restore the camera to factory default EMN468 EMN468W 1 2 3 4 6 2 3 4 6 5 No Item Name Descriptions 1 Light Sensor Detects lig...

Page 3: ...ghts 4 Lens Fixed lens 5 Reset Button Press the button to restore the camera to factory default 6 Micro SD SDHC SDXC Slot Insert a micro SD SDHC SDXC card Please go to the web page of the IP camera to...

Page 4: ...Value IP 288 368 468 Series 3 Dimensions EBN288 368 468 EDN288M 368M 468M EMN468 468W...

Page 5: ...ts Before installing please check that your computer meets the following system requirements Operating System Microsoft Windows XP Vista 32 bit 7 32 bit Microsoft Internet Explorer 11 or later Chrome...

Page 6: ...1 x 1 7 Set Screw x 3 8 Power Pigtail Cable x 1 x 1 x 1 x 1 x 1 9 Accessories Instruction for installation of Set Screw x 1 10 Software CD x 1 x 1 x 1 x 1 x 1 11 Quick Installation Guide x 1 x 1 x 1 x...

Page 7: ...built in amplifier and external power supply are required 12VDC Input LAN PoE Cable Audio Input TRS Line in Red Audio Output TRS Line out White Alarm Input Black Reset Button Alarm Output RS 485 Red V...

Page 8: ...TRS Connector Left Channel Tip Right Channel Ring Ground Sleeve To activate the Audio function the Complex Stream must be selected See Stream in 7 2 1 2 Streaming Settings Pin Assignment Alarm Output...

Page 9: ...e position for installation Drill four holes on the wall ceiling according to the supplied Sticker and push the supplied four Screw Anchors into the four holes on the wall ceiling Drill another hole i...

Page 10: ...the supplied four Screws to screw the camera base to the ceiling wall 6 Adjust the camera angle and twist back the Outer Housing simultaneously 7 Optionally screw back the Set Screw by using the suppl...

Page 11: ...o the 12VDC power source using the supplied Power Adapter Pigtail or a power adapter Power Adapter Pigtail Power Cable RJ 45 Connector or Power Adapter EDN288M 368M 468M 1 Before screwing the camera t...

Page 12: ...nserting a micro SD Card 4 Connect the LAN PoE cable to the camera a Remove the Screw Cap from the Cable Gland b Insert a RJ 45 network cable without the RJ 45 connector on the one end through the Cab...

Page 13: ...ing a video Test Out cable to connect a monitor to the camera for setting image aim and focus 7 To adjust camera angles Pan Adjustment Simply turn left right of the 3 Axis bracket by 75 to the desired...

Page 14: ...to the supplied Sticker drill three holes on the surface and optionally drill a through out hole for wiring the camera cables Push the supplied three Screw Anchors into the three holes on the surface...

Page 15: ...Cable Tightly screw the Cable Gland and Screw Cap to the RJ 45 Connector Cable 4 Optionally connect the camera to the 12VDC power source using the supplied Power Adapter Pigtail or a power adapter Po...

Page 16: ...mera EZN288 368 468 EZN288M 368M 468M 1 Before screwing the camera to the wall stick the Sticker on the wall ceiling to mark the screw position Drill three EZN288 368 468 or four EZN288M 368M 468M hol...

Page 17: ...the supplied Screws 4 Optionally insert a micro SD SDHC SDXC card into the card slot Please refer to 3 2 Inserting a micro SD Card 5 Connect the LAN PoE cable to the camera a Remove the Screw Cap fro...

Page 18: ...live view See 5 Accessing the Camera Or connect a handheld test monitor to the CVBS wire on the Cable Assembly for adjusting viewing angles 8 To adjust the camera angles Pan Adjustment Loosen the Set...

Page 19: ...8M 468M Note 1 Before start operating the IP camera please make sure the camera date and time are correct To configure the camera date time go to System Date Time setting page on Web UI 2 By default t...

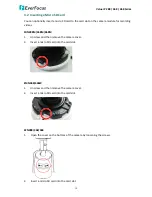
Page 20: ...cording videos EDN288M 368M 468M 1 Unscrew and then remove the camera cover 2 Insert a micro SD card into the card slot EMN468 468W 1 Unscrew and then remove the camera cover 2 Insert a micro SD card...

Page 21: ...8 468 Series 20 EZN288M 368M 468M 1 Loosen the two set screws on the bracket Set Screw 2 Loosen the three screws on the rear housing Rotate and then remove the rear housing 3 Loosen the four screws on...

Page 22: ...ing Place the desiccant bag beside the IPC board Water proof ring Desiccant bag 6 Screw back the IPC board secure the rear housing back to the front housing and tighten the set screws on the bracket N...

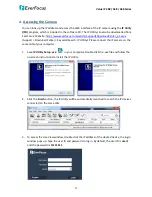
Page 23: ...ord Search IP Utility Please connect the IP camera on the same LAN of your computer 1 Save IP Utility Setup exe in your computer Double click the exe file and follow the on screen instructions to inst...

Page 24: ...168 0 10 5 To optionally configure the Machine Name IP Address IP Type or Port Number using the IPU a Log in the camera by checking the desired model and then click the Log in icon The Log in dialog b...

Page 25: ...e drop down list and set up the desired IP Address for example 192 168 31 67 Please also set up the Subnet Mask and Gateway Click the Apply Changes button to apply and save the settings 1 2 3 To show...

Page 26: ...u can connect directly without using a switch router or modem However only the PC connected to the camera will be able to view the IP camera You will also have to manually assign a compatible IP addre...

Page 27: ...Utility can also be downloaded from EverFocus Website http www everfocus com tw HQ Support DownloadCenter_p1 aspx Support Download Center Keyword Search IP Utility Please connect the IP camera on the...

Page 28: ...u will be able to log in several cameras at once 3 Up to 10 cameras can be simultaneously upgraded to the latest firmware If you connect the cameras to a PoE switch please make sure the Power Consumpt...

Page 29: ...EverFocus Japan 3F Kuramochi Building II 2 2 3 Koto Bashi Sumida Ku Tokyo 130 0022 Japan TEL 81 3 5625 8188 FAX 81 3 5625 8189 www everfocus co jp info everfocus co jp Your EverFocus product is design...

Reviews: