Stainless Steel 2MP/3MP/4MP Network Cameras
5
4.
Installation
Please refer to the steps below to mount the IP cameras.
EDN288MS / EDN368MS / EDN468MS:
1.
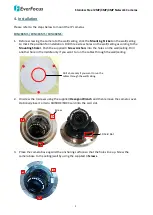
Before screwing the camera to the wall/ceiling, stick the Mounting Sticker on the wall/ceiling
to mark the position for installation. Drill three screw holes on the wall/ceiling according to the
Mounting Sticker. Push the supplied 3 Screw Anchors into the holes on the wall/ceiling. Drill
another hole in the middle only if you want to run the cables through the wall/ceiling.
Drill a hole only if you want to run the
cables through the wall/ceiling.
2.
Unscrew the 3 screws using the supplied Hexagon Wrench and then remove the camera cover.
Optionally insert a micro SD/SDHC/SDXC card into the card slot.
SD Card Slot
Screw
3.
Place the camera base against the anchoring surface so that the holes line up. Screw the
camera base to the ceiling/wall by using the supplied 3 Screws.


