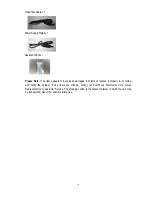
background image

1.4 Dimensions 

 
123mm x 107.8mm ; 4.8” x 4.2” 


Ø 5.143mm//0.2” 
Ø 94.7mm/3.78” 


- 6 - 

Summary of Contents for EHH5200

Page 1: ...equipment failure or other damage 3 Try and avoid facing the camera toward the sun In some circumstances direct sunlight may cause permanent damage to the sensor and or internal circuits 4 Keep the po...

Page 2: ...ing Camera 10 3 1 1 Drill the Holes 10 3 1 2 Mounting 11 3 2 Adjusting Camera 13 3 2 1 Adjusting Camera Position 13 3 2 2 Adjusting Zoom and Focus 14 3 2 3 Camera Setting 15 3 2 3 1 OSD User Setup Men...

Page 3: ...ht 21 4 4 Special 21 4 4 1 Resolution 21 4 4 2 Camera Title 21 4 4 3 D Effect 22 4 4 4 TV standard 22 4 4 5 Language 22 4 4 6 Default 23 4 5 Image Adjust 23 4 5 1 Sharpness 23 4 5 2 Brightness 23 4 5...

Page 4: ...focal 3 3 12mm megapixel auto iris lens the EHH5200 delivers flexible robust coverage in a wide range of demanding surveillance environments while delivering stunning HD image quality 1 1 Main Featur...

Page 5: ...been damaged in shipment replace it properly in its carton and notify the shipper If any items are missing notify your EverFocus Electronics Corp Sales Representative or Customer Service The shipping...

Page 6: ...utter Auto 1 60 1 50 1 8000 Lens Type Vari focal lens Auto Iris f 3 3 12mm F 1 4 True Day Night Control Yes Auto IR cut filter removal Back Light Comp On Off selectable Auto Gain Control High Middle L...

Page 7: ...1 4 Dimensions 123mm x 107 8mm 4 8 x 4 2 5 143mm 0 2 94 7mm 3 78 6...

Page 8: ...2 NAMES AND FUNCTIONS OF PARTS 2 1 Camera Component Description Exterior view Base Outer Cover ring Rotatable cover 2 Front And Back Panel Layout ront Panel Layout 2 F 7 3 1 4 2...

Page 9: ...knob and turn the ring toward F or N as 5 T t Video Output Connector can use this video connector to connect a portable monitor This will External Light Sensor External Light sensor i is down when th...

Page 10: ...properly installed and sealed the dome is IP66 rated against water infiltration OSD Menu joystick Use the joystick to move the curso select the item to be set Tilt the stick to the right or Press in o...

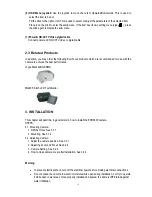
Page 11: ...e on the ceiling or wall 2 Drill 4 holes 1 for the power video cable 3 for screws A B and C 1 Paste the drilling Installation sticker Screw hole A Screw hole C Screw hole B Power Video Cable Camera ba...

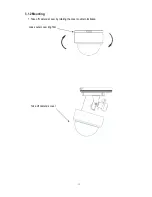
Page 12: ...11 3 1 2 Mounting 1 Ta f camera s cover by rotating the cover counter clockwise ke of Loose outer cover ring first Take off camera s cover...

Page 13: ...d to the power and video cables from the ceiling or wall 3 Fix the camera base to ceiling or wall by using 3 screws and washers The washers are used to create the IP66 seal and must be used Ceiling Mo...

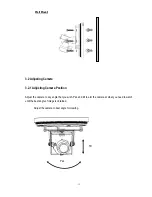
Page 14: ...3 2 1 Adjusting Camera Po Adjust the camera to any angle that camera at what you need to watch until the best angle of image is obtained Adjust the camera to best angle for viewing sition you wish Pan...

Page 15: ...l it completely covers the whole red gasket and line up with camera base parallel The inner cover need to be aligned with camera base otherwise it cannot be closed Then close the outer cover ring tigh...

Page 16: ...creen Display OSD user setup menu Please refer to Chapter 3 OSD Menu Configuration to get more details about OSD menu usage 3 2 4 Close the Camera Cover after installation is complete The EHH5200 is s...

Page 17: ...ens is not aligned with the window loosen the outer cover adjust the inner cover so that the lens aimed exactly at the window Slightly adjust the cover 4 Tighten the outer cover ring until it is firml...

Page 18: ...the joystick or to move the cursor up or down Angle the joystick or to adjust the mode or value of a setting III Switching to sub menu screens When an item with sub menu is selected press inward on t...

Page 19: ...Off 50Hz 60Hz Return Auto WB One push WB Red 0 100 Manual Blue 0 100 White Balance Return Indoor Outdoor Return Auto Color Day Night Black White Return 720p60Hz 720p50Hz Resolution 1080i60Hz 1080i50H...

Page 20: ...camera settings including Exposure White balance Day Night Special and Image adjust Please select the item by moving the joystick UP or DOWN then press SET to enter the settings Move the joystick to t...

Page 21: ...d by fluorescent light when manual lens is used 4 2 White Balance Control The screen color can be adjusted by using the White Balance function Please select one of the 5 modes below by moving the joys...

Page 22: ...uding Resolution Camera Title D Effect TV Out Language and Default Please select the item by moving the joystick UP or DOWN then press SET to enter the settings Select Return to return to the previous...

Page 23: ...light areas appear dark and vice versa A negative color image is additionally color reversed with red areas appearing cyan greens appearing magenta and blues appearing yellow 4 4 3 3 Test Pattern Sel...

Page 24: ...the joystick LEFT or RIGHT The contour of the video image becomes cleaner and more easily distinguished as the level of Sharpness increases If the level is set too high it may affect the video image...

Page 25: ...ww everfocus co jp info everfocus co jp EverFocus Europe UK Unit 12 Spitfire Business Park Hawker Road Croydon Surrey CR0 4WD UK TEL 44 20 8649 9757 44 845 430 9999 FAX 44 20 8649 9907 www everfocusuk...

Reviews: