Value IP Series Network Cameras – H265, 2MP / 5MP / 8MP
7
3
Installation
3.1
EHN Series
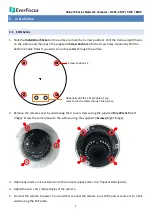
1.
Stick the
Installation
Sticker
on the surface to mark the 4 screw positions. Drill the 4 screw-depth holes
on the surface and then push the supplied 4
Screw Anchors
into the screw holes. Optionally drill the
bottom 2 Cable Holes if you want to run the cables through the surface.
+
+
+
+
+
+
Screw Position x 4
Optionally drill the 2 Cable Holes if you
want to run the cables through the surface.
2.
Remove the camera cover by unscrewing the 3 cover screws using the supplied
Torx Wrench
(Left
Image). Screw the camera base to the surface using the supplied 4
Screws
(Right Image).
3.
Optionally insert a micro SD card into the card slot (please refer to
2. Physical Description
).
4.
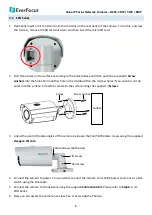
Adjust the pan / tilt / rotate angles of the camera.
5.
Connect the camera to power. You can either connect the camera to a 12VDC power source or to a PoE
switch using the PoE cable.


