background image


10.


  Before screwing back the camera cover, remove the 2 Desiccant Bags


from the inner 

side of the Camera Cover and replace them with the supplied 

Desiccant Bag

. Screw the 

camera cover back to the camera. 

Remove the 2 Desiccant Bags

Note: Please screw back the 

Camera Cover immediately 

after replacing the Desiccant 

Bag to reduce the absorption 

capacity of the Desiccant Bag 

inside the camera body. 


11.


  Screw back the Camera Cover, and the installation is complete. 


4.


Accessing the Camera 

You can look up the IP address of the IP camera using the 

IP Utility (IPU) 

program. You can 

download the IP Utility from 

EverFocus website

 (key word search: "IP Utility"). 

The default network is DHCP. However, if there is no dynamic IP address assigned to the 
device, its IP will switch to 192.168.0.10. By default, the ID is 

admin

 and there is no 

password. Please input a password for the first-time login. 


Summary of Contents for EMN2560

Page 1: ...cluding product pictures or screen shots in this document are for example only The images may vary depending on the product and software version Information contained in this document is subject to ch...

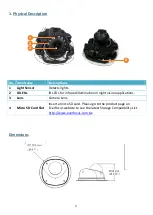
Page 2: ...ts lights 2 IR LEDs IR LEDs for infrared illumination in night vision applications 3 Lens Camera Lens 4 Micro SD Card Slot Insert a micro SD card Please go to the product page on EverFocus website to...

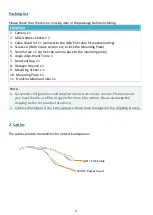
Page 3: ...Angle Adjustment Tool x 1 7 Desiccant Bag x 1 8 Hexagon Wrench x 1 9 Mounting Sticker x 1 10 Mounting Plate x 1 11 Quick Installation Guide x 1 Note 1 Equipment configurations and supplied accessorie...

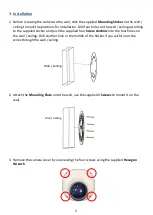
Page 4: ...supplied sticker and push the supplied four Screw Anchors into the four holes on the wall ceiling Drill another hole in the middle of the Sticker if you wish to run the wires through the wall ceiling...

Page 5: ...om the side cut b Use the supplied 2 Small Screws to lock the camera module to the Mounting Plate Camera Module Mounting Plate 5 Connect the camera to power You can either connect the camera to a 12VD...

Page 6: ...range Green with white stripe Blue Blue with white stripe Green Brown with white stripe Brown 7 Optionally insert a micro SD card into the card slot please refer to 1 Physical Description 8 Access the...

Page 7: ...tion capacity of the Desiccant Bag inside the camera body 11 Screw back the Camera Cover and the installation is complete 4 Accessing the Camera You can look up the IP address of the IP camera using t...

Reviews: