background image


EPN5230 / EPN5210 

54 


7.4.3.


Motion Detection 

You can set up the areas to detect motion along with the schedules to active the alarm functions on 
this page. When a motion is detected by the camera, the 

Event

 icon on the Live View window will turns 

to a motion detection icon 

  to alert the user. 


7.4.3.1.


Motion Detect 

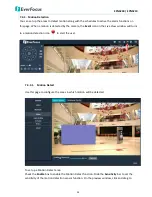
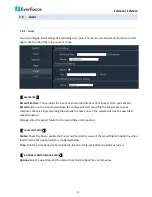
Use this page to configure the areas in which motion will be detected. 


To set up a Motion Detect area: 
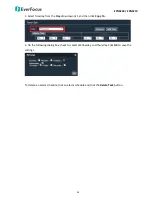
Check the 

Enable

 box to enable the Motion Detect function. Slide the 

Sensitivity

 bar to set the 

sensitivity of the motion detection sensor function. On the preview window, click and drag to 

Summary of Contents for EPN5210

Page 1: ...EPN Series IR Network Speed Dome 30x 10x Optical Zoom IP66 EPN5230 EPN5210 User s Manual EPN5230 EPN5210 Copyright EverFocus Electronics Corp Release Date January 2017...

Page 2: ...sion Information contained in this document is subject to change without notice Copyright All rights reserved No part of the contents of this manual may be reproduced or transmitted in any form or by...

Page 3: ...cur in a particular installation If this equipment does cause harmful interference to radio or television reception which can be determined by turning the equipment off and on the user is encouraged t...

Page 4: ...in equipment failure electric shock or in extreme cases fire 6 Cleaning For cameras with interchangeable lenses do not touch the surface of the sensor directly with the hands Use lens tissue or a cott...

Page 5: ...hecking the Dynamic IP Address 13 5 2 Settings for Microsoft Internet Explorer 15 5 3 Connecting the Camera to the Network 16 5 4 Live View Window 18 5 4 1 Image Setting 22 5 4 2 PTZ Setting 24 6 Play...

Page 6: ...g 44 7 2 5 Image Setting 45 7 3 Network 46 7 3 1 Ethernet 46 7 3 2 DDNS 47 7 3 3 Port Setting 49 7 3 4 Other PROT 50 7 4 Alarm 51 7 4 1 Alarm Setting 51 7 4 2 IO Alarm 52 7 4 3 Motion Detection 54 7 4...

Page 7: ...e intensity of illumination can vary excessively The DNR Digital Noise Reduction function is designed for reducing the noises in the images allowing the camera to better distinguish between real motio...

Page 8: ...lly switch the IR LEDs from the near distance lights to the far distance lights based on the zoom ratio EPN5230 1x Zoom 2x 3x Zoom 4x 9x Zoom 10x 30x Zoom 2 Near distance IR LEDs 2 Near distance IR LE...

Page 9: ...g on scene IR reflectivity Low luminance for better image quality at night Motion Detection Wide Dynamic Range WDR Dynamic Noise Reduction DNR From super slow to very fast pan tilt speed EPN5210 0 1 s...

Page 10: ...C power plug to 2 pin screw terminal EPN5230 4 screws for installing the Enhanced optional Enhanced Wall Mount Bracket 4 anchors for installing the Enhanced optional Enhanced Wall Mount Bracket 4 wash...

Page 11: ...agents for more information Indoor Ceiling Pendant Mount Wall Mount Keyboard EPTZ CLM Indoor Ceiling Pendant Mount Bracket EPTZ WMB Enhanced Wall Mount Bracket EKB200 USB controller keyboard 4 3 Cabl...

Page 12: ...racket to install the camera against the wall Note You can also install the camera against the ceiling using a ceiling pendant mount bracket See 4 2 Optional Accessory To acquire the ceiling pending m...

Page 13: ...lace a new desiccant bag place the spare or self prepared desiccant bag in the same location as image below Note There is a desiccant bag placed inside the camera bottom module The desiccant bag loses...

Page 14: ...e wear the supplied gloves before installing the micro SD card 2 Unscrew the two screws inside the camera housing twist the outer ring counterclockwise and then lift up to remove the outer ring from t...

Page 15: ...onal If you want to replace new desiccant bags place the spare or self prepared desiccant bags in the same location as image below Note There are two desiccant bags placed inside the camera bottom mod...

Page 16: ...tionally drill a second through wall hole to separate cable feeding 3 Attach the waterproof silicon pad to the bracket base plate for waterproofing 4 Optionally insert the supplied Anchors inside the...

Page 17: ...racket base plate 9 Screw the Enhanced Wall mount bracket to the wall using the supplied Screws For EPN5230 you can place the supplied Washers between the Screws and the Enhanced Wall Mount Bracket Wa...

Page 18: ...able Gland and Screw Cap c Place the Waterproof Ring into the LAN PoE cable Connect the RJ 45 cable to the RJ 45 Connector Cable Tightly screw the Cable Gland and Screw Cap to the RJ 45 Connector Cabl...

Page 19: ...CD or you can download it from EverFocus Website http www everfocus com tw HQ Support DownloadCenter_p1 aspx Support Download Center Keyword Search IP Utility Please connect the IP Camera in the same...

Page 20: ...ton on the top right corner of the login window 6 Type the user name and password on the login window By default the user ID is user1 and the password is 11111111 Click Login the live view window appe...

Page 21: ...Please follow the steps below 1 Open the Internet Explore click Tools Internet Options Security Tab Custom Level the Security Settings windows appears 2 In the Download signed ActiveX controls field s...

Page 22: ...ase refer to 7 3 2 DDNS High speed modem Internet Straight through LAN patch cable Router Cat 5 Straight Through Cable Left Pinout of a straight through cable Direct High Speed Connection In a Direct...

Page 23: ...nly the PC connected to the camera will be able to view the IP camera You will also have to manually assign a compatible IP address to both the computer and the IP camera Unless the PC has another net...

Page 24: ...the model name To change the storage path go to Setting Local Local see 7 5 1 Local You can play back the recordings using any MP4 players or use the built in player through the UI interface see 6 Pl...

Page 25: ...r configuring the related settings in the PTZ Setting field see 5 4 2 PTZ Setting you can use the quick buttons including Quick Preset Quick Auto Pan and Quick Tour to activate the functions easily an...

Page 26: ...nal power supply are required 13 Microphone Slide the bar to adjust the microphone volume Note for this function to work microphones with a built in amplifier and external power supply are required 14...

Page 27: ...the mouse and click Exit or press the ESC button on keyboard 16 Snapshot Click to take a snapshot of the current live stream By default the snapshots will be stored in C Everfocus EPN5xxx where 5xxx i...

Page 28: ...tically BLC Check uncheck the box to enable disable the Backlight Compensation function Low Lux Check uncheck the box to enable disable the low lux function WDR Check uncheck the box to enable disable...

Page 29: ...Save button to save the settings For Auto Exposure mode you can further configure the Max Shutter Min Shutter and Max Gain values yourself in the fields below this field Max Shutter Select a max shutt...

Page 30: ...ction such as preset or pattern will be activated To set up the PTZ Watch function input an idle time select a function from the drop down If Preset Tour or Pattern is selected select a number from th...

Page 31: ...lick the button and a Message window pops up Select the desired preset number and then input a dwell time in the Delay Time column for the camera to pause at a preset position Click the Add button thi...

Page 32: ...he recordings 1 Click on the Start End column to bring up the calendar and then select a start end date Key in the desired time for the date 2 Select a source of recordings from the Record Type drop d...

Page 33: ...ordings stored in the computer And the selected recording will be played back directly on the screen 2 To pause playback click the pause button To switch the playback speed between 1X to 32X click the...

Page 34: ...the Live View Window click the Setting button to enter the setting page and a menu bar appears on the left side of the window Enter each field to configure the settings Click the Live Video button ca...

Page 35: ...set reboot the camera and upgrade firmware 7 1 1 1 System Info You can set up the device name and check system information using this page Device Name If required enter a new name for the device This...

Page 36: ...mport parameters Press the Browse button to load a previously saved parameter log file and then click the Parameter import button The system s settings will be restored to the saved configuration Plea...

Page 37: ...eviously prepared firmware file Click OK to install the new firmware Please be noted that you may need to restart the browser after upgrading firmware Click the Save button on the bottom right to save...

Page 38: ...Exception Operation and Information 2 Click on the Start End Time column to bring up the calendar and then select a start end date and time 3 Click the Query button the search result will be displayed...

Page 39: ...3 Select an authority level for the user account from the User Group drop down list Admin Admin Account can edit all accounts and their password Operate User Operate User Account can only edit their o...

Page 40: ...Type the password again in the Confirm password field 3 Click Modify to save all the settings 4 Click the Save button on the bottom right to save the settings To delete a user account 1 Highlight a u...

Page 41: ...camera s baud rate transmission speed Protocol select the communication protocol Click the Save button on the bottom right to save the settings 7 1 3 2 Schedule Task Use this page to configure a sche...

Page 42: ...bottom right to save the settings You can also use the Copy To function to copy the PTZ schedule of current day to the other day For example if you want to copy the PTZ schedule of Tuesday to Wednesd...

Page 43: ...file from 1 to 15 minute s in the File Size field Once you click the Record button on the Live View window the camera will start recording the live stream to your computer When a single recording fil...

Page 44: ...oad snapshot or record files to the FTP server 1 Click on the Start End column to bring up the calendar and then select a start end date 2 Select to upload snapshot or record in the File Type field 3...

Page 45: ...me zone of the camera s location NTP Server Enter the Network Time Protocol server if applicable The camera s time will be automatically adjusted by synchronizing with the NTP server Check the Auto co...

Page 46: ...ty or format the SD Card using this page SD Card Status SD Card Usage This shows you the memory capacity of the card and how much card memory has been used Format Click this button to format the card...

Page 47: ...quality and resolution of the streams but keep the frame rate at its maximum Resolution Select the most suitable resolution for your needs Frame Rate Enter the desired frame rate from 1 to 30 fps Qual...

Page 48: ...m the drop down list To change the day and time setting see 7 1 5 Time Zone Name Enter the desired channel name in the input field and check the box to display the name Text1 Text5 Enter the desired t...

Page 49: ...Mask Check the Enable box to enable the Privacy Mask function On the preview window click and drag to draw the desired Privacy Mask area the area will be marked in purple You can also operate the up d...

Page 50: ...us zoom AF Sensitivity Enter the AF sensitivity value from 1 to 255 AF Area Select Select the Auto Focus area from All Region Focus or Center Focus AF Search Mode Select the Auto Focus search mode fro...

Page 51: ...Format Select a video format 50Hz for PAL and 60Hz for NTSC EV Level Select an exposure level from the drop down list Exposure Mode Select Auto or Manual from the drop down list For Auto Exposure mode...

Page 52: ...the DNS server if this is provided by an ISP Ethernet Setting IP When DHCP is not used the user needs to manually enter the IP address of the camera Do not enter an IP address that is already used for...

Page 53: ...the dynamic IP address of a network device You can set up the DDNS service for remote access to the IP camera DDNS assigns a domain name URL to the IP camera so that the user does not need to go throu...

Page 54: ...Please refer to the specific DDNS company s website for further information Device domain name Type the registered domain name from the DDNS server provider Username Password Type the login account o...

Page 55: ...ge notifications from the camera to predefined addresses via SMTP Note that to enable e mail notification function you have to check the Email box on Alarm IO Alarm see 7 4 2 IO Alarm and Alarm Motion...

Page 56: ...hat to enable uploading recordings to the FTP server function you have to check the FTP Upload box on Alarm IO Alarm see 7 4 2 IO Alarm and Alarm Motion Parameter Config pages see 7 4 3 2 Parameter Co...

Page 57: ...e e mail address or the FTP server using this page Record Time Enter the alarm video record time from 10 to 30 seconds Snapshot Select the snapshot number and frequency from 1 to 10 second s For examp...

Page 58: ...uding Preset ID IO Output Snap Record Activate Level Email and FTP Upload Preset ID Check the box to enable the Preset function for the alarm in channel and select a preset number from the number drop...

Page 59: ...n and select a Start End time 3 Repeat steps 2 as many times as you need to add more schedules 4 Click the Save button on the bottom right to save the settings You can also use the Copy To function to...

Page 60: ...ent icon on the Live View window will turns to a motion detection icon to alert the user 7 4 3 1 Motion Detect Use this page to configure the areas in which motion will be detected To set up a Motion...

Page 61: ...to enable transmitting the alarm notification to the FTP server To configure FTP settings see 7 3 3 Port Setting Snapshot Check the box to enable taking a snapshot to the FTP server when an event occu...

Page 62: ...from the Day drop down list and then click Copy To 2 On the following dialog box check to select Wednesday and Thursday Click OK to save the settings To delete an alarm schedule click an alarm schedu...

Page 63: ...e stream to your computer When a single recording file exceeds the time you set the system will create a new file to save that data to Storage Enter the export folder for the record files and snapshot...

Page 64: ...ding on scene IR reflectivity Day Night True Day Night with ICR Video Video Compression H 264 Streaming Frame Rate 1 30fps NTSC 1 25fps PAL Video Output BNC 1Vp p 75ohm Audio Audio 1channel bi directi...

Page 65: ...ash light Fluorescent lamp High fluorescent lamp Water bottom Customized Motion Detection Yes General Power Source 24VDC 24VAC PoE Max Power Consumption 25W 24VDC 24VAC 30W PoE IEEE 802 3at 30W 24VDC...

Page 66: ...audio video data transmission port talkback data transmission port UDP 5050 Audio video data transmission port Onvif port 80 RTSP port 554 RTSP stream port 554 Search port 10000 Telnet port 23 Onvif s...

Page 67: ...nDisk Ultra microSDXC UHS I card Transcend MicroSDXC Class 10 UHS I memory card 300x C RTSP URL Syntax Following is the RTSP URL syntax of the EPN5xxx Speed Dome cameras rtsp device ip address 554 cha...

Page 68: ...network device It assigns a domain name URL to the IP Camera so that the user does not need to go through the trouble of checking if the IP address assigned by DHCP Server has changed Once the IP is c...

Page 69: ...EPN5230 EPN5210 63 2 On the Network Setting page Setting Network Ethernet Port Setting configure the IP Settings and Port Settings then click the Save button...

Page 70: ...Camera Name field Note The host name should not include a space or a dot period or any special characters particularly _ c Click Save 4 The DDNS setup is now complete Open a browser and enter the doma...

Page 71: ...e PTZ control functions 2 Go to the EKB200 setup page of the Genie XMS server Setting System Setting EKB200 to define the function for each control key on the keyboard Please refer to the Genie XMS Us...

Page 72: ...verFocus Japan 3F Kuramochi Building II 2 2 3 Koto Bashi Sumida Ku Tokyo 130 0022 Japan TEL 81 3 5625 8188 FAX 81 3 5625 8189 www everfocus co jp info everfocus co jp Your EverFocus product is designe...

Reviews: