background image


1.4  Optional Accessory 


BAE3201 


Color: White 
Size (Φ x H): 138 x 54mm / 5.43” x 2.16” 
Weight: 700g / 1.87 
Material: Metal


1.5  Cable Description 

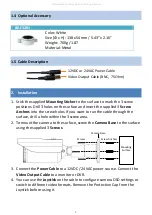
12VDC or 24VAC Power Cable

Video Output Cable (BNC,  75Ohm)


2.  Installation 

1.


Stick the supplied 

Mounting Sticker

 to the surface to mark the 3 screw 

positions. Drill 3 holes on the surface and insert the supplied 3 

Screw 

Anchors 

into the screw holes. If you want to run the cable through the 

surface, drill a hole within the 3 screw area. 

2.


To mount the camera to the surface, screw the 

Camera Base

 to the surface 

using the supplied 3

 Screws

Mounting 

Surface

Screws

Screw Anchors

Camera Base


3.


Connect the 

Power Cable

 to a 12VDC / 24VAC power source. Connect the


Video Output Cable

 to a monitor or DVR. 

4.


You can use the

 Joystick

 on the cable to configure camera OSD settings or 

switch to different video formats. Remove the Protection Cap from the 
Joystick before using it. 

All manuals and user guides at all-guides.com

Summary of Contents for EZA2880 eZ.HD Series

Page 1: ... shots in this document are for example only The images may vary depending on the product and software version Information contained in this document is subject to change without notice EverFocus Taiwan 2F No 12 Ln 270 Sec 3 Beishen Rd Shenkeng Dist New Taipei City 222 Taiwan TEL 886 2 2662 2338 FAX 886 2 2662 3632 www everfocus com tw All manuals and user guides at all guides com ...

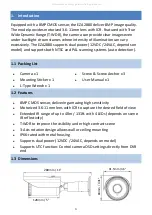
Page 2: ...1 Mounting Sticker x 1 L Type Wrench x 1 Screw Screw Anchor x 3 User Manual x 1 1 2 Features 8MP CMOS sensor delivering amazing high sensitivity Motorized 3 6 11mm lens with ICR to capture the desired field of view Extended IR range of up to 40m 131ft with 4 LEDs depends on scene IR reflectivity T WDR to improve the visibility under high contrast scene 3 Axis rotation design allows wall or ceiling...

Page 3: ...ew holes If you want to run the cable through the surface drill a hole within the 3 screw area 2 To mount the camera to the surface screw the Camera Base to the surface using the supplied 3 Screws Mounting Surface Screws Screw Anchors Camera Base 3 Connect the Power Cable to a 12VDC 24VAC power source Connect the Video Output Cable to a monitor or DVR 4 You can use the Joystick on the cable to con...

Page 4: ...k up down to select among menu items Push the Joystick left right to adjust the level of the selected item Press the Joystick to enter the submenu or exit the OSD Setup Menu 5 You can optionally adjust camera angles To do so loosen the Tilt Screw or Rotate Screw on the bracket using the supplied L Type Wrench to adjust camera angles After adjusting camera angles tightly screw back the Tilt Rotate ...

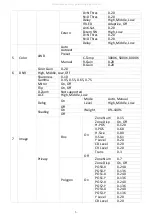
Page 5: ... GRN MAG RED BLU BLK WHT BLC H POS 0 38 V POS 0 35 H SIZE 0 38 V SIZE 0 35 WDR WDR Mode Line ROI Mode Box Window Zone 0 3 Window Use On Off H POS 0 3856 V POS 0 2176 H SIZE 0 3856 V SIZE 0 2176 Polygon Window Zone 0 3 Window Use On Off POS0 X 0 935 POS0 Y 0 361 POS1 X 0 935 POS1 Y 0 361 POS2 X 0 935 POS2 Y 0 361 POS3 X 0 935 POS3 Y 0 361 Off Weight High Middle Low Off 4 Day Night Mode Auto IR LED ...

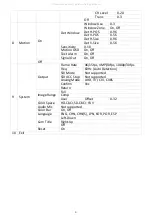
Page 6: ...5 0 55 0 65 0 75 Mirror On Off Flip On Off D Zoom Not supported ACE High Middle Low Defog On Mode Auto Manual Level High Middle Low Off Shading On Weight 0 100 Off Privacy Box On Zone Num 0 15 Zone Disp On Off H POS 0 120 V POS 0 68 H Size 0 80 V Size 0 61 Y Level 0 20 CB Level 0 20 CR Level 0 20 Trans 0 3 Off Polygon On Zone Num 0 7 Zone Disp On Off POS0 X 0 240 POS0 Y 0 136 POS1 X 0 240 POS1 Y 0...

Page 7: ... System Output Frame Rate 4K 15fps 4MP 30fps 1080p 30fps Freq 60Hz Auto Detection SDI Mode Not supported SDI UCC Stop Not supported Analog Mode AHD TVI CVI CVBS Confirm Yes Return Image Range Full Comp User Offset 0 32 Color Space HD CbCr SD CbCr YUV Audio Mic Not supported Color Bar On Off Language ENG CHN CHN S JPN KOR POR ESP Cam Title Left Down Right Up Off Reset On 10 Exit All manuals and use...

Reviews: