background image


EHN7221/7260/7360 


13 

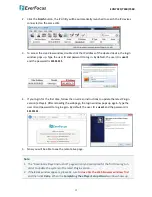
click 

Finish

. Then, you can open a new browser again to access the camera’s remote Web 

interface. 


6.


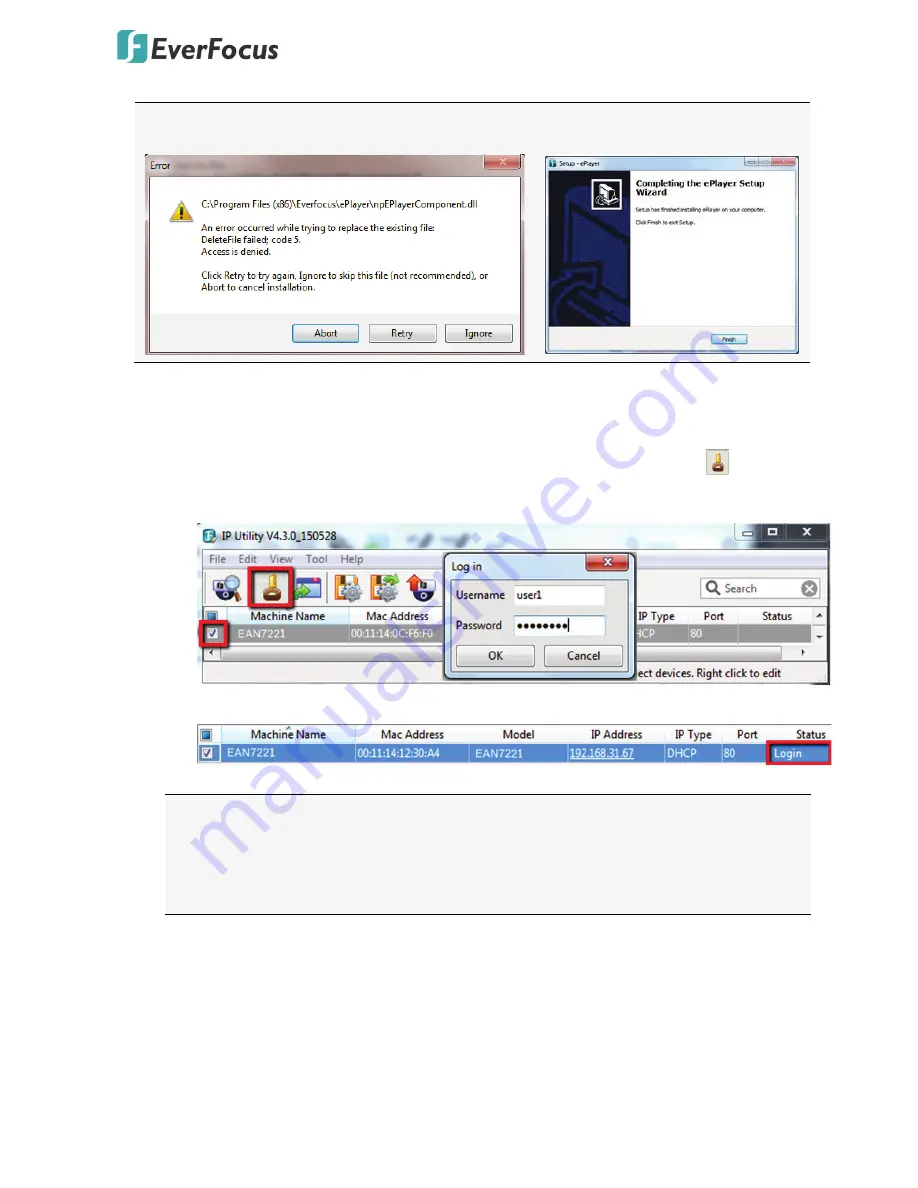
To optionally configure the Machine Name, IP Address, IP Type or Port Number using the 
IPU:   

a. 


Log in the device by checking the desired model and then click the

 Log in


  icon. The 

Log in dialog box appears. 


b. 


Type the Username and Password and click 

OK. 

The 

Status

 column will display 

Login


Note:


1.


The default user ID is 

user1

 and the default password is 

11111111

2.


If you select more than one camera that has the same user ID / password, you will be 

able to log in several cameras at once. 


Summary of Contents for POLESTAR EHN7221

Page 1: ...Star Light Outdoor Dome IR Network Camera EHN7221 7260 7360 Ultra Low Light Network Camera Quick Installation Guide Copyright EverFocus Electronics Corp Release Date March 2016 ...

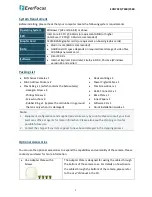
Page 2: ...ation Guide 3 LAN PoE Connect to a 10 100 Ethernet or PoE 4 Micro SD SDHC Slot Insert a micro SD SDHC card see Appendix A in the User s Manual for tested card brands 5 Reset Button Press and hold the Reset Button for 10 seconds to reset all configurations to the factory default settings 6 IR LEDs 33 IR LEDs for infrared illumination in night vision applications 7 Lens Vari focal lens Auto Focus 3 ...

Page 3: ...iver x 1 Hexagon Screw x 4 RJ 45 Connector x 1 Phillips Screw x 4 Base Plate x 1 Screw Anchor x 4 Inner Paper x 1 Rubber Ring x 1 replace the old rubber ring around Software CD x 1 the lens only when it is damaged Quick Installation Guide x 1 Note 1 Equipment configurations and supplied accessories vary by country Please consult your local EverFocus office or agents for more information Please als...

Page 4: ...r to the User s Manual in the CD IP Sidekick ESK1000 Using it for installation you do not need to pre configure the IP address or to use an additional monitor to check and adjust all the IP cameras The product can assign an IP address to the camera through its Wi Fi network then you can connect and check the camera live view using our mobile app For details about IP Sidekick please refer to the IP...

Page 5: ...s microphones with a built in amplifier and external power supply are required 3 2 1 6 5 4 9 8 7 12 11 10 16 15 14 13 Camera Module No Functions No Functions 1 12 VDC Input 9 Audio Output Line out 2 Digital GND 10 Audio GND 3 Alarm Out Alarm Output 11 CVBS Output 4 Alarm COM 12 Digital GND 5 Alarm In Alarm Input 13 AC24V 6 Digital GND 14 AC24V 7 Audio Input Line in 15 RS485_A 8 Audio GND 16 RS485_...

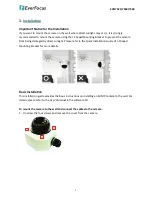
Page 6: ...amera from being damaged by direct sunlight Please refer to the Quick Installation Guide of L Shaped Mounting Bracket for more details Basic Installation This installation guide provides the basic instructions on installing an EHN IP camera to the wall For details please refer to the User s Manual in the software CD To mount the camera to the wall and connect the cables to the camera 1 Unscrew the...

Page 7: ...bles through the bottom of the Camera Case follow the steps below a Remove the Circle Plate on the bottom of the Camera Case You can simply loosen the Circle Plate using a coin Circle Plate Camera Case b Loosen and remove the Cable Gland from the Camera Case Screw the Cable Gland to the hole on the bottom of the Camera Case Cable Gland Camera Case ...

Page 8: ... to the side hole on the Camera Case d Screw the Adapter Plate between the Base Plate and Wiring Box Base Plate Wiring Box Adapter Plate 3 Screw the Camera Case back to the Base Plate using the supplied four Hexagon Screws Base Plate Camera Case ...

Page 9: ... Plug Stopper Adjustment Ring s Cable Gland Cable Gland Screw Cap a Keep the supplied 6 Adjustment Rings for waterproofing Transparent x 5 1 mm thickness Black x 1 0 5 mm thickness b Remove the Plug s from the Stopper depends on the number of cables inserted One Cable Conduit can only be inserted with one cable Plug Stopper Cable Conduit c Insert the network PoE cable through the Cable Conduit if ...

Page 10: ...ore inserting to the Cable Conduit e Tighten the Screw Cap all the way to the Adjustment Ring s f Due to the variable cable diameters for better waterproofing it is strongly recommended that you apply silicon sealants to the inner Screw Cap 5 Connect the network PoE cable to the LAN PoE port on the camera module If you have difficulty connecting the network cable to the LAN PoE port on the camera ...

Page 11: ...he camera case Note It is recommended to replace the desiccant bags every time when you open the camera 9 Access the camera live view for adjusting camera angles To access the camera live view see 4 Accessing the Camera To adjust the camera to a desired angle Pan Adjustment Simply turn left right for the top camera module 360 ...

Page 12: ...re the camera date time go to System Date Time setting page on Web UI 4 Accessing the Camera You can look up the IP address and access the Web interface of the IP camera using the IP Utility IPU program which is included in the software CD The IP Utility can also be downloaded from EverFocus Website http www everfocus com tw HQ Support DownloadCenter_p1 aspx Support Download Center Keyword Search ...

Page 13: ... screen instructions to update the latest Plugin version ePlayer After reloading the webpage the login window pops up again Type the user ID and password to log in again By default the user ID is user1 and the password is 11111111 5 Now you will be able to see the remote live page Note 1 The Download ePlayer Instruction page will only be prompted for the first time login in order to update the sys...

Page 14: ...g the IPU a Log in the device by checking the desired model and then click the Log in icon The Log in dialog box appears b Type the Username and Password and click OK The Status column will display Login Note 1 The default user ID is user1 and the default password is 11111111 2 If you select more than one camera that has the same user ID password you will be able to log in several cameras at once ...

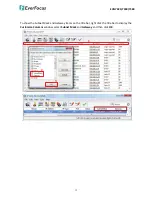
Page 15: ...tors for configuration details 2 If you want to set up PPPoE please refer to 7 1 1 Network in the User s Manual in the software CD To set up a static IP By default EverFocus IP cameras are set up with DHCP To change the IP setting to static IP select Static IP from IP Type drop down list and set up the desired IP Address for example 192 168 31 67 Please also set up the Subnet Mask and Gateway Clic...

Page 16: ...EHN7221 7260 7360 15 To show the Subnet Mask and Gateway items on the title bar right click the title bar to display the Customize Columns window select Subnet Mask and Gateway and then click OK 1 2 3 ...

Page 17: ... ISP If you have a dynamic IP address this connection may require that you use DDNS for a reliable connection Please refer to DDNS Settings in 7 1 1 Network in the User s Manual Cat 5 Straight Through Cable High speed modem Internet One to One Connection Directly from PC to IP camera You can connect directly without using a switch router or modem However only the PC connected to the camera will be...

Page 18: ...in the User s Manual To set up port forwarding please consult the manual of the router High speed modem Internet Straight through LAN patch cable Router Cat 5 Straight Through Cable Left Pinout of a straight through cable 5 Upgrading Firmware You can upgrade camera s firmware using the IP Utility software included in the software CD The IP Utility can also be downloaded from EverFocus Website http...

Page 19: ...han one camera that has the same user ID password you will be able to log in several cameras at once 3 Up to 10 cameras can be simultaneously upgraded to the latest firmware If you connect the cameras to a PoE switch please make sure the Power Consumption of the PoE switch is sufficient 4 Click the Upgrade Firmware button a browsing window appears 5 Select the firmware file evb and then click Open...

Page 20: ...apan 3F Kuramochi Building II 2 2 3 Koto Bashi Sumida Ku Tokyo 130 0022 Japan TEL 81 3 5625 8188 FAX 81 3 5625 8189 www everfocus co jp info everfocus co jp Your EverFocus product is designed and manufactured with high quality materials and components which can be recycled and reused This symbol means that electrical and electronic equipment at their end of life should be disposed of separately fr...

Reviews: