background image

- 4 - 

2. NAMES AND FUNCTIONS OF PARTS 

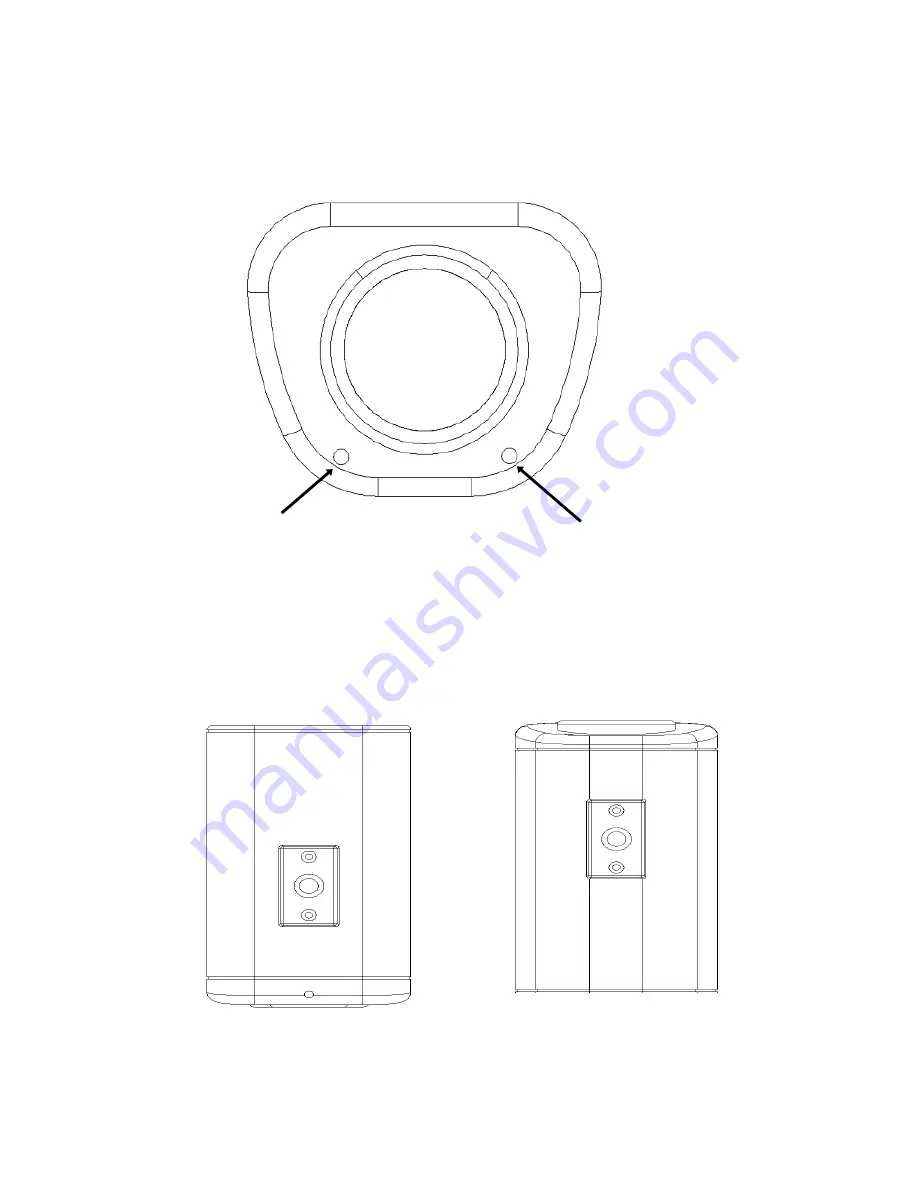
2.1 Front panel 


2.2 Top/Bottom 


The bracket on the top side can be used for suspending the camera. On the other hand, 
the brackets on the bottom side can be used as a support of the camera. 


Internal Sensor 

Microphone (Reserved only for Audio model) 

Bottom Bracket 


Top Bracket 

Summary of Contents for PoleStar EQ550

Page 1: ...ies in it Disassembly or impurities may result in trouble or fire 3 Never face the camera toward the sun Direct sunlight or severe ray may cause fatal damage to sensor and internal circuit 4 Keep the power cord away from wet and never touch the power cord with wet hands Touch the wet power cord with hands or touch the power cord with wet hands may result in electric shock 5 Never install the camer...

Page 2: ...OL 14 6 6 DNR DYNAMIC NOISE REDUCTION 15 6 7 SENS UP 15 6 8 SPECIAL 16 6 8 1 CAMERA ID 17 6 8 2 COLOR ADJ 18 6 8 3 SYNC 18 6 8 4 MOTION DETECTION 18 6 8 5 PRIVACY 21 6 8 6 MIRROR 23 6 8 7 SHARPNESS 23 6 8 8 RESET 24 6 8 9 RETURN 24 6 9 EXIT 24 7 POLESTAR WITH RS485 MINI DIN 25 7 1 RS485 COMMUNICATION CONTROL PIN 25 7 2 KEY FEATURES WITH RS485 26 7 3 HOW TO SET RS485 ID BAUD RATE 26 7 4 CONTROL BY ...

Page 3: ... 2 9 CONTENT LIST 31 ...

Page 4: ...ontal resolution Advanced 16 bit Digital Signal Processor DSP delivers excellent picture quality and performance Day Night function EQ550D True Day Night function with ICR module EQ550T Built in DNR Dynamic Noise Reduction for noise reduction and a 70 saving of Disk storage The starlight Super high sensitivity of 0 002 Lux F 1 2 is achieved by setting SENS UP Shutter X128 0 Lux IR LED on if IR ill...

Page 5: ... 2 Top Bottom The bracket on the top side can be used for suspending the camera On the other hand the brackets on the bottom side can be used as a support of the camera Internal Sensor Microphone Reserved only for Audio model Bottom Bracket Top Bracket ...

Page 6: ...ate power to each model 3 Video Output Connector Connect the video output of the camera to a color monitor or other video devices through a 75 Ohm type coaxial cable with BNC female connector at backside of the camera 4 Tact switcher for left cursor 5 Tact switcher for down cursor 6 Tact switcher for right cursor 7 Tact switcher for up cursor 8 Tact switcher for on screen setting menu 13 4 1 2 3 5...

Page 7: ... function is disabled 11 LED Red Power on Green Low light condition detected 1 IR cut filter will be removed in about 5 10 sec for EQ550T 2 Entering the Night mode which makes the image to turn from color to B W for both EQ550D EQ550T 12 External sensor connector If user wants to change the location of IR light sensor he she can use an External light sensor to connect to this port Note External li...

Page 8: ...the lens mount 3 Mount the lens by turning it clockwise on the lens mount of the camera 4 If you use the Auto Iris lens connecting the lens cable to the auto iris lens connector on the side of the camera 5 Place ND filter in front of the lens adjust lens focus until best image is obtained 6 Fix lens focus by turning tightly the swivel then remove ND filter Mount the lens Use ND filter ...

Page 9: ... of the camera to monitor s input jack 3 RS485 ID of Polestar has to be the same as CAM ID of the keyboard Please refer to 6 3 How to set RS485 ID Baud rate for RS485 ID setup detail 4 Baud rate of Polestar has to be the same as Keyboard s baud rate Please refer to 6 3 How to set RS485 ID Baud rate for baud rate setup detail 485 ...

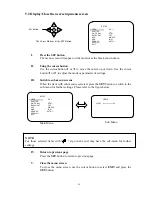
Page 10: ...downwards Use this button to select the item wanted to set Right Button Use this button to select or adjust the parameters of the selected item The parameter changes each time as this button is pressed Left Button Use this button to select or adjust the parameters of the selected item The parameter changes each time as this button is pressed Set Button This button is used to enter setup menu If th...

Page 11: ...enu for further settings Please refer to the figure below NOTE For those selected items with sign in the end they have the sub menu for further settings IV Return to previous page Press the SET button to return to previous page V Close the menu screen To close the menu screen use the cursor button to select EXIT and press the SET button The Cursor Buttons the SET Button Sub Menu Main Menu SETUP LE...

Page 12: ... using the DOWN button 2 Select the shutter mode by pressing the LEFT or RIGHT button Ö FLK Please select FLK mode when flickering occurs on the screen because of an irregular balance between illumination and frequency NTSC model 1 100 PAL model 1 120 SETUP LENS DC SHUTTER ___ WHITE BAL ATW BACKLIGHT OFF AGC MIDDLE DNR LOW SENS UP AUTO SPECIAL EXIT NOTE 1 When using an auto iris lens the setting o...

Page 13: ... all the settings NOTE 1 When selecting DC lens the shutter speed is fixed as 1 60 for NTSC and 1 50 for PAL 2 When MANUAL mode is on the SENS UP function will be disabled SETUP LENS MANUAL SHUTTER FLK WHITE BAL ATW BACKLIGHT OFF AGC MIDDLE DNR LOW SENS UP ___ SPECIAL EXIT BRIGHTNESS BRIGHTNESS 25 SHUTTER MANUAL 1 50 SETUP LENS MANUAL SHUTTER MANUAL WHITE BAL ATW BACKLIGHT OFF AGC MIDDLE DNR LOW S...

Page 14: ... source are changed you need to adjust the white balance again Ö MANUAL The manual adjustment mode enables a more precise adjustment Please select ATW or AWC first Then change to manual adjustment mode and press the SETUP button Set the suitable color temperature and increase or decrease the red and blue color values at the same time while checking the color changes of the object NOTE Under the fo...

Page 15: ...LIGHT function does not operate 6 5 AGC Auto Gain Control 1 Please direct the arrow to point to AGC on the SETUP menu by using the UP and DOWN buttons 2 Select the mode you would like to operate by pressing the LEFT or RIGHT button The more the level of gain increases the brighter the screen and the level of noise increases as well Ö HIGH The gain increases from 6dB up to 42dB Ö MIDDLE The gain in...

Page 16: ...ise level Ö LOW Little reduction in noise level with nearly no ghost image Default value is LOW Ö MIDDLE Just enough reduction in noise levels without causing much ghost imaging Ö HIGH Huge reduction in noise level which may cause much ghost imaging 6 7 SENS UP SENS UP is used to keep a brilliant vivid screen image by automatically detecting changes in the level of light under low light level cond...

Page 17: ...bled NOTE 1 The maximum storage magnification in low light level movement situations can be adjusted by pressing the SETUP button in AUTO mode 2 The screen becomes brighter when the magnification increases yet the after image increases as well 3 Please be noted that spots and noise may appear if storage magnification increases when SENS UP is operating This is a normal phenomenon SETUP LENS DC SHU...

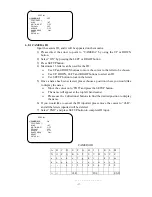
Page 18: ...rsor onto POS and press the SETUP button The name will appear at the top left hand corner Please use the 4 directional buttons to find the desired position to display the name 6 If you would like to cancel the ID inputted please move the cursor to CLR and all the letters inputted will be deleted 7 Select END and press SETUP button to complete ID input _ _ _ _ _ _ _ _ _ _ _ _ _ _ _ A B C D E F G H ...

Page 19: ...rom 0 to 359 6 8 4 MOTION DETECTION Polestar enables you to observe movements of objects in 4 different places on the screen the message MOTION DETECTED appears on the screen when movement is detected therefore this helps to improve supervision efficiency The camera detects an object s movement by sensing discrepancy of outline 1 Please direct the arrow to point to MOTION DET by using the UP or DO...

Page 20: ...value for size of the area to be detected z Additionally it is possible to change the position of the area to be detected Please refer to the following example for detailed steps on moving AREA1 to center 1 The original position of AREA1 was TOP 10 DOWN 25 LEFT 20 and RIGHT 40 MOTION DETECTION AEREA SEL AREA1 AREA STATE ON TOP 10 DOWN 25 LEFT 20 RIGHT 40 Press SET to return SPECIAL CAMERA ID OFF C...

Page 21: ...WN 45 LEFT 20 and RIGHT 40 4 Increase RIGHT scale value by 20 AREA1 position after change is TOP 30 DOWN 45 LEFT 20 and RIGHT 60 5 Increase LEFT scale value by 20 AREA1 position after change is TOP 30 DOWN 45 LEFT 40 and RIGHT 60 z In order to save the changes and complete the setting press the SETUP button This allows you to return to the previous menu AREA1 AREA1 AREA1 AREA1 ...

Page 22: ... the lighter the cover area z Please use the UP or DOWN button to move between TOP DOWN LEFT and RIGHT for adjusting the size of the area to be covered z Please use the LEFT or RIGHT button to adjust the value for size of the area to be covered z Additionally it is possible to change the position of the area to be covered Please refer to the following example for detailed steps on moving AREA1 to ...

Page 23: ...lue by 20 AREA1 position after change is TOP 10 DOWN 45 LEFT 20 and RIGHT 40 3 Increase TOP scale value by 20 AREA1 position after change is TOP 30 DOWN 45 LEFT 20 and RIGHT 40 4 Increase RIGHT scale value by 20 AREA1 position after change is TOP 30 DOWN 45 LEFT 20 and RIGHT 60 AREA1 AREA1 AREA1 AREA1 ...

Page 24: ...f the video image becomes cleaner and more distinguishing as the level of SHARPNESS increases If the level goes up extremely it may affect the video image and cause noise ON Enable the SHARPNESS mode OFF Disable the SHARPNESS mode z Please press the SETUP button z The available range of level is 0 31 SHARPNESS LEVEL 8 SPECIAL CAMERA ID OFF COLOR ADJ SYNC INT MOTIION DET OFF PRIVACY OFF MIRROR OFF ...

Page 25: ...l the setting menus and exit SPECIAL CAMERA ID OFF COLOR ADJ SYNC INT MOTIION DET OFF PRIVACY OFF MIRROR OFF SHARPNESS ON RESET RETURN SPECIAL CAMERA ID OFF COLOR ADJ SYNC INT MOTIION DET OFF PRIVACY OFF MIRROR OFF SHARPNESS ON RESET RETURN NOTE If you quit the Menu without pressing EXIT all the settings you previously did will NOT be saved ...

Page 26: ...If more than 1 camera is connected to keyboard then last camera s Grey wire must be connected to its White wire for terminal resistance purpose 8 7 6 5 4 3 1 2 Wire color representation Black TXD RS485 White RXD RS485 Red Motion detection output Yellow GND Purple D N output Blue Reserved Brown Reserved Green Day Night control Grey Terminal resistance Black White Red Yellow Purple Blue Brown Green ...

Page 27: ...or DOWN button to decrease ID number RS485 ID is changeable from 01 to 99 Press SET button to confirm setting If you do not press SET button to confirm it will jump automatically to next selection which is Baud rate setting after 2 seconds of pause without pressing anything 2 To change baud rate press UP button to increase baud rate value or DOWN button to decrease baud rate value There are 4 opti...

Page 28: ...ETUP for more detailed description about Setup Menu and every setup function 7 5 Day Night mode setting from keyboard 1 For Day mode press 88 Position key it changes to day mode immediately 2 For Night mode press 89 Position key it changes to night mode immediately 3 For Auto Day Night mode press 90 Position key Please be informed that if Auto Day Night mode is selected the standard that a sensor ...

Page 29: ...If the camera is to send out D N signal to other external D N control then external D N mode will be the same as what the Polestar camera is Table of Day Night switching level Switch High Low Day Night 8 Lux 2 Lux When the camera is at Day mode it will send out a Low level of 0V signal to external receiver When the camera is at Night mode it will send out a High level of 5V signal to external rece...

Page 30: ...Menu Special Motion Det ON When a motion is detected not only the message MOTION DETECTED appears on the screen but the camera also sends out a high level of 3V signal to alarm output If no motion has been detected a low level of 0V signal will be sent out to alarm output 8 7 6 5 1 2 4 3 ...

Page 31: ...able Auto White Balance ATW 2500 8300 k AWC Manual Shutter Control ESC Manual FLK selectable Gamma Correction 0 45 Video Output BNC 1 0Vp p 75ohm OSD Menu Yes True Day Night Control Yes Auto IR cut removable and B W Sensitivity Enhanced Off High lux low lux switchable Motion Detection off on 4 zone position size tone Privacy off on 4 zone position size tone H Mirror Yes Sync Mode Line Lock Interna...

Page 32: ... 31 9 CONTENT LIST 1 Camera Unit 2 Operation Instructions this document 3 RS485 Cable 4 ND Filter 5 External Light Sensor ETHPES 01GR optional ...

Page 33: ...om P N MQ55G01310_Ver A Your EverFocus product is designed and manufactured with high quality materials and components which can be recycled and reused This symbol means that electrical and electronic equipment at their end of life should be disposed of separately from your household waste Please dispose of this equipment at your local community waste collection recycling centre In the European Un...

Reviews: