background image


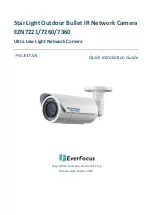
EZN7221/7260/7360 


Note:

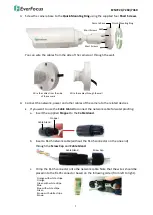
 After opening the camera cover for inserting the micro SD card, you have to 

close the cover immediately in case of reducing the absorption capacity of the 
desiccant bag inside the camera.


3.


Stick the supplied 

Desiccant Bag

 inside the camera. 


4.


Firmly close the camera cover for waterproofing and then slide the 

Sunshield

 back to the 

camera body.


Note:

 When properly installed, the rear-side of the 

Sunshield

 should be even with the 

rear-side of the camera body. Extending the

 Sunshield

 in order to shade the lens will 

compromise the image quality.


4.


Accessing the Camera 

You can look up the IP address and access the Web interface of the IP camera using the 

IP Utility 

(IPU)

 program, which is included in the software CD. The IP Utility can also be downloaded from 

EverFocus’ Website: 

http://www.everfocus.com.tw/HQ/Support/DownloadCenter_p1.aspx


(Support > Download Center > Keyword Search: IP Utility). Please connect the IP camera on the 
same LAN of your computer. 

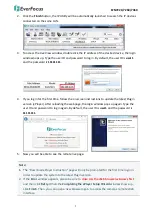
1.


Save

 IP Utility Setup .exe 

  in your computer. Double click the .exe file and follow the 

on-screen instructions to install the IP Utility.   


Summary of Contents for Polestar EZN7221

Page 1: ...Star Light Outdoor Bullet IR Network Camera EZN7221 7260 7360 Ultra Low Light Network Camera Quick Installation Guide Copyright EverFocus Electronics Corp Release Date March 2016 ...

Page 2: ...card 2 Reset Button Resets all configurations to the factory default settings Press and hold the Reset Button for 5 seconds 3 IR LEDs 44 IR LEDs for infrared illumination in night vision applications 4 Lens 3 3 10 mm auto focus varifocal F1 3 360C 5 Light Sensor Detects lights 6 Sunshield Protect the camera from the direct rays of the sun ...

Page 3: ...er Pigtail Cable x 1 Cable Gland Kit x 1 connect to the Plug x 1 inserting to the Quick Mounting Ring for LAN PoE cable for waterproofing through the wall installation Quick Mounting Ring x 1 Software CD x 1 MAC Address Sticker x 2 Quick Installation Guide x 1 Mounting Kit x 1 Long Screw x 4 for attaching the Quick Mounting Ring to the mounting surface Short Screw x 4 for connecting the camera bas...

Page 4: ... ES2446 51 ES2448 62 2 Cables The Cables provide connections for Network GND CVBS output power audio input output and alarm input output Note that the audio in out cable features a line 3 5mm jack TRS Be sure to prepare microphones speakers with TRS connector see TRS Connector image below Also microphones speakers with a built in amplifier and external power supply are required 12VDC Input LAN PoE...

Page 5: ... If you wish to run the wires into the wall drill another hole in the middle of the circular area within the Quick Mounting Ring Circular Area This conduit Is for wiring the cables along the wall installation If you want to wire the cables through the wall then this conduit will not be used You can insert the supplied Plug into the conduit Plug 2 Push the four supplied Anchors into the four holes ...

Page 6: ... related devices If you want to use the Cable Gland to connect the network cable for waterproofing a Insert the supplied Stopper to the Cable Gland Cable Gland Stopper b Insert a RJ 45 network cable without the RJ 45 connector on the one end through the Screw Cap and Cable Gland Cable Gland Screw Cap c Crimp the RJ 45 connector onto the network cable Note that the wires should be placed into the R...

Page 7: ...on the Cable Assembly for adjusting viewing angles 7 To adjust the camera angles Pan Adjustment Unscrew the Set Screw using the supplied Thinner Hexagon Wrench Twist the Camera Body forcefully until it unscrews from the Camera Base Rotate the camera by 360 to the desired position and screw the E Z Lock Ring until it locks against the Camera Base Screw back the Set Screw E Z Lock Ring Set Screw 360...

Page 8: ...ng the IP camera please make sure the camera date and time are correct To configure the camera date time go to System Date Time setting page on Web UI 3 2 Inserting a Micro SD Card You can optionally insert a micro SD card to the card slot on the camera module for recording videos 1 Remove the Sunshield from the camera Loosen the set screw on the Sunshield using the provided Thinner Hexagon Wrench...

Page 9: ... rear side of the camera body Extending the Sunshield in order to shade the lens will compromise the image quality 4 Accessing the Camera You can look up the IP address and access the Web interface of the IP camera using the IP Utility IPU program which is included in the software CD The IP Utility can also be downloaded from EverFocus Website http www everfocus com tw HQ Support DownloadCenter_p1...

Page 10: ... version ePlayer After reloading the webpage the login window pops up again Type the user ID and password to log in again By default the user ID is user1 and the password is 11111111 5 Now you will be able to see the remote live page Note 1 The Download ePlayer Instruction page will only be prompted for the first time login in order to update the system to the latest Plugin version 2 If the Error ...

Page 11: ...sired model and then click the Log in icon The Log in dialog box appears b Type the Username and Password and click OK The Status column will display Login Note 1 The default user ID is user1 and the default password is 11111111 2 If you select more than one camera that has the same user ID password you will be able to log in several cameras at once ...

Page 12: ...r network administrators for configuration details 2 If you want to set up PPPoE please refer to 7 1 1 Network To set up a static IP By default EverFocus IP cameras are set up with DHCP To change the IP setting to static IP select Static IP from IP Type drop down list and set up the desired IP Address for example 192 168 31 67 Please also set up the Subnet Mask and Gateway Click the Apply Changes ...

Page 13: ...EZN7221 7260 7360 12 To show the Subnet Mask and Gateway items on the title bar right click the title bar to display the Customize Columns window select Subnet Mask and Gateway and then click OK 1 2 3 ...

Page 14: ...ou have a dynamic IP address this connection may require that you use DDNS for a reliable connection Please refer to DDNS Settings in 7 1 1 Network in the User s Manual Cat 5 Straight Through Cable High speed modem Internet One to One Connection Directly from PC to IP Camera You can connect directly without using a switch router or modem However only the PC connected to the camera will be able to ...

Page 15: ...ompatible with its LAN By setting up port forwarding on the router you can remotely access the cameras from outside of the LAN via the Internet To remotely access the Web interface of the IP camera please refer to DDNS Settings in 7 1 1 Network in the User s Manual To set up port forwarding please consult the manual of the router High speed modem Internet Straight through LAN patch cable Router Ca...

Page 16: ...e IPU will automatically search the IP devices connected in the LAN 2 Log in the camera by checking the desired model and then click the Log in icon The Log in dialog box appears 3 Type the Username and Password Click the OK button the Login status displays Note 1 The default user ID is user1 and the default password is 11111111 2 If you select more than one camera that has the same user ID passwo...

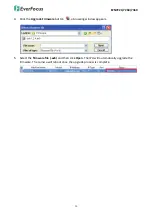
Page 17: ... 4 Click the Upgrade Firmware button a browsing window appears 5 Select the firmware file evb and then click Open The IPU will automatically upgrade the firmware The camera will reboot once the upgrade process is complete ...

Page 18: ...apan 3F Kuramochi Building II 2 2 3 Koto Bashi Sumida Ku Tokyo 130 0022 Japan TEL 81 3 5625 8188 FAX 81 3 5625 8189 www everfocus co jp info everfocus co jp Your EverFocus product is designed and manufactured with high quality materials and components which can be recycled and reused This symbol means that electrical and electronic equipment at their end of life should be disposed of separately fr...

Reviews: