EZN7221/7260/7360
61
【
Event Management
】
You can set up the events such as Motion Detection or Tampering Detection
to automatically notify the users when an event occurs.
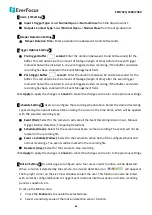
Event Name:
Enter an event name.
Event Trigger Type:
Select an event for the event reaction (as selected in the “Notification Over”
field below).
•
Alarm Input:
Select this if you want a reaction trigger coming from any external, connected
sensor to activate the event reaction (as selected in the “Notification Over” field below) via
the camera system. Make sure that a suitable device is actually connected to the alarm
input relay.
•
Manual Trigger:
Select this option if you want to manually trigger the event reaction (as
selected in the “Notification Over” field below) by clicking the
Manual Trigger
button on
the Live View Page.
•
Motion Detection:
Select this option to trigger the event reaction (as selected in the
“Notification Over” field below) when motion events occur. You have to pre-configure the
Motion Settings for this function to work.
•
Schedule Recording
: Select this option if you want the Schedule Recording periods
configured in the Schedule Settings to activate this. In this scenario, a preconfigured event
reaction like a log entry will list the start and end times of each period. Actual recording will
only be triggered if the event is preconfigured to do so.
•
Tampering Detection:
Select this option if you want the camera’s tampering detection
sensor to trigger the event reaction (as selected in the “Notification Over” field below). You
can set up the tamper duration time in the Event Trigger Settings field below.
Enable This Event:
Check the box to activate the event. For Alarm Input, Manual Trigger, and
Tampering Detection trigger types, multiple events can be created on the Event List but only
one event can be enabled. For example, if you create three Alarm Input trigger events, only one
event under this trigger type can be enabled. The option of
Enable This Event
for the rest of
two Alarm Input events will be grayed out and display ‘’
This Trigger Type has already been
enabled
.’’ To enable another event under the same type, uncheck to disable the event first and
check the desired event.
Enable Re-trigger minimum interval between triggers
second:
Check the box to set a
minimum time (between 10 and 120 seconds) after the event is triggered before the event can
be triggered again.
Enable Pre-trigger Buffer:
Check the box if you want the event reaction (as selected in the
“Notification Over” field below) to be the activation of the video recording function, and if you
want the recording to include the video feed from the time period (configurable in the
Schedule Settings field) just before the Event trigger occurred.
Enable Post-trigger Buffer:
Check the box if you want the Event reaction (as selected in the
Notification Over field) to be the activation of the video recording function, and if you want the
recording to include the video feed from a time period (configurable in the Schedule Settings
field) just after the Event trigger occurred.


