2-22
2. Thread the cable through the hole in the wall mount bracket, and screw in 4 M8
nuts for mounting the bracket.
3. Take off the housing from the packing, and take off the base board (4 bolts on it.)
inside the housing. Thread the cable through the top of the housing. Fix the
housing on the wall mount bracket, and screw in 3 M5 bolts (Hex) on the top of the
bracket with the attached Hex Allen wrench to fix the housing.
RELAY
JP6
JP4
JP3
JP1
JP5
Video +
Video -
RS485 +
RS485 -
AC24
AC24
M5 Bolt
Hex Allen wrench
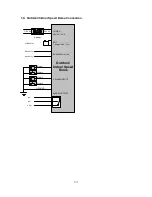
4. Connect the cable connectors to the nodes on the base board, and then fix the
base board in the housing by screwing 4 bolts on it.
Notice: Please notice the polarity of control line. The outdoor speed dome will not work if
the polarity of control line is mis-connected.
5. Align the two screw holes on the bottom of mechanical part to the two bolts on the
Summary of Contents for Speed Dome EPTZ1000
Page 1: ...EPTZ1000 Outdoor Speed Dome EPTZ500 Indoor Speed Dome USER MANUAL Date Sep 26th 2005 ...
Page 4: ...1 3 ...
Page 38: ...4 37 different keyboards ...
Page 40: ...4 39 APPENDIX B Protocol 0 1 2 3 4 5 6 3 4 7 5 4 6 6 0 0 0 0 0 8 9 ...
Page 41: ...4 40 2 2 1 2 5 0 0 5 1 9 1 9 1 9 5 0 0 1 A A 5 1 A 0 0 1 5 0 0 5 B B A 5 9 0 0 0 0 ...
Page 42: ...4 41 0 0 0 0 1 1 5 1 1 0 0 5 5 0 0 A A A 5 5 C 9 9 9 9 C 9 9 7 0 0 0 0 2 5 5 9 9 5 ...
Page 43: ...4 42 2 2 1 2 5 0 0 3 4 4 7 9 4 7 5 5 0 0 4 D D 7 9 0 0 ...
Page 44: ...4 43 P N MW01G00500 ...


