32
Note 1: In order to protect the bubble from dirt and scrape, please put on the gloves
before installing the bubble.
Note 2: The camera module on the mechanical part is very sensitive. Please be careful
when installing this part.
13. Turn on the power, and start to operate the EPTZ3100.
Note: When turning on the power, EPTZ3100 will enter self-inspection mode, and carry out
a self-testing program. After finishing self-inspection, you can start to operate the
EPTZ3100.
2.4.4. EPTZ3100 Dome Camera Ceiling Mount Installation
(Indoor Recessed Mount Bracket & Surface Ring)
The indoor recessed mount bracket and surface ring are used for ceiling mount installation.
Installation steps are described below:
1. Use the ceiling template provided to cut the ceiling.
Cut the ceiling
Summary of Contents for Speed Dome EPTZ3100
Page 1: ...Speed Dome EPTZ3100 EPTZ3100I USER MANUAL Date Jan 2009 ...
Page 14: ...14 EKB500 Keyboard EKB200 USB Controller Keyboard ...
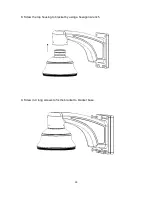
Page 24: ...24 5 Screw in 4 long screws to fix the bracket to bracket base ...
Page 28: ...28 6 Screw in 4 screws for mounting the bracket base 7 Thread the cable through the bracket ...
Page 35: ...35 7 Aim bracket s fillister to surface ring s fillister turn it until it is firmly fixed ...


