background image

Problem                       possible cause                         Solution

Appliance dose not 
work.

Appliance is not switched on.

Main plug is not plugged in or is 
loose.

Fuse has blown or is defective.

Outlet is defective.

Switch on the appliance.

Plug the appliance into the 
electrical socket.

Check fuse, replace if necessary.

Defective parts need to be 
repaired by an electrician.

Appliance cools too 
much.

Temperature is set too cold.

Turn the temperature regulator to 
a warmer setting temporarily.

The food is too warm.

Temperature is not properly 
adjusted.

Door was open for an extented 
period.

A large quantity of warm food 
was placed in the appliance 
within the last 24 hours.

The appliance is near a heat 
source.

Open the door only as long as 
necessary.

Turn the temperature regulator to 
a warmer setting temporarily.

Please look in the “Changing the 
Light Bulb” section.

Interior lighting dose 
not work.

Light bulb is defective.

Heavy build-up of 
frost, possibly also on 
the door seal.

Door seal is not air-tight 
(possibly after reversing the 
door) .

Carefully warm the leaking 
sections of the door seal with a 
hair dryer (on a cool setting). At 
the same time, shape the 
warmed door seal by hand so 
that it sits correctly.

Unusual noises.

Appliance is not level.

The appliance is touching the 
wall or other objects.

A component, e.g. a pipe, on 
the rear of the appliance is 
touching another part of the 
appliance or the wall.

Readjust the feet.

Move the appliance slightly.

If necessary, carefully bend the 
component out of the way.

The compressor dose 
not start immediately 
after changing the 
temperature setting.

This is normal, no error has 
occurred.

The compressor starts after a 
period of time.

Refer the “Cleaning and Care” 
section.

Water on the floor or 
storage shelves.

Water drain hole is blocked.

What to do if... 

Warning! 

Before troubleshooting, 

disconnect the power supply. Only a 
qualified electrician or other

personnel must carry out the 
troubleshooting that is not in the manual.

performed by competent service engineers. 
Improper repairs can give rise to significant 
hazards for the user. If your appliance 
needs repairing, please contact your 
specialist dealer or your local Customer 
Service Center.

Important!

Repairs to the appliance may only be 

14

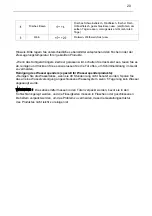
Please refer to the “Starting up and 
temperature regulation” section.

Please refer to the “Installation 
positioning” section.

Summary of Contents for EVTT1019

Page 1: ...Koelkast Refrigerator K hlschrank Refrigerateur Gebruiksaanwijzing User Manual Gebrauchsanleitung Mode d Emploi EVTT1019...

Page 2: ...ing met de EN standaard Dit apparaat is niet bedoeld voor gebruik door personen waaronder begrepen kinderen met verminderde fysieke zintuiglijke vermogens of een gebrek aan ervaring en kennis tenzij d...

Page 3: ...ieden in winkels kantoren en andere werkomgevingen boerderijen en door klanten in hotels motels en andere residenti le soort omgevingen bed and breakfast type omgevingen catering en dergelijke niet re...

Page 4: ...ontvlambaar Indien het koelcircuit beschadigd is open vuur en ontstekingsbronnen vermijden de ruimte waar het apparaat zich bevindt grondig ventileren Het is gevaarlijk om wijzigingen aan te brengen...

Page 5: ...brand veroorzaken 3 Verzeker u ervan dat u de stekker van het apparaat kunt bereiken 4 Trek niet aan het snoer 5 Als de stekker los zit steek hem dan niet in het stopcontact Dan bestaat er een risico...

Page 6: ...eld voor het bewaren van voedingsmiddelen en of dranken in gewoon huishouden zoals uitgelegd in dit instructieboekje Dit apparaat is zwaar Wees voorzichtig als u het apparaat verplaatst Haal geen arti...

Page 7: ...worden onderhouden door een erkendonderhoudscentrum en er dient alleen gebruik te worden gemaakt van originele reserveonderdelen 1 Als het apparaat is Frost Free 2 Als het apparaat een vriesvak bevat...

Page 8: ...matisch functioneren Instellen op 1 betekent Hoogste temperatuur warmste instelling Instellen op 7 eind stop betekent Laagste temperatuur koudste instelling Belangrijk Voor een optimale bewaring van h...

Page 9: ...et apparaat uit de buurt van warmtebronnen zoals radiatoren warmteroosters direct zonlicht enz De maximale prestaties en veiligheid zijn gewaarborgd door het handhaven van de juiste binnentemperatuu v...

Page 10: ...t het rechtop staan en beide verstelinrichtingen moeten in stabiel contact zijn met de vloer U kunt ook het niveau in te stellen door het losdraaien van het juiste niveau aanpassing aan de voorkant Ge...

Page 11: ...te Op kamertemperatuur In een magnetron In een conventionele of heteluchtoven Ontdooide levensmiddelen moeten opnieuw worden ingevroren met uitzondering van speciale gevallen 1 Als het apparaat beschi...

Page 12: ...vroren voedsel raken teneinde een verhoging van de temperatuur van laatstgenoemde te voorkomen Ingevroren producten kunnen onmiddellijk na verwijdering uit het vriesvak brandewonden aan de huid veroor...

Page 13: ...inigen en Onderhoud Vanwege hygi nische redenen moet de binnenkant van het apparaat met inbegrip vaninterieuraccessoires regelmatig worden gereinigd Het apparaat moet tenminste om de twee maanden word...

Page 14: ...ke instelling Open de deur niet langer dan noodzakelijk Draai de temperatuurregelaar tijdelijk op een warmere instelling De binnenverlichting werk niet Het apparaat is in de buurt van een warmtebron g...

Page 15: ...der de vier schroeven zoals in het schema weergegeven De bovenste scharnier optillen en deze vervolgens op een veilige plek leggen verstelbare voetjes en verwijder de onderste scharnier door het losdr...

Page 16: ...r de installatie sluiting verwijderen en vervolgens de aan de tegenovergestelde zijde vastmaken 5 Houd de deur van de vriesruimte gesloten Bevestig de installatie knop op de onderste scharnier Druk op...

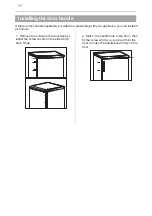
Page 17: ...d kunt u het als volgt monteren 1 Verwijder de schroef uit de deur De schroefdeksel aan de zijde van de scharnier monteren of deze bewaren 2 De handgreep aan de opening van deur aanpassen vervolgens d...

Page 18: ...te verwijdering van dit product Deze markering geeft aan dat dit product niet mag weggegooid worden met ander huishoudelijk afval in de EU Om mogelijke schade aan het milieu of de menselijke gezondhei...

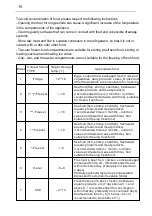
Page 19: ...tijd is 3 maanden voedingswaarden en smaak neemt af in de loop der tijd geschikt als ingevroren vers voedsel Zeevruchten vis garnalen schaaldieren aquatische zoetwaterproducten en vleesproducten aanb...

Page 20: ...ntdooien reinigen drogen en de door open laten staan teneinde schimmelvorming in het apparaat te voorkomen Reiniging afgeefinrichting voor water speciaal voor afgeefinrichting voor water producten Rei...

Page 21: ...defecte onderdelen naar ons inzicht gratis gerepareerd worden of door deugdelijke onderdelen vervangen worden Apparaten die normaal vervoerd kunnen worden bv in een auto dienen naar het punt van aank...

Page 22: ...onen mit eingeschr nkten k rperlichen sensorischen bzw geistigen F higkeiten oder mangelnder Erfahrung und Wissen verwendet werden wenn sie eine Beaufsichtigung bzw Anweisung f r die Nutzung der Masch...

Page 23: ...ungen in der Ger teverkleidung oder in der integrierten Struktur von Behinderungen frei WARNUNG Verwenden Sie keine mechanische Vorrichtung oder anderen Mittel um den Abtauvorgang zu beschleunigen WAR...

Page 24: ...K hlmittelkreislauf besch digt ist Vermeiden Sie offene Flammen und Z ndquellen L ften Sie den Raum sorgf ltig in dem das Ger t steht WARNUNG Die K hlschr nke enthalten K ltemittel und Gase in der Is...

Page 25: ...omstecker k nnte berhitzen und einen Brand verursachen 3 Achten Sie darauf dass Sie an den Ger tenetzstecker gelangen 4 Ziehen Sie nicht am Kabel 5 Stecken Sie den Stromstecker nicht ein wenn die Stro...

Page 26: ...r Getr nke im normalen Haushalt vorgesehen wie in der Gebrauchsanweisung ausgef hrt Das Ger t ist schwer Bei der Bewegung sollte darauf geachtet werden Entfernen oder ber hren Sie keine Elemente aus d...

Page 27: ...Kompressor Kondensator ber hrt oder abgefangen werden um eine Brandgefahr zu vermeiden Befolgen Sie die Installationsanweisungen Das Ger t darf nicht in der N he von Heizungen oder Kochstellen stehen...

Page 28: ...mperatur w rmste Einstellung Die Einstellung 7 Endanschlag bedeutet Niedrigste Temperatur k lteste Einstellung Wichtig F r eine optimale Lebensmittelkonservierung empfehlen wir Ihnen eine Einstellung...

Page 29: ...des Ger tes Positionieren Sie das Ger t nicht in der N he von W rmequellen wie fen Heizungen direkte Sonneneinstrahlung usw Maximale Leistung und Sicherheit werden durch die Aufrechterhaltung der rich...

Page 30: ...n und beide Einstellvorrichtungen sollten festen Kontakt mit dem Boden haben Sie k nnen die H he auch einstellen indem Sie die entsprechende vordere Pegelanpassung abschrauben mit Ihren Fingern oder e...

Page 31: ...tur In einem Mikrowellenofen In einem herk mmlichen Ofen oder Konvektionsofen Die einmal aufgetauten Lebensmittel sollten mit Ausnahme von Sonderf llen wieder eingefroren werden 1 Wenn das Ger t entsp...

Page 32: ...frische noch nicht gefrorene Lebensmittel nicht mit bereits eingefrorenen Lebensmitteln in Ber hrung kommen damit die letzteren keinen Temperaturanstieg erleiden Eisgek hlte Produkte k nnen wenn Sie d...

Page 33: ...ege Reinigung und Pflege Aus hygienischen Gr nden sollte das Interieur des Ger tes einschlie lich Zubeh rteile f r Interieur regelm ig gereinigt werden Das Ger t sollte mindestens alle zwei Monate ger...

Page 34: ...nur so lange wie n tig Stellen Sie den Temperaturregler vor bergehend auf eine k ltere Temperatur ein Die Innenbeleuchtung funktioniert nicht Das Ger t steht in der N he einer Hitzequelle Die Gl hbirn...

Page 35: ...Schrauben Dann bertragen Sie sie auf eine andere Seite Hinweis 1 Vor dem Transfer m ssen Sie die Scharnierachse von dem Loch zu bewegen 2 Sie m ssen den Gummist tz auf der Seite auf der es kein Schar...

Page 36: ...t 1 1 3 Mit einem Schraubenzieher nehmen Sie den Installationsverschluss ab und dann befestigen Sie ihn auf der entgegengesetzten Seite 5 Halten Sie die Gefrierfacht r geschlossen Befestigen Sie die I...

Page 37: ...T rgriffe wie folgt installieren 1 Entfernen Sie die Schraube an der T r Halten oder installieren Sie die Schraubenabdeckungen auf der Seite wo das Scharnier sich befindet 2 Passen Sie das Griffloch...

Page 38: ...it dem Netzstecker Korrekte Entsorgung dieses Produkts Innerhalb der EU weist dieses Symbol darauf hin dass dieses Produkt nicht ber den Hausm ll entsorgt werden darf Altger te enthalten wertvolle rec...

Page 39: ...tiere S wasserprodukte und Fleischprodukte empfohlen f r 3 Monate N hrwerte und Geschmack nehmen mit der Zeit ab geeignet f r gefrorene frische Lebensmittel Meeresfr chte Fisch Garnelen Schalentiere S...

Page 40: ...en und trocknen Sie es sowie lassen Sie die T r offen um Schimmelbildung im Ger t zu vermeiden Reinigung des Wasserspenders speziell f r Wasserspenderprodukte Reinigen Sie die Wassertanks wenn sie 48...

Page 41: ...dass fehlerhafte Teile nach unserem Ermessen kostenlos repariert oder durch einwandfreie Teile ersetzt werden Ger te die normal transportiert werden k nnen z B in einem Auto m ssen zur Wartung an der...

Page 42: ...ndard This appliance is not intended for use by persons including children with reduced physical sensory or mental capabilities or lack of experience and knowledge unless they have been given supervis...

Page 43: ...s offices and other working environments farm houses and by clients in hotels motels and other residential type environments bed and breakfast type environments catering and similar non retail applica...

Page 44: ...ance ensure that none of the components of the refrigerant circuit becomes damaged The refrigerant R600a is flammable If the refrigerant circuit should be damaged Avoid opening flames and sources of i...

Page 45: ...the main cable 5 If the power plug socket is loose do not insert the power plug There is a risk of electric shock or fire 6 You must not operate the appliance without the interior lighting lamp cover...

Page 46: ...ms with naked flames away from the appliance so that do not set the appliance on fire The appliance is intended for keeping food stuff and or beverages in normal household as explained in this instruc...

Page 47: ...e spare parts must be used 1 If the appliance is Frost Free 2 If the appliance contains freezer compartment Installation Important For electrical connection carefully follow the instructions given in...

Page 48: ...Lowest temperature coldest setting Important For optimum food preservation we advise you select a setting of 3 or 4 if you want the temperature higher or lower please turn the knob to a warmer or cold...

Page 49: ...the appliance as poor air circulation can affect performance Built in appliances should be positioned away from heat sources such as heaters and direct sunlight screw provided in a plastic bag with yo...

Page 50: ...should be upright and both adjusters should be in stable contact with the floor You can also adjust the level by unscrewing the appropriate level adjustment in the front use your fingers or a suitable...

Page 51: ...erature In a microwave oven In a conventional or convection oven Food once thawed should be re frozen with the exception of special cases 1 If the appliance contains related accessories and functions...

Page 52: ...make sure that the packages are airtight Do not allow fresh unfrozen food to touch food that is already frozen thus avoiding a rise in the temperature of latter Iced products if consumed immediately a...

Page 53: ...es should be cleaned regularly The appliance should be cleaned and maintained at least every two months Warning Danger of electrical shock The appliance should not be connected to the main power suppl...

Page 54: ...h a hair dryer on a cool setting At the same time shape the warmed door seal by hand so that it sits correctly Unusual noises Appliance is not level The appliance is touching the wall or other objects...

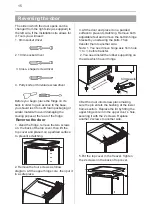
Page 55: ...hould rest it on soft foam packaging or similar material to avoid damaging the cooling popes at the rear of the fridge 3 Lift the door and place it on a padded surface to prevent scratching Remove bot...

Page 56: ...which covering on the up door bearing 1 1 3 Using a screwdriver take down the installation buckle and then fix it in the opposite side 5 Keep the freezer compartment door closed Fix the installation...

Page 57: ...c bag with your appliance you can install it as follows 1 Remove the screw on the door Keep or install the screw covers on the side which have hinge 2 Match the handle hole to the door then fix the sc...

Page 58: ...Cut off the main cable and discard it This marking indicates that this product should not be disposed with other household wastes throughout the EU To prevent possible harm to the environment or human...

Page 59: ...ition values and taste decrease with time suitable for frozen fresh food 3 Freezer 18 Seafood fish shrimp shellfish freshwater aquatic products and meat products recommended time is 3 months nutrition...

Page 60: ...ply if water has not been drawn for 5 days If the refrigerating appliance is left empty for long periods switch off defrost clean dry and leave the door open to prevent mould developing within the app...

Page 61: ...is offered under the condition that defect components will be repaired as we see fit or will be replaced by suitable components Devices that can be transported normally e g in a car must be returned t...

Page 62: ...des autres personnes vuln rables Selon les normes EN Ce syst me peut tre utilis par des enfants g s de 8 ans et plus et par des personnes capacit s r duites sur le plan physique sensoriel ou mental o...

Page 63: ...de travail et bureaux structures de type Bed and Breakfast b timents de ferme et h tels motels et autres organismes accueillant des clients cuisine industrielle et autres applications non destin es la...

Page 64: ...ration ne soit endommag Le r frig rant R600a est un liquide inflammable Si le circuit de r frig ration tait endommag Evitez les flammes nues et toute source d inflammation Ventilez bien la pi ce o se...

Page 65: ...urale de l appareil 4 Ne tirez jamais sur le c ble principal 5 Si la prise murale est l che ne branchez pas le cordon Il existe un risque d lectrocution ou d incendie 6 Vous ne devez jamais utiliser l...

Page 66: ...d viter les risques d incendie Cet appareil est destin ranger des aliments et ou des boissons domestiques traditionnelles selon les consignes livr es avec le syst me L appareil est lourd Soyez pruden...

Page 67: ...cendie suivez les instructions d installation L appareil ne doit pas tre situ c t de radiateurs ou de feux de cuisson V rifiez bien que les prises sont accessibles une fois l appareil install D pannag...

Page 68: ...nsion le r frig rateur ce dernier se met fonctionner automatiquement Un r glage sur 1 signifie Temp rature la plus lev e r glage le plus lev Un r glage sur 7 r glage maximum signifie Temp rature la pl...

Page 69: ...de chaleur telles que les fours radiateurs sources d clairage directes etc La s curit de l utilisateur et la performance maximale du syst me sont garantis si vous veillez bien respecter la bonne temp...

Page 70: ...e trouver en position verticale et les deux pieds ajustables doivent tre en contact avec le sol Vous pouvez galement ajuster le niveau en d vissant les pieds l avant pour cela utilisez vos doigts ou u...

Page 71: ...e Au four micro ondes Dans un four convection ou dans un four traditionnel Une fois d congel s les aliments ne doivent plus tre recongel s sauf dans certains cas particuliers 1 Si l appareil est quip...

Page 72: ...herm tiques Ne laissez pas les aliments frais d congel s entrer en contact avec les aliments d congel s afin d viter un choc de temp ratures Les produits congel s s ils sont consomm s imm diatement l...

Page 73: ...au moins tous les deux mois Mise en garde Risque d lectrocution L appareil ne doit pas tre reli l alimentation lectrique pendant les op rations de nettoyage Avant de proc der au nettoyage de l appare...

Page 74: ...porte Bruits inhabituels L appareil n est pas bien nivel L appareil est en contact avec le mur ou avec d autres objets Un composant du syst me par exemple l un des conduits situ s l arri re est en co...

Page 75: ...sf rez le tout du c t oppos Remarque 1 Vous devez d placer l axe de la charni re depuis la fente vers la fente avant le transfert 2 Vous devez installer le support en caoutchouc du c t sans charni re...

Page 76: ...c un tournevis faites tomber la boucle d installation puis installez la du c t oppos 5 Maintenez la porte du cong lateur ferm e Fixez le bouton d installation sur le palier de porte inf rieur Appuyez...

Page 77: ...ez l installer de la mani re suivante 1 Retirez la vis de la porte Installez ou mettez de c t les caches de vis du c t de la charni re 2 Faites correspondre le c t de la poign e avec le c t de la port...

Page 78: ...pale limination correcte de ce produit Ce marquage indique que le produit ne doit pas tre limin avec les autres produits m nagers au sein de l UE Afin d viter de possible d g ts sur l environnement ou...

Page 79: ...croissent avec le temps adapt la cong lation d aliments frais 3 Cong lateur 18 Les fruits de mer poisson crevettes les crustac s les produits d eau douce et les viandes la dur e recommand e est de 3 m...

Page 80: ...des distributeurs d eau sp cial pour les produits distributeurs d eau Nettoyez les r servoirs d eau s ils n ont pas t utilis s depuis 48 h rincez le syst me d eau raccord une alimentation en eau si l...

Page 81: ...atuite des pi ces d fectueuses ou leur remplacement par des pi ces appropri es Les appareils pouvant tre transport s normalement p ex en voiture doivent tre ramen es au point d achat pour la r alisati...

Page 82: ...4214623...
Reviews: