-4-
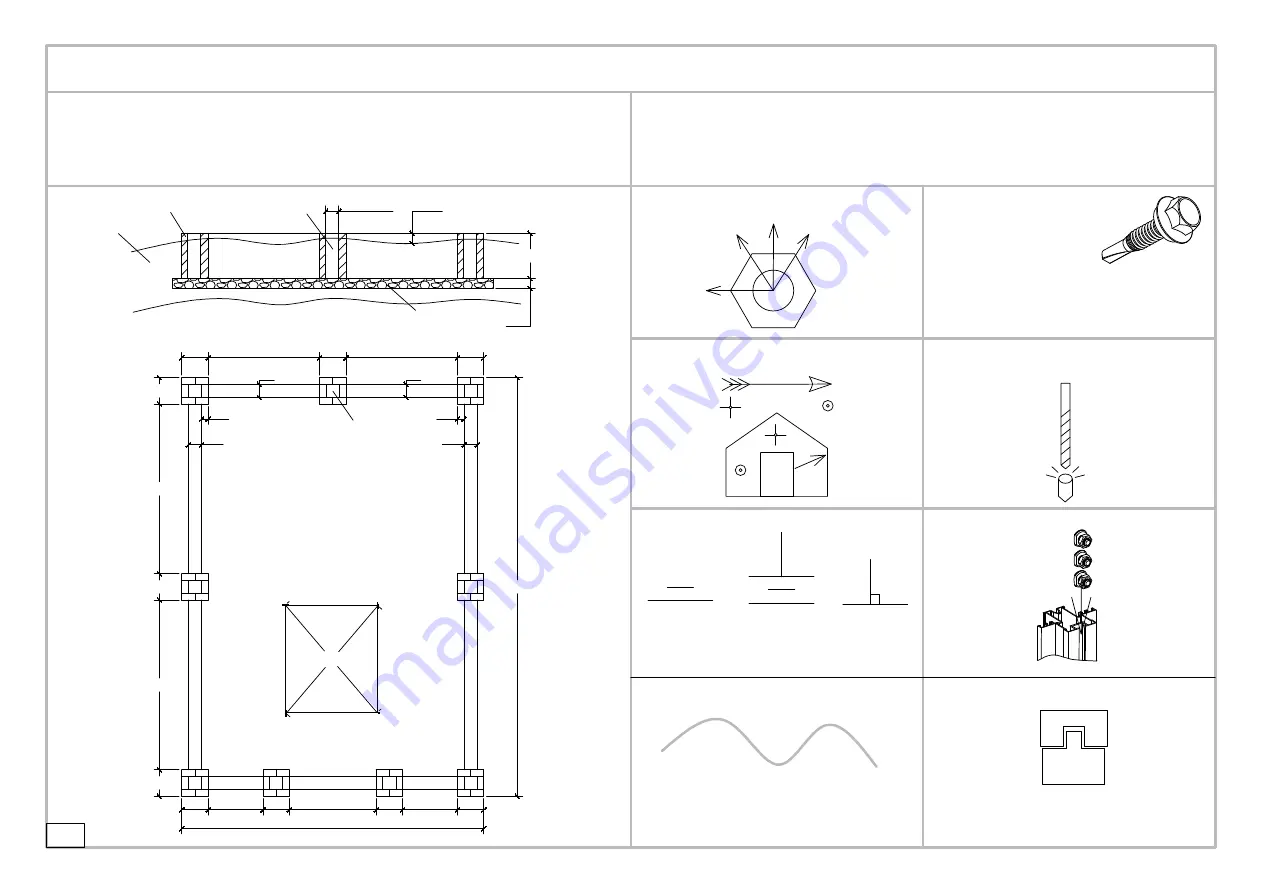
Installation instructions and illustrations
1.Make sure the ground flat and firm before installing, avoid the ground subsidence and cause the
greenhouse to tilt.
2. If you need to permanently install without moving, please use solid bricks and concrete to make the
building foundation, make the house stronger.
3. Additional ground anchors or expansion screws required for different floors are required to be purchased
by the user, and this product is not provided.
≥5cm
Earth
Concrete
Brick
Well
50cm
6cm
763cm
551cm
48
309
48
309
48
48
203
48
203
48
48
100
48
158
48
48
100
Unit:cm
Ratio: 1:80
24cm
1.Before installation, you need to know the meaning of the following symbols.
2.Follow the pattern to install faster and less effort.
Use of Wells(Pouring concrete after inserting
ground anchor)
After the construction of the Civil Foundation,
it needs to be dry for 3-5 days. Then the
greenhouse components can be placed on
the Civil Foundation.
24
24
12
24
12
24
950cm
Silicon
Ø3mm
F6 Screw Installation Method
1. Install 8mm Sleeve
2. Start the first layer clockwise
3. Rotate counterclockwise for 3 seconds.
4. Fight clockwise to the end
5. Not too tight to ensure that the profile can
not be deformed.
L=L
Loose
looser
tight
tighter
Screw tightening State
Installation process Perspective
It need to be punched.
Parallel on
both sides
Upright
Vertical
Reserved screws
Components, preloaded
井
Summary of Contents for ZA720
Page 11: ...11 ZA B1 x2 B7 x2 B7 B7 ZA B1 ZA B1 B7 B7 ZA B1 ZA B1 x8 F4 F4 F4 F4 F4 F4 ZA B1 F4 F4 x14...
Page 26: ...26 A7L A7R ZA D9 F4 x2 F8 x4 ZA D9 ZA D9 F4 F8 x2 x2...
Page 31: ...31 ZA B3 x4 B7 x4 F4 x28 B7 B7 ZA B3 ZA B3 x2 B7 B7 ZA B3 ZA B3 x8 F4 F4 F4 F4 F4 F4 ZA B3 F4...
Page 36: ...36 Assembled above the foundation...
Page 38: ...38 B8 x2 F4 x10 x2 A4 A4 F4 F4 B7 x2 B9 x2 x2 B9 B8 B8 B7 F4 x4 B8 B9 B9 B8 B7 B7...
Page 39: ...39 F4 x2 Wooden Mallet Remove C1 F4 F4 F4 F4 C1 C1 C4 A4 ZA A5 x2 F4 A10 x2...
Page 40: ...B8 x2 B7 x2 B9 x2 40 F4 x10 x2 A4 A4 F4 F4 x2 B9 B8 B8 B7 F4 x4 B8 B8 B9 B9 B7 B7...
Page 42: ...42 Window W2 W2 W1 W1 W3 SW1 W4 W4 SW4 SW4 SW4 SW4 F4 F4 F4 F4 F10 F10 F11 F4 F4 P1 x8...
Page 43: ...43 x8 W1 x16 W2 x16 F4 x64 F10 x16 P1 W2 W2 W1 W1 F10 F10 F4 F4 F4 F4...
Page 45: ...45 x8 W4 x16 SW4 x32 W4 W4 SW4 SW4 SW4 SW4 F11 x8 F11 W4 SW4 SW4 Silicon Silicon...
Page 47: ...47 F4 x18 x6 F4 x12 F4 F4 x9 F4 x9 F4 F4...
Page 51: ...51 A7A x6 F4 x12 x6 F4 x5 A7A x6 TA5 A7A F4 A7A TA5 F4 A7A x6 WA3A F4...
Page 52: ...52 Window Window TA5 W1 TA5 TA5 W1 Help to exclude rain 3mm 3mm x4 x4 x8 Window x8...
Page 54: ...54 TA5 Window W4 W5 F11 SW3 SW2 SW3 SW2 SW3 SW2 Close Open CW6 CW6 CW7...
Page 64: ...64 F6 x6 Door Door F2 x6 F7 x24 C9 x4 L2 x2 L3 x2 F3 x8 J5 J2...
Page 66: ...66 F4 F9 Tighten all screws...


