background image

6

For queries or additional product information, please call our Service Centre on: 

087 997 0865

Please have your model name on hand.

www.everlast.com

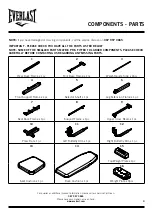
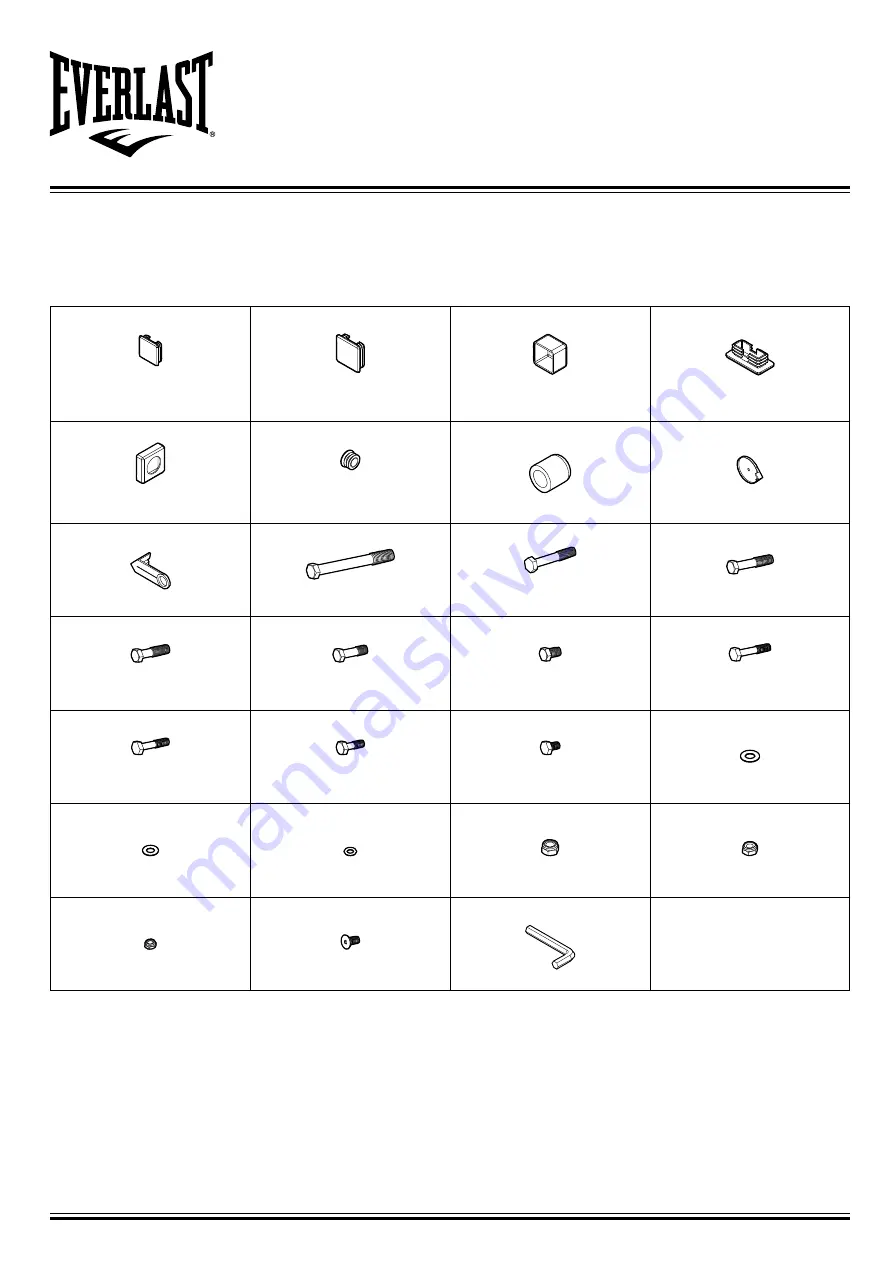
COMPONENTS - PARTS

IMPORTANT - PLEASE CHECK YOU HAVE ALL THE PARTS LISTED BELOW

NOTE: SOME OF THE SMALLER PARTS MAY BE PRE- FITTED TO LARGER COMPONENTS. PLEASE CHECK 

CAREFULLY BEFORE CONTACTING US REGARDING ANY MISSING PARTS.

47

Square End Plug

(

38mm) x 8pcs

48

Square End Plug

(

40mm) x 2pcs

49

Square Cap

(

38mm) x 3pcs

50

Square End Plug

(

20x

40mm) x 2pcs

51

Middle-empty Plug

(

38 x ø26) x 2pcs

52

Round End Plug

(ø25mm) x 4pcs

53

Plastic Cover x 2pcs

54

Pulley Cover x 2pcs

55

Pulley Hook x 18pcs

56

Hex Bolt

(M12x120mm) x 1pc

57

Hex Bolt

(M10x65mm) x 2pcs

58

Hex Bolt

(M10x60mm) x 11pcs

59

Hex Bolt

(M10x48mm) x 9pcs

60

Hex Bolt

(M10x45mm) x 2pcs

61

Hex Bolt

(M10x20mm) x 2pcs

62

Hex Bolt

(M8x50mm) x 2pcs

63

Hex Bolt

(M8x40mm) x 2pcs

64

Hex Bolt

(M8x25mm) x 1pc

65

Hex Bolt

(M8x15mm) x 4pcs

66

Washer (M12) x 4pcs

67

Washer (M10) x 50pcs

68

Washer (M8) x 12pcs

69

Nylon Nut (M12) x 3pcs

70

Nylon Nut (M10) x 24pcs

71

Nylon Nut (M8) x 3pcs

72

Bolt (M10x25mm) x 4pcs

41

Allen Key x 1pc

Summary of Contents for 18105

Page 1: ...which will help you get the best from your equipment and ensure safe and correct assembly use and maintenance If you need help or have damaged or missing parts call the service centre on 087 997 0865...

Page 2: ...INFORMATION 17 19 PRE AND POST STRETCHING EXERCISES 20 21 EXPLOEDE VIEW 22 PARTS LIST 23 SERVICE WARRANTY 24 SPECIFICATIONS FOR EVERLAST POWER GYM EXERCISE FUNCTION Seated pec deck Seated chest press...

Page 3: ...and manufactured to comply with the latest BS EN 957 British and European Safety Standards USE It is the responsibility of the owner to ensure that all users of this product are properly informed as t...

Page 4: ...F THE SMALLER PARTS MAY BE PRE FITTED TO LARGER COMPONENTS PLEASE CHECK CAREFULLY BEFORE CONTACTING US REGARDING ANY MISSING PARTS 1 Rear Base Frame x 1pc 2 Font Base Frame x 1pc 3 Weight Guide Tube x...

Page 5: ...Handle Tube x 2pcs 19 Lat Bar x 1pc 20 Reverse U x 1pc 21 Single Pulley Block x 2pcs 22 Pulley U x 1pc 23 Plum Blossom Nut x 1pc 24 Weight Selector Pin x 1pc 25 Rubber Ring x 2pcs 26 Plastic Washer x...

Page 6: ...p 38mm x 3pcs 50 Square End Plug 20x 40mm x 2pcs 51 Middle empty Plug 38 x 26 x 2pcs 52 Round End Plug 25mm x 4pcs 53 Plastic Cover x 2pcs 54 Pulley Cover x 2pcs 55 Pulley Hook x 18pcs 56 Hex Bolt M12...

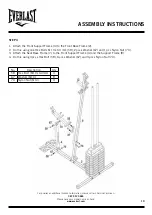
Page 7: ...2 CAREFULLY REMOVE ALL PACKING MATERIAL AND CHECK EACH PART WITH THE MANUAL FIRST 3 REMEMBER SOME PARTS ARE PRE FITTED TO LARGER COMPONENTS STEP 1 1 Remove 2pcs x Bolt 72 from the 2pcs x Weight Guide...

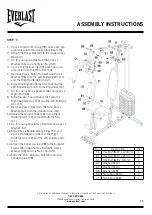
Page 8: ...Plates 16 down the Weight Guide Tubes 3 3 Slide the Selector Shaft Bushing 44 down the Selector Shaft 5 4 Secure at the first hole with the Selector Shaft Pin 27 5 Insert the Selector Shaft 5 into the...

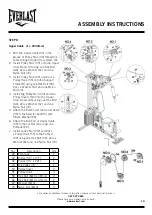
Page 9: ...Attach the Support Frame 8 to the Front Base Frame 2 2 Do this using 2pcs x Hex Bolts 58 4pcs x Washer 67 and 2pcs x Nylon Nut 70 3 Attach the 2pcs x Single Pulley Block 21 to the Support Frame 8 4 D...

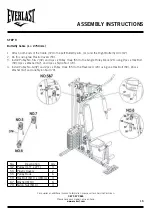
Page 10: ...tach the Front Support Frame 4 to the Front Base Frame 2 2 Do this using one Hex Bolts M 10 x 60 mm 58 2pcs x Washer 67 and 1pc x Nylon Nut 70 3 Attach the Seat Base Frame 7 to the Front Support Frame...

Page 11: ...ach the Upper Cross Beam 9 to the 2pcs x Weight Guide Tube 3 using 2pcs x Bolt 72 3 Attach the Upper Cross Beam 9 to the Support Frame 8 4 Do this using 2pcs x Hex Bolt 58 4pcs x Washer 67 and 2pcs x...

Page 12: ...o the Support Frame 8 2 Do this using 2pcs x Hex Bolt 62 and 2pcs x Washer 68 3 Attach the Seat Cushion 13 to the Seat Base Frame 7 4 Do this using 4pcs x Hex Bolt 65 and 4pcs x Washer 68 5 Insert the...

Page 13: ...ar 10 7 Do this using 2pcs x Washer 66 and 2pcs x Nylon Nut 69 8 Slide the Arm Foam Rollers 31 onto the Right Butterfly Arm 12 and the Left Butterfly Arm 11 9 Remove 2pcs x Hex Bolts 61 and 2pcs x Was...

Page 14: ...Bolt 59 2pcs x Washer 67 and one Nylon Nut 70 4 Install Big Pulley No 4 34 and two Pulley Covers 54 onto the Upper Cross Beam 69 using one Hex Bolt 60 2pcs x Washer 67 and one Nylon Nut 70 5 Attach th...

Page 15: ...ght Butterfly Arm 12 2 Do this using two Plastic Covers 53 3 Install Pulley No 5 7 32 and 4pcs x Pulley Hook 55 to the Single Pulley Block 21 using 2pcs x Hex Bolt 59 4pcs x Washer 67 and 4pcs x Nylon...

Page 16: ...2pcs x Pulley Hook 55 to the Front Base Frame 2 using one Hex Bolt 59 2pcs x Washer 67 and one Nylon Nut 70 6 Install Pulley No 11 32 and 2pcs x Pulley Hook 55 to the Pulley U 22 using one Hex Bolt 59...

Page 17: ...culty increase the amount of resistance TONING You can tone your muscles by pushing them to a moderate percentage of their capacity Select a moderate amount of resistance and increase the number of r...

Page 18: ...r energy level is the highest Each workout should be fol lowed by at least one day of rest Once you nd the schedule that is right for you stick with it EXERCISE FORM Maintaining proper form is an esse...

Page 19: ...to achieving the greatest results is to make exercise a regular and enjoyable part of your everyday life HEART RATE CHART YOUR AGE TARGET RANGE HR 50 85 MAX HEART RATE 20 100 170 BEATS PER MINUTE 200...

Page 20: ...s and push forwards Spread shoulder blades apart Chest addition Forearm raised slightly on xed object Lunge stance Move body forward beyond elbow Lats addition Relaxed elbow Lean slightly over away fr...

Page 21: ...the side of bottom LOWER BACK GLUTES Reach behind knees Lift bottom Pull knees right into chest KNEE ROLLS Keep knees and feet close together Gently roll to one side hold Repeat on the other side ABD...

Page 22: ...our Service Centre on 087 997 0865 Please have your model name on hand www everlast com EXPLODED VIEW 32 Pulley 35 x27T x 9pcs 33 Pulley 3 5 x22T x 1pc 34 Big Pulley 4 x 1pc 35 Upper Cable 2330mm x 1p...

Page 23: ...nd Plug 40mm 2 12 Right Butterfly Arm 1 49 Square Cap 38mm 3 13 Seat Cushion 1 50 Square End Plug 20 x 40mm 2 14 Back Cushion 1 51 Middle empty Plug 38 x 26 2 15 Top Weight Plate 1 52 Round End Plug 2...

Page 24: ...se commercial use use not in accordance within the written instructions included with the product abuse and or any non authorized modi cation of the product incorrect installation of the product or no...

Reviews: