User Manual of Network Video Recorder
15
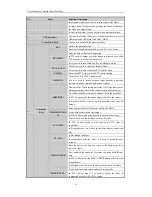
HDD
HDD indicator blinks in red when data is being read from or written to HDD.
Tx/Rx
TX/RX indictor blinks in green when network connection is functioning properly.
5
DVD-ROM
Slot for DVD-ROM.
6
DIRECTION
The DIRECTION buttons are used to navigate between different fields and items in
menus.
In Playback mode, the Up and Down button is used to speed up and slow down
recorded video.
In All-day Playback mode, the Left/Right button can be used to select the recorded
video of next/previous day; in Playback by Normal Video Search, the Left/Right
button can be used to select the next/previous recorded file.
In Live View mode, the directional buttons can be used to cycle through channels.
In PTZ control mode, it can control the movement of the PTZ camera.
ENTER
Confirm selection in any of the menu modes. It can also be used to tick checkbox
fields.
In Playback mode, it can be used to play or pause the video.
In Single-frame Playback mode, pressing the ENTER button will advance the video
by a single frame.
In Auto-switch mode, it can be used to stop /start auto switch.
7
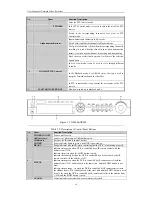
SHIFT
Switch of compound keys between the numeric/letter input and functional control.
1/MENU
Enter numeral “1”;
Access the main menu interface.
2ABC/F1
Enter numeral “2”;
Enter letters “ABC”;
The F1 button can be used to select all items on the list;
In PTZ Control mode, the F1 button can be used to zoom out (zoom-) the PTZ
camera;
In live view or playback mode, the F1 button can be used to switch between main
and spot video output.
3DEF/F2
Enter numeral “3”;
Enter letters “DEF”;
In PTZ Control mode, the F1 button can be used to zoom in (zoom+) the PTZ
camera;
The F2 button can be used to cycle through tab pages.
4GHI/ESC
Enter numeral “4”;
Enter letters “GHI”;
Exit and back to the previous menu.
5JKL/EDIT
Enter numeral “5”;
Enter letters “JKL”;
Delete characters before cursor;
Select the checkbox and ON/OFF switch;
Start/stop record clipping in playback.
6MNO/PLAY
Enter numeral “6”;
Enter letters “MNO”;
In Playback mode, it is used for direct access to playback interface.
7PQRS/REC
Enter numeral “7”;
Enter letters “PQRS”;
Manual record, for direct access to manual record interface; manually enable/disable
record.
8TUV/PTZ
Enter numeral “8”;
Enter letters “TUV”;
Access PTZ control interface.
9WXYZ/PREV
Enter numeral “9”;
Enter letters “WXYZ”;
Multi-camera display in live view;
In Playback mode or Menu
Playback
Tag playback interface, this button can be
used to delete the selected tag.
0/A
Enter numeral “0”;
Switch between input methods (upper and lowercase alphabet, symbols and numeric
input).
In Playback mode, this button can be used to add the default tag.
8
JOG SHUTTLE
Control
Move the active selection in a menu. The inner ring will move the selection up and
down; the outer ring will move it left and right.
Summary of Contents for Diamon Series
Page 1: ...Network Video Recorder User Manual ...
Page 12: ...User Manual of Network Video Recorder 11 Chapter 1 Introduction ...
Page 24: ...User Manual of Network Video Recorder 23 Chapter 2 Getting Started ...
Page 40: ...User Manual of Network Video Recorder 39 Figure 2 24 Edit IP Camera Interface Manual ...
Page 41: ...User Manual of Network Video Recorder 40 Chapter 3 Live View ...
Page 52: ...User Manual of Network Video Recorder 51 Chapter 4 PTZ Controls ...
Page 61: ...User Manual of Network Video Recorder 60 Chapter 5 Recording and Capture Settings ...
Page 84: ...User Manual of Network Video Recorder 83 Chapter 6 Playback ...
Page 104: ...User Manual of Network Video Recorder 103 Chapter 7 Backup ...
Page 126: ...User Manual of Network Video Recorder 125 Figure 7 44 Synchronizing ...
Page 127: ...User Manual of Network Video Recorder 126 Chapter 8 Alarm Settings ...
Page 144: ...User Manual of Network Video Recorder 143 Chapter 9 Network Settings ...
Page 168: ...User Manual of Network Video Recorder 167 Chapter 10 RAID Only for NRA0R series NVR ...
Page 183: ...User Manual of Network Video Recorder 182 Figure 10 28 Upgrade the Firmware ...
Page 184: ...User Manual of Network Video Recorder 183 Chapter 11 HDD Management ...
Page 198: ...User Manual of Network Video Recorder 197 Figure 11 26 View HDD Status 2 ...
Page 202: ...User Manual of Network Video Recorder 201 Chapter 12 Camera Settings ...
Page 206: ...User Manual of Network Video Recorder 205 Chapter 13 NVR Management and Maintenance ...
Page 218: ...User Manual of Network Video Recorder 217 Chapter 14 Others ...
Page 227: ...User Manual of Network Video Recorder 226 Appendix ...

