background image

Summary of Contents for E-134-A

Page 1: ..._ I _ _ _ _ _ _ _ _ _ _ _ _ _ _ _ t 1 _ _ _ _ ___ ______ _ __ _ ______ ______ ___ _ 1 1 7 _ ervice manual 35 HP MODELS 40 HP MODELS 50 HP MODELS E 134 A J 134 A E 144 A J 144 A E 164 A J 164 A SNOWMOB...

Page 2: ...g 4 2 Starting Manual Starter 4 3 Starting Electric Starter 4 3 Running Low Speed Only 4 3 Running High Speed Only 4 3 Running High and Low Speed 4 4 SECTION 5 TUNE UP PROCEDURES Description Factors A...

Page 3: ...or Coil Resistance Check Test 8 Charge Coil Resistance Check Test 9 Ignition Coil Continuity Power and Insulation Checks Test 10 Kilovolt Check Lighting System Trouble Shooting Lighting Coils Lighting...

Page 4: ...Secondary Assembly Cleaning and Inspection Reassembly Chain Case Disassembly Cleaning and Inspection Reassembly SECTION 11 STEERING TRACK AND SUSPENSION 10 1 10 1 10 2 10 3 10 3 10 3 10 3 10 4 10 4 1...

Page 5: ...lways use a separate clean container for mixing fuel 2 Do not pour lubricant or gasoline separately into vehicle tank 3 To prepare the snowmobile fuel properly pour into a SEPARATE clean container hal...

Page 6: ...placement In addition the exploded views illustrate the correct sequence of all parts This catalog can be of considerable help as a reference during disassembly and reassembly The Table of Contents on...

Page 7: ...Always be sure to give complete information including model number and vehicle serial number All information illustrations and specifications contained in this literature are based on the product inf...

Page 8: ...engine warm up to enrich the fuel air mixture to the engine Pull to choke 11 PRIMER Pushing the primer knob manually pumps fuel into the intake manifold A cold engine should be primed prior to startin...

Page 9: ...rotect the eyes from lashing tree and shrub branches and from wind and sun glare Goggles should meet the requirements of Vehicle Equipment Safety Commission regulation VESCO 8 Do not attempt to perfor...

Page 10: ...d with shock absorbing leaf springs and replaceable wear runners Seat Vinyl coated cover molded urethane foam cushion Hood Molded fiberglass Headlamp Sealed beam Westinghouse 7700 Taillamp Stoplamp GE...

Page 11: ...rdware against tie rod end ball to prevent distortion or binding Nut Bearing Cup to Chassis 6 8 Nut Cable to Solenoid 36 60 Screw Connecting Rod 29 31 Screw Crankcase 3 8 16 18 20 Screw Crankcase 5 16...

Page 12: ...019 Rod 316613 Seal Installer Front Bearing 114584 Disassembly Tool Primary Drive 114585 Ring Compressor 2 750 Bore 114586 Ring Compressor 2 875 Bore 114587 Ring Compressor 3 250 Bore 319924 Cone Wris...

Page 13: ......

Page 14: ...olution which consists of two strokes of the piston one from BDC to TDC and one from TDC to BDC Consequently the engine utilizing this basic principle is called a two stroke cycle engine It can be see...

Page 15: ...the body see Figure 3 2 opening the passage between the carburetor and crankcase When the piston is on the down stroke it compresses the crankcase charge forcing the reeds against the passage opening...

Page 16: ...halves are separated by a compression spring in the hub of the movable sheave half E B G 0 N M L TRANSMISSION LOCKED IN NEUTRAL Figure 3 3 As the engine speed increases centrifugal effect forces a ga...

Page 17: ...cap and push the movable sheave toward the fixed sheave In dOing this the movable sheave has covered the holes in the splined shaft and the neutral lockout balls can not be pushed into the locked pos...

Page 18: ...dentifying the problem 2 Determining the cause of the problem and 3 Correcting the problem Familiarity with the factors which affect two cycle engine perform ance is important in making a correct serv...

Page 19: ...ine improperly connected e Fuel line kinked or severely pinched f Engine not primed g Clogged fuel line or fuel filter h Clogged check valve i Carburetor adjustments too lean j Low speed needle bent o...

Page 20: ...LECTRIC STARTER 1 Starter cranks too slowly a Weak battery 4 3 b Loose or corroded connections c Faulty starter solenoid or solenoid wiring d Worn armature brushes or springs e Faulty armature shorted...

Page 21: ...oned up q Charge coils Power Pack 2S faulty 3 Idles well but acceleration poor dies at full throttle a Fuel lines or passages obstructed b Fuel filter clogged c Faulty fuel pump or pulse line d Faulty...

Page 22: ...tion timing off d Carbon build up on piston head exhaust ports or exhaust system 4 5 e Cylinder scored or rings stuck f High speed adjustment lean g Spark plugs fouled or misfiring 7 Engine misfires a...

Page 23: ......

Page 24: ...ssary for peak engine performance The tank should be removed emptied of old fuel rinsed out installed and refilled with a fresh supply at the beginning of the season and at every tune up A stale fuel...

Page 25: ...gine power and performance can be di vided into three groups namely 1 items affecting compression 2 items affecting ignition 3 items affecting carburetion Any tune up procedure should cover these grou...

Page 26: ...en all external boits nuts and screws and retorque spark plugs to specified torque 1 Check track tension and ski alignment see Section 11 m Start engine and allow to warm up Check track alignment see...

Page 27: ...ounterclockwise until it no longer con tacts the throttle arm 2 Check throttle cable to be sure there is slack and that the cable is not holding the throttle open 3 Hold throttle control lever on the...

Page 28: ...he intake manifold CARBURETOR The carburetor used on this snowmobile is the diaphragm operated HD series Tillotson The carburetor should be cleaned and inspected at regular intervals depending on serv...

Page 29: ...ture screw washer and tension spring Inspect for damaged threads see Figure 6 2 I THROTT E SH IDLE SPEED I l MIXTURESCREW HIGH SPEED P NEEDLE VALVE G IV t J CHOKE __ SHAFT llUUl I l 0 1 JlI l O CHOKE...

Page 30: ...g see Figure 6 3 If either mixture screw is damaged be sure to inspect the casting If the adjust ment seats are damaged a new body casting is required Check for clogged inlet and return line screen IM...

Page 31: ...in the closed position 6 Insert choke cable assembly through clamp on carburetor and insert cable through choke lever swivel pin With choke knob flush against face plate on instrument panel open chok...

Page 32: ...en in storage may be clogged without appearing to be During storage volatile agents as well as anti gum and anti varnish agents evaporate from the gasoline that remains in the fuel filter The result i...

Page 33: ...n on reassembly c Disconnect taillight wire inside seat compartment d Remove two nuts seat to chassis e Lift rear of seat and pull back f Remove three nuts from fuel tank hold down bracket g Fuel tank...

Page 34: ...g The alternator coils produce alternating current which changes in frequency and voltage in proportion to engine speed Alternating current is then used to power the headlamp taillamp and brakelamp Se...

Page 35: ...7 2 Figure 7 2 Figure 7 5 MERCO O TRONIC Figure 7 8 27098 27099 Figure 7 3 Figure 7 6 j GRAHAM Figure 7 9 37118 27070 Figure 7 4 27072 Figure 7 7 37314 STEVENS 27100 Figure 7 10...

Page 36: ...ric shock 7 Don t hold spark plug wires in your hand while checking for spark A severe electrical shock could result Use insulated pliers de signed for this purpose 8 Don t remove potting compound fro...

Page 37: ...ition C Remove spark plugs for easier cranking D Crank engine with manual starter with ignition switch in RUN position 1 Strong steady spark from both coils system is good 2 Weak erratic or no spark f...

Page 38: ...isconnect ignition switch orange black lead on terminal block terminal 7 Repeat test spark present replace wiring har ness to ignition switch F If no spark disconnect orange black lead from terminal b...

Page 39: ...re should be infinite reading on meter indicating ignition switch not shorted and lead not grounded C If less than 500K ohm reading remove terminal connectors from ignition switch and remove ignition...

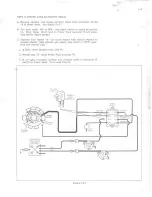
Page 40: ...A and crank engine with electric starter or manual starter with ignition and safety stop switch in RUN posi tion and observe light 1 If light check ignition coils test 9 2 Repeat step B using Power P...

Page 41: ...position 2 C Crank engine with electric starter or manual starter with ignition switch in RUN position and observe neon tester light 1 If light charge coils are good 2 If no light remove charge coil...

Page 42: ...2 and blue lead to sensor common terminal 8 Set rotary switch to position 3 C Crank engine with electric starter or manual starter with ignition and safety stop switch in RUN position and at same time...

Page 43: ...d align with advanced mark on the fan housing If no timing mark on flywheel can be seen and timing light is flashing check timing light pick up to be sure it s on cylinder 1 high tension lead E If tim...

Page 44: ...ion analyzers and their adapter for C D ignition are particularly recommended Detailed instructions for the use of any tester are provided with the unit therefore only general information is given her...

Page 45: ...while con ducting this test 2 Complete test as rapidly as possible as this is a severe test on a coil TEST 10 KILOVOLT CHECK using MERC O TRONIC KILOVOLT METER MODEL 172 A Remove spark plug B Connect...

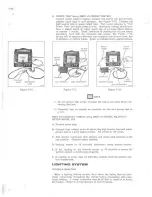
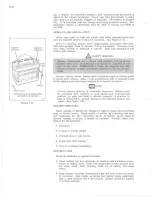
Page 46: ...ywheel as shown in the following test LIGHTING COIL RESISTANCE TEST A Remove terminal block cover B Set ohmmeter low ohms scale C Meter red lead to terminal block terminal 8 yellow wire with the ignit...

Page 47: ...itch is not properly adjusted brake switch will not function properly HEADLAMP TEST A Disconnect headlamp connector B Set ohmmeter HI ohms scale C Check for continuity across headlamp terminals IGNITI...

Page 48: ...been charged from an outside source Each cell in the storage battery consists of a negative plate of sponge lead and a positive plate of lead peroxide immersed in a solution of water and sulphuric ac...

Page 49: ...tight on battery posts to insure good contact Apply a coat of petroleum jelly to exposed areas of the battery posts and clamp connectors to retard corrosion Imill lJnNOTE Correct battery polarity is...

Page 50: ...ing electrolyte to proper level Fully charged batteries have been known to withstand temperatures as low as 90 F a discharged battery will freeze at about 19 F perhaps causing bursting of both the cel...

Page 51: ...original owner Should a battery fail due to inherent defects during the first three months of service it will be replaced on a nO Charge basis Batteries that fail during the balance of the warranty p...

Page 52: ...so that engine can be cranked without firing c Connect a voltmeter across starter motor see Figure 7 26 with positive lead to starter motor terminal and negative lead to ground on starter frame d Tur...

Page 53: ...ry b Voltmeter reading should be approximately 10 volts during this test Torque should be a minimum of 4 0 ft lbs and current should be a maximum of 512 amperes nTfnfi NOTE If motor smokes or gets hot...

Page 54: ...often varnish insulation used on armature and field windings All starter motor components can be cleaned adequately with a clean cloth or soft brush Cleaning end heads in solvent may dissolve the oils...

Page 55: ...j I...

Page 56: ...ove starter handle and tie knot in rope b Remove two bolts securing manual starter to blower housing using speed handle long extensions and 1 2 universal socket c Remove two bolts securing starter hou...

Page 57: ...the spring relax and install it in the housing d Wind starter rope clockwise toward pulley so that the rope comes off the top of the pulley See Figure 8 2 e Install return spring on pinion Install fr...

Page 58: ...c Loosen hood hinge bolt nuts d Remove hood restraint cable from top of engine e Remove hood f Remove belt guard g Remove manual starter handle and tie knot in rope h Remove throttle cable using the f...

Page 59: ...internal parts of engine and remove high tension leads from spark plugs b Remove five screws engine air shields to exhaust air outlet hous ing See Figure 9 2 c Remove four screws fan housing to air i...

Page 60: ...and the short bolt is located inside the housing n UNOTE Fan guard housing has an extra hole for removing electric starter motor when engine is so equipped k Use a 15 16 open end wrench and 3 8 open...

Page 61: ...they are kept matched Place engine upside down on work bench See Figure 9 8 x Remove three bolts attaching engine mounting frame to crankcase and remove engine hl INOTE The two long engine frame bolt...

Page 62: ...on quite easily an Remove wrist pins ao Remove piston rings Remove the bearing and seal assembly from the power take off end of the crankshaft by sliding it off of the shaft and splines To remove the...

Page 63: ...igure 9 12 d Install the piston rings on each piston Spread each ring with a ring expander just enough to slip it over the head of the piston and into place Be sure that the rings fit freely in the pi...

Page 64: ...each connecting rod up to the crankshaft throw making sure not to force or cause a bind between the connecting rod and the crankshaft throw Once the connecting rod has made contact with the crankshaft...

Page 65: ...w Install the spark plugs and torque to 18 to 20 foot pounds x Before installing the fan housing check to see that the sensors are against the stops in the timer base plate See Figure 9 19 Slide the f...

Page 66: ...n guard with the three 3 screws Remember the short screw fits at the top and at the inside of the guard hous ing The two 2 longer screws fit at the bottom and outside of the fan housing aj Install the...

Page 67: ...ten nut on choke cable clamp just enough to hold cable firmly Work choke knob to check for adjustment or possible binding j Assemble throttle cable using the follOwing procedure Depress thumb throttle...

Page 68: ...ETWEEN HALVES OF SECONDARY SHE AV E WHEN PERFORMING STEP 3 MOV ABLE SHEAVE IS SPRING LOADED AND COULD PINCH FINGERS PROCEDURE FOR REMOVING TRANSMISSION BELT e MOVE BELT BETWEEN ENGINE ANO SECONOARY SH...

Page 69: ...replaced Use a contact cement to secure new puck to carrier UrllUNOTE Keep all oil and grease from puck surfaces Braking action will be impaired by slipping on brake disc surface BRAKE CABLE AND CAM A...

Page 70: ...ION AND REPAIR IlIA SAFETY WARNING When using trichlorethylene as a cleaning agent use in a well ventilated area at normal room temperatures and under no circumstances heated Trichlorethylene vapors a...

Page 71: ...alignment of holes in lock plate and end cap turn lock plate over and rotate until aligned position is obtained 8 Operate the neutral lockout plunger to see that it functions prop erly When neutral l...

Page 72: ...d Align end cap keyway to stationary shaft keyway e Turn sliding sheave counterclockwise to next ramp 1 3 turn f Push down on end cap and install lock ring with sharp edge faCing out g If adjusting co...

Page 73: ...in a well ventilated area at ambient temperatures Under no circum stances should the solvent be heated Trichlorethylene vapors are poisonous b Check bearings for wear or roughness c Check shaft sheav...

Page 74: ...switch g Remove 2 philips screws from dash panel to support h Steering column can now be removed REASSEMBLY a Reassemble in reverse order of disassembly b Refer to throttle and brake cable adjustment...

Page 75: ...ings are in the center position of the three position bracket Next measure as shown in Figure 11 2 Track tension is correct if the dis tance measured from the underside of the chassis to the dimple on...

Page 76: ...r 1 silver 1 blue Rear blue Mark boggie assemblies so that on reassembly they are assem bled in the correct position on the chassis f For disassembly of truck assemblies see Figure 11 4 g Boggie wheel...

Page 77: ...x Press bearing on right end of axle U 11l11NOTE Caution must be used when assembling left side of axle into chain case Axle must be centered during entire assembly proc ess until left bearing is in...

Page 78: ...en be traced to an excess of lubricant in the fuel mixture Instructions for the mixing of fuel during break in and normal operation as given here and in the Owner s Manual should be followed exactly T...

Page 79: ...ughly agitate this partial mixture Next add the balance of gasoline necessary to bring the mixture to the required ratio of 50 1 Again thoroughly agitate the mixture A clean funnel equipped with a fin...

Page 80: ...g connections to skis SAE 10 Oil CD After 10 hrs then Drive Chain oil bath OMC Sea Lube Automatic in U S every 25 hrs In Canada use OMC Type C Transmission Fluid r CDOnce a season Have dealer lubricat...

Page 81: ...r mixture and run rough and reduce fuel economy To clean silencers shake to dislodge dirt particles blow with compressed air and shake wash in warm water with a mild detergent FUEL FILTER SCREEN FUEL...

Page 82: ...nside surfaces of primary and secondary sheaves and other unprotected surfaces of vehicle with oily cloth 7 Block entire vehicle off ground to take weight off track Loosen track tension 8 Store in dry...

Page 83: ...I...

Reviews: