background image

So?ware   Installa,on


24


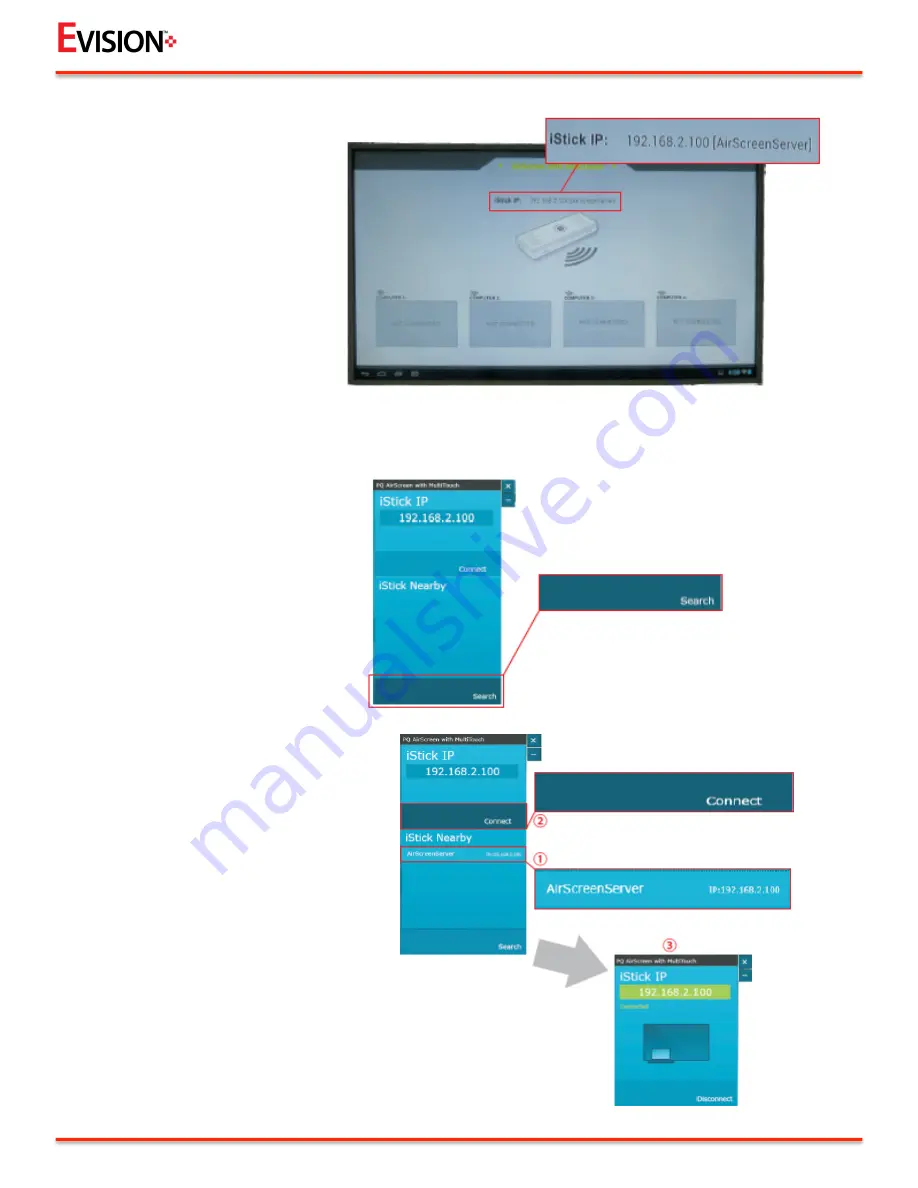
This   is   what   the   interface   for   this   

sohware   should   look   like...   


Click   the   search   buAon   at   the   

boAom   to   start   a   search.   


You   will   then   see   op'ons   to   

connect...   

   
Select   which   airscreen   server   

you   which   to   connect   to   and   
click   connect.   

Summary of Contents for EV844K MT12

Page 1: ...65 Interac ve Touch Screen Manual...

Page 2: ...und wallpaper se6ng Resolu on se6ngs Applica on management Display input se9ngs Func on buAon VGA signal access HDMI signal access Func on menu se9ng Image se6ng Sound se6ngs Time se6ngs Language se6n...

Page 3: ...Installa on Steps 1 Step one Assemble the base so that it resembles Figure 1 Step two Remove the wall mount from the base Ensure you keep this in a safe place Figure 1 Figure 2...

Page 4: ...teps 2 Step three The holes in the support column should line up with the screw holes in the back of the screen Step two Once aAached it should be as shown in gure 5 Wall hanging screws Figure 3 Figur...

Page 5: ...an add a mini USB to RJ45 adapter to allow you to use mini USB devices or Ethernet A TF Memory card can be added Step two Figure 7 is the rear of a 65 LCD monitor showing the available connec ons Figu...

Page 6: ...Complete Setup 4 Front Back...

Page 7: ...Se9ngs On the main screen you will see there is an icon located at the top right of the screen Selec ng this will take you to the screen showing all of the applica ons When on the All Programs screen...

Page 8: ...e system se6ngs menu Select Wi Fi and you will get the op ons on the right side of the screen to setup your Wi Fi Select the network you wish to connect to You will then be required to enter your pass...

Page 9: ...the System Se6ngs menu you can nd the Ethernet op ons by selec ng more then Ethernet Once you have selected the Ethernet op on you will get a pop up as shown above NB you will require the USB to RJ45...

Page 10: ...System Se9ngs 8 Sound Se9ngs You can adjust the sound se6ngs by selec ng sound and then volume You can adjust by moving the horizontal sliders...

Page 11: ...System Se9ngs 9 Brightness Se9ngs The brightness se6ngs can be adjusted to suit by selec ng show and then brightness You will then need to move the horizontal sliders...

Page 12: ...System Se9ngs 10 Background Wallpaper Se9ngs Your wallpaper can be changed by selec ng show and then wallpaper You will then get a pop up asking you where to select an image from...

Page 13: ...System Se9ngs 11 You will then have another window showing the contents of the folder you have selected Once you have chosen your selec on press the select wallpaper buAon at the boAom of the screen...

Page 14: ...em Se9ngs 12 To setup your resolu on you will need to select HDMI Con gura on in System Se6ngs and then resolu on se ngs on the right You will then have the op on to change your resolu on Resolu on Se...

Page 15: ...System Se9ngs 13 Apps can be found in the system se6ngs and then managed from the pop up on the right Further op ons can be found by selec ng an applica on icon Applica on Se9ngs...

Page 16: ...side of the screen Pressing the top buAon ENTER will then give you the Input Source Selec on use the select buAon or select buAon to scroll up and down Pressing the volume buAon will con rm your sele...

Page 17: ...Ensure you are using the VGA port when selec ng the VGA Input which is located on the back of the screen The HDMI ports are located to the immediate leh of the VGA port VGA Signal Access HDMI Signal A...

Page 18: ...he image se6ngs can be adjusted using the func on buAons Using the func on buAons on the leh hand side of the screen press the menu buAon to get the above screen Image Se9ngs Enter Menu Select Select...

Page 19: ...Func on Menu Se9ngs 17 Use H or H to scroll across the tabs at the top of the screen Press the IN buAon to make a selec on The same buAons are used within the above menu to select your choice...

Page 20: ...From the main menu select sound by using C or C and then IN to con rm selec on Use H or H to scroll across Press the IN buAon to make a selec on Sound Se9ngs In the mini menu use H or H to scroll up a...

Page 21: ...9 From the main menu select me by using C or C and then IN to con rm selec on Use H or H to scroll across Press the IN buAon to make a selec on Time Se9ngs In the mini menu use H or H to scroll up and...

Page 22: ...select se ngs by using C or C and then IN to con rm selec on Use H or H to scroll across Press the IN buAon to select Menu Language Language Se9ngs In the pop up using the H buAons select the languag...

Page 23: ...o ware Installa on 21 Using the CDROM provided install the Windows exe le Click NEXT to con nue As shown in the image to the right select install Driver Plamorm then NEXT Client Installa on Then Finis...

Page 24: ...So ware Installa on 22 Next you will need to install AirscreenInstaller_0606 exe Click NEXT to con nue Accept the terms and the NEXT Select Install...

Page 25: ...So ware Installa on 23 Select Finish to complete the install From the main screen select the apps icon You will then nd the icon of the sohware just installed...

Page 26: ...This is what the interface for this sohware should look like Click the search buAon at the boAom to start a search You will then see op ons to connect Select which airscreen server you which to connec...

Page 27: ...ing Angle Wide angle Right Leh 178 min up down 178min Energy Level 1 Power 220w Standby Power 0 50w Response Time 5ms Display Mode Transfer mode screen display mode Surface Treatment Hard coa ng 3h fr...

Reviews: