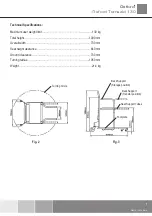
background image

Oxford

®

Oxford Transaid 130

294000.10398  Rev A

9

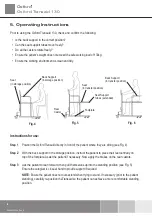
Step   When the patient is in the standing position, extend the two seat support tubes out fully from their    


storage position (see Fig. 5).


NoTE: If the seat support tubes cannot be fully extended, no transfer must  take place as the seat    


cannot be safely fitted.

Step 

  Remove the seat from its storage position and place firmly on top of the seat support tubes (see Fig. 5)   


with grooves facing downwards, ensuring that the carry handle slot is on the outside edge.


NoTE: The seat support tubes must be fully extended. 

Step   Insert the back support into the locating holes in the  Transfer position. Make sure the back support is   


fully inserted into the locating holes (no bare metal should be showing), then ask the patient to sit    


down on the seat (see Fig. 6).


NoTE: The back support will prevent the patient from falling backwards during transfer.

Step 7  Prior to commencing transfer, ensure the patient is holding onto either the back support or front  


grab rail. Unlock the rear castors and transfer the patient to the desired location (i.e. chair/toilet/bed   


or shower). Carefully manoeuvre the Transaid into position as close to the chair, bed or shower as    


possible or over the toilet, then apply the brakes on the rear castors.


NoTE: Ensure there are no inclines or declines exceeding 5 degrees during transfer.

Step 8  Instruct the patient to lean forward slightly, hold onto the grab rail and assume a standing  position. 


When the patient is fully standing, remove the seat and return to its storage  position within the 


retaining clips. Remove the back support, then slide the seat support tubes  back fully into their 


tube housings.

Step 9  Instruct the patient to then carefully sit down onto the chair/toilet/bed or shower seat whilst holding    


onto the front grab rail. Once the patient is safely re-seated and the transfer is complete, carefully    


move the Transaid away from the patient.


The Transaid can now be stored or re-used for further transfers.

Summary of Contents for Oxford Transaid 130

Page 1: ......

Page 2: ......

Page 3: ...n the following Carton contents General guidance for use and an overview of the product Step by step operating instructions Maintenance and inspection information Warranty information The Transaid 130...

Page 4: ...ned to assist with care duties for patients who have some difficulty walking but have the ability to stand independently Using this device assists the caregiver to be able to move the patient safely a...

Page 5: ...ce a year by a competent person Should the Oxford Transaid be damaged during normal use or in transit the product must not be used Please contact your local Oxford distributor or Joerns Healthcare The...

Page 6: ...ck support The Transaid has a detachable back support inside width 49 5cm It is designed to provide reassurance for the patient during the transfer and encourage them to sit in an upright position The...

Page 7: ...m user weight limit 130 kg Total height 1090 mm Overall width 730 mm Seat height clearance 640 mm Ground clearance 730 mm Turning radius 1050 mm Weight 21 4 kg Turning Circle Back Support Storage posi...

Page 8: ...in the storage position instruct the patient to place their feet centrally on top of the footplate Assist the patient if necessary Now apply the brakes on the rear castors Step 3 Ask the patient to le...

Page 9: ...rior to commencing transfer ensure the patient is holding onto either the back support or front grab rail Unlock the rear castors and transfer the patient to the desired location i e chair toilet bed...

Page 10: ...Transaid is clean Clean using a damp cloth with ordinary soap and water and or any hard surface disinfectant Harsh chemical cleaners or abrasives should be avoided as these may damage the surface fini...

Page 11: ...ct Person Tel Condition Good Satisfactory Poor Observations Good Sat Poor Findings Actions Hygiene of device Backrest black Seat support tubes Footplate retaining clips Seat Castors front rear Frame W...

Page 12: ...100070 3 Footplate 13100110 4 Seat support tubes 13300010 5 Braked rear castor 13100100 6 Front castor 13100260 7 Front castor pin 13100270 8 Cap d 30 13100200 9 Cap for seat support rail 13100200 10...

Page 13: ......

Page 14: ......

Reviews: