background image

13

7-Electricity

7.2 The operation of the wire controller

14

7-Electricity

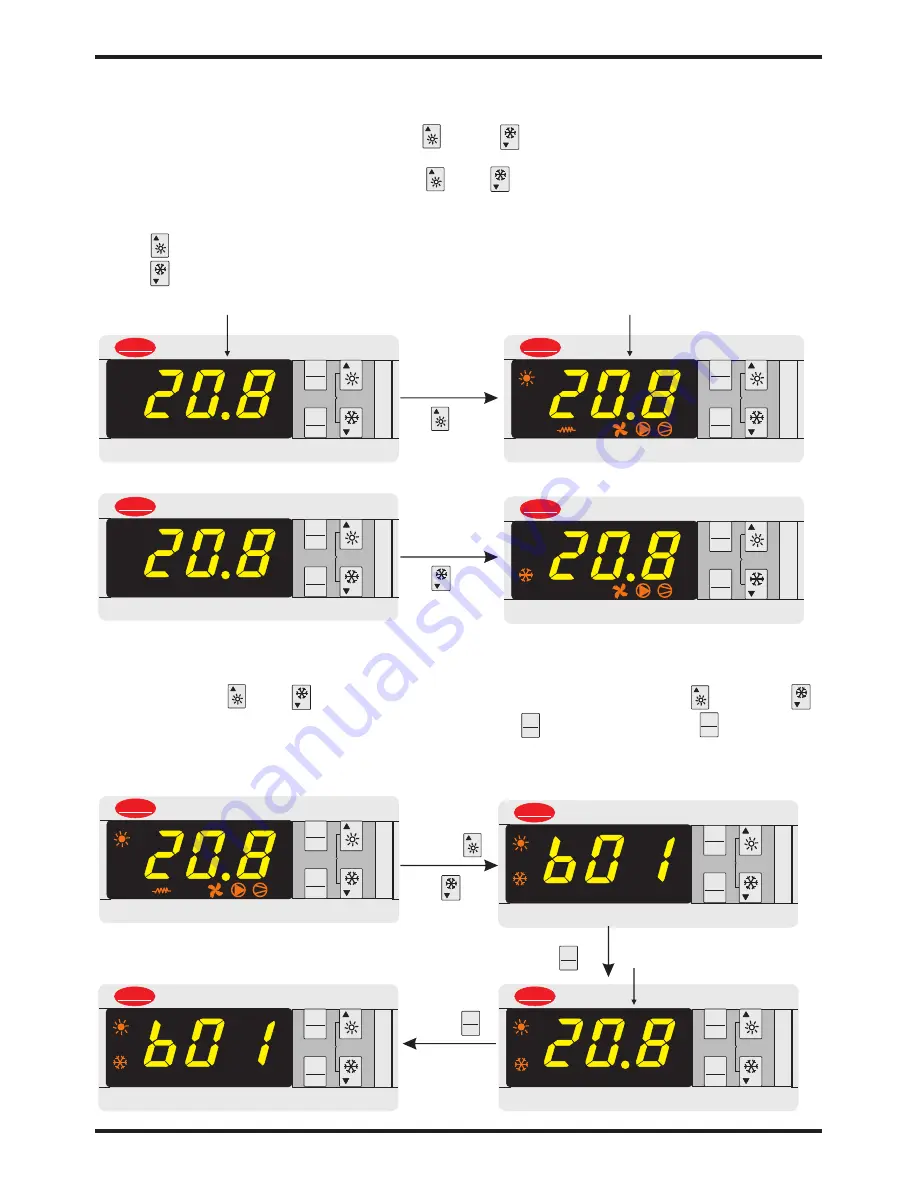
1 Turn on/off

On the state of power off, pressing(for 5s)


 or  


could start the unit. The screen 

displays the mode and water inlet temperature

On the state of power on

pressing(for 5s)


or


could turn off the unit. For the 

corresponding modes please refer to the corresponding buttons. The screen shows the water 

inlet temperature.

Press


the system will be heating;

Press


the system will be cooling.

Prg

mute

Sel

clear

CAREDL

μ

C SE

2

Prg

mute

Sel

clear

1
2

CAREDL

μ

C SE

2

Prg

mute

Sel

clear

1
2

CAREDL

μ

C SE

2


Continually press

“    ”

Prg

mute

Sel

clear

CAREDL

μ

C SE

2

 Continually press

“    ”

 On the state of standby

 On the state of power on

2 Check the parameters

On the state of power on or power off, the measured temperature of B01-B04 could be  

checked. Press


or


to enter into the temperature interface. Press


(Up)or


(Down) to find the needed temperature, then press


to check it. Press 


to return 

back to the previous interface.

B01:Inlet water temp.

B02:Outlet water temp.

B03:Coil temp.

B04:Ambient temp.

Sel

Prg

mute

Prg

mute

Sel

clear

1
2

CAREDL

μ

C SE

2

Prg

mute

Sel

clear

CAREDL

μ

C SE

2

press


or

“     ”

Prg

mute

Sel

clear

CAREDL

μ

C SE

2

Press

“    ”

Prg

mute

Sel

clear

CAREDL

μ

C SE

2

Press


back to  the

 former

 interface

Sel

Prg

mute

The water inlet 
temperature is 20.8

 Water inlet temperature

 Water inlet temperature

3 Temperature setting

On the state of power on or power off, you could set the heating or cooling temperature.

Press

and hold for 5s to enter into the parameter setting interface. Press

(Up)or

(Down) to choose the needed setting. Press

to confirm. Press

again to enter into 

the corresponding parameter setting interface. Pressing

or

could increase or 

decrease the value of  the parameters. Press

conserve settings.Back the previous 

interface press

.

The setting of parameters will effect the performance and efficiency of the unit. Do not make any 

change of them when it is not necessary. r01/r02/r03/r04 are permitted to set by the users. For 

the default values please refer to 

Parameters Table

.

The permitted setting are shown as below (take r01 for example)

Sel

Prg

mute

Sel

Sel

Sel

Prg

mute

Sel

clear

1
2

CAREDL

μ

C SE

2

Prg

mute

Sel

clear

CAREDL

μ

C SE

2

Prg

mute

Sel

clear

CAREDL

μ

C SE

2

Prg

mute

Sel

clear

CAREDL

μ

C SE

2

Prg

mute

Sel

clear

CAREDL

μ

C SE

2

Prg

mute

Sel

clear

CAREDL

μ

C SE

2

Prg

mute

Sel

clear

CAREDL

μ

C SE

2

Prg

mute

Sel

clear

CAREDL

μ

C SE

2

Continually press

“    ”

Sel

press


or


select "r"

 Press


Sel

Press


Sel

Press


   or


press


to 

save setting

Sel

Press


to return back to 

the fomer

 interface

Prg

mute

Cooling temperature set value

Summary of Contents for Evo Control 8

Page 1: ......

Page 2: ...it 5 HYDRAULIC CONNECTIONS 5 1 Hydraulic connections 5 2 Connection of the chilled water loop 5 3 Drainniag 5 4 Treminal insulation 5 5 Starting operation 5 6 Saffety differencial pressostat 5 7 Hydraulic module 6 ELECTRICAL CONNECTION 6 1 Electrical connection 7 ELECTRICITY 7 1 7 2 7 3 7 4 Compensate temperature chart 8 MAINTENANCE 9 The operation manual of the wire controller The operation of th...

Page 3: ...must come in contact with the heat source or the fan rotating parts WARNING Preparation for shutting down the unit for a prolonged period if the installation does not contain glycol the evaporator and the chilled water pipes need to be carefully and completely drained of water Take care The unit should be handled using lifting and handling equipment appropriate to the unit s size and weight Take c...

Page 4: ...2 Description 3 2 1 DIMENSIONS 705 43 95 Top view 400 420 700 Models Evo Control 8 Front view 645 1015 Electric wire hole Water outlet 1 inch Drainage 1 2inch Water inlet 1 inch 479 ...

Page 5: ... letter with acknowledgement of receipt The manufacturer is not liable for physical damage to the unit after acceptance WARNING The sharp edges and surfaces of the coils can cause injury Avoid contact with them 2 3HANDLING THE UNIT Take care to avoid any sharp movements during the unloading and moving of the unit Do not push or pull it by any other means than its base Place a safety wedge between ...

Page 6: ...ressor Quantity Compressor Fan Quantity Fan Power Input Fan rotate speed Noise Water Pump Input Water head Water Connection Water Flow Volume Water Pressure Drop Capacity Of Water Storage Unit Net Dimensions L W H Unit Shipping Dimensions L W H Net Weight Shipping Weight kW Btu h kW Btu h kW kW A W RPM dB A kW m inch 3 m h kPa L mm mm kg kg See package label See nameplate See package label See the...

Page 7: ...d to high wind avoid the wind striking the fan surfaces directly The arrows show the direction of air circulation through the unit refer to diagram opposite 4 2 Fitting the unit After installation all sides of the unit must be accessible for regular maintenance operations Removal of Panel 1 provides access to the electrical junction box the compressor and the cooling circuit Note Panel 1 is remova...

Page 8: ... exchanger during handling and installation operations However it can create a risk of clogging with frost or ice on heat pump machines installed in cold or mountainous regions and exposed to the elements To avoid such a risk a shelter must be provided or the protective grill can simply be removed ...

Page 9: ...ts on the chilled water circuit 4 An adequate system to maintain water pressure in the circuit expansion tank or pressure regulating valve 5 Thermometers and pressure gauges installed on the exchanger inlet and outlet They will facilitate regular checks and maintenance 6 To avoid any risk of foreign bodies entering the system and to maintain optimum performance it is strongly advised to install th...

Page 10: ...s adequate to fill the installation 5 3 DRAINING Units are equipped with couplings to fill and drain the hydraulic circuit according to standards in force The water should come from a distribution network either to the unit directly or to any other point on the circuit linking the terminal units together 5 4 TERMINAL INSULATION In order to properly keep power consumption low and to comply with sta...

Page 11: ... DIFFERENTIAL PRESSOSTAT A safety differential pressostat is fitted as standard on the water inlet pipe into the evaporator in order to ensure adequate water flow to the evaporator before starting the unit It acts both in the event of partial blockage starting to take in ice and in the event of a drop in water flow due to pump failure This is the machine s main protection device 5 7 HYDRAULIC MODU...

Page 12: ...panel which allows access to the junction box To remove the inspection panel extract the controller from its support bracket Thread the power supply cable through the cable guide provided on the unit WARNING On site wiring must be carried out in accordance with the wiring diagram affixed to the unit s junction box The power cables for general power supply to the unit must have a copper core and be...

Page 13: ...ally pressing this button could start the heating mode Function2 pressing this button could turn up and increase the value Function1 continually pressing this button could start the cooling mode Function2 pressing this button could turn down and increase the value 1 About buttons 2 About icons Ico 1 2 3 4 Meaning Heating mode Compressor1 and 2 start up At least one compressor starts up Condensate ...

Page 14: ...y press Prg mute Sel clear CAREDL μ C SE 2 Continually press On the state of standby On the state of power on 2 Check the parameters On the state of power on or power off the measured temperature of B01 B04 could be checked Press or to enter into the temperature interface Press Up or Down to find the needed temperature then press to check it Press to return back to the previous interface B01 Inlet...

Page 15: ... of the unit Do not make any change of them when it is not necessary r01 r02 r03 r04 are permitted to set by the users For the default values please refer to Parameters Table The permitted setting are shown as below take r01 for example Sel Prg mute Sel Sel Sel Prg mute Sel clear 1 2 CAREDL μ C SE 2 Prg mute Sel clear CAREDL μ C SE 2 Prg mute Sel clear CAREDL μ C SE 2 Prg mute Sel clear CAREDL μ C...

Page 16: ...perature Heating temperature difference R02 R03 R04 2 40 2 1 4 Malfunction When there is something wrong with the unit the wire controller will display the error code according to the fault reason For the detailed meanings of the error codes please refer to the Fault Table For example Prg mute Sel clear CAREDL μ C SE 2 Water inlet fault ...

Page 17: ...he screw terminal block every 6 months CONDENSER COILS The condenser coils do not require any special maintenance except when they are clogged by paperor any other foreign bodies In corrosive atmospheres providefor suitable protection Cleaning is by washing with detergent and water at low pressure and then rinsing with clean water EVAPORATOR The direct expansion evaporator comprises a tube in tube...

Page 18: ...oduct at the end of its useful life must be handled separately from domestic waste must be taken to a recycling centre for electric and electronic devices or handed back to the dealer when purchasing an equivalent appliance 6 Directive 2002 95 EC RoHs This product is compliant with directive 2002 95 EC RoHs concerning restrictions for the use of harmful substances in electric and electronic device...

Page 19: ... line MCB Creepage protector Signal line 2 n 0 5mm Nameplate maximum current Earth line No more than 10A 20A 32A 40A 40A 63A 80A 100A 125A 160A 225A 250A 280A 2 1 5mm 2 2 5mm 2 4mm 2 6mm 2 10mm 2 16mm 2 mm 25 2 mm 25 2 35mm 2 50mm 2 70mm 2 95mm 2 Three phase unit 2 3 1 5mm 2 3 2 5mm 2 3 4mm 2 3 6mm 2 3 10mm 2 16mm 3 2 25mm 3 2 3 25mm 2 3 35mm 2 3 50mm 2 3 70mm 2 3 95mm 30mA less than 0 1 sec 30mA ...

Page 20: ...Code 20170517 0001 ...

Reviews: