background image

End Cap 

(B)

UV Bulb 

(C)

Bulb Socket 

(F)

End Cap Sealing Ring 

(I)

Quartz

Sleeve 

(D)

Thread

Quartz

Sleeve

O-Ring 

(G)

Locking

Nut 

(H)

evoUV

Body

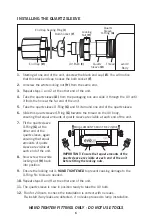
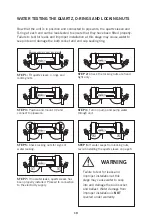
INSTALLING THE QUARTZ SLEEVE

EQUAL AMOUNTS MUST BE VISIBLE

1.

   Starting at one end of the unit, unscrew the black end cap 

(B)

. You will notice  

that this black end cap houses the bulb socket 

(F)

.

2.

   Unscrew the white locking nut 

(H)

 from the same end.

3.

   Repeat steps 1 and 2 at the other end of the unit.

4.

    Take the quartz sleeve 

(D)

 from the packaging box and slide it through the UV until 

it finds the hole at the far end of the unit.

5.

   Take the quartz sleeve O-Ring 

(G)

 and fit it around one end of the quartz sleeve.

6.

    Slide this quartz sleeve O-Ring 

(G)

 towards the thread on the UV body,  

ensuring that equal amounts of quartz sleeve are visible at each end of the unit.

7.

   Fit the quartz sleeve 

O-Ring 

(G)

 at the 

other end of the 
quartz sleeve, again 
ensuring that equal 
amounts of quartz 
sleeve are visible at 
each end of the unit. 

8.

    Now screw the white 

locking nut 

(H)

 back 

into position. 

9.

   Ensure the locking nut is 

HAND TIGHTENED

 to prevent causing damage to the 

O-Ring. No tools are needed. 

10.

 Repeat steps 8 and 9 at the other end of the unit.

11.

 The quartz sleeve is now in position ready to take the UV bulb.

12.    

Run for 24hours to check the installation is correct with no leaks. 
Re-install if any leaks are detected - if no leaks proceed to lamp installation.

IMPORTANT:

 Ensure that equal amounts of the 

quartz sleeve are visible at each end of the unit 
before fitting the locking nuts.

HAND TIGHTEN FITTINGS ONLY - DO NOT USE TOOLS

6

Summary of Contents for evoUV

Page 1: ...ttempt to conduct any type of maintenance on the evoUV Ensure the unit is installed in the recommended orientation Fit the quartz sleeves and O rings and switch on pump to check that unit is water tig...

Page 2: ...e an appliance for anything other than its intended use The use of attachments not recommended or sold by the appliance manufacturer may cause an unsafe condition This unit must be earthed when earth...

Page 3: ...sleeve are packed separately for safe transit Please refer to pages 6 and 7 of this manual for instructions on how to install the bulb and quartz sleeve Quartz Sleeve O Rings and End Cap Sealing Ring...

Page 4: ...S AND COMPONENTS LIST Please familiarise yourself with the components shown in the diagram below For optimum performance the electronic ballast has been configured for UV bulbs supplied by Evolution A...

Page 5: ...pipework not supplied For best possible sterilisation results use an over rated unit with an under rated flow rate and replace the UV bulb with new every six months Always combine with effective mech...

Page 6: ...wards the thread on the UV body ensuring that equal amounts of quartz sleeve are visible at each end of the unit 7 Fit the quartz sleeve O Ring G at the other end of the quartz sleeve again ensuring t...

Page 7: ...e evoUV units are sealed in a water tight unit The evoUV has an IP rating of 64 Fix your evoUV into position using the stainless steel brackets attached to the evoUV Screws and washers are not provide...

Page 8: ...return to main aquarium using hard pipe evoUV connected to external filter Fit evoUV to outlet return hose to aquarium evoUV connected to pump in sump Fit evoUV to pump return to main aquarium using f...

Page 9: ...ightened using tools as it may crack or damage the thread Slide flexible pvc hose not supplied over the barb of the hosetail at each end This can be eased by dipping the end of the flexible pvc hose i...

Page 10: ...Turn on pump and pump water through unit STEP 5 Check locking nuts for signs of water leaking STEP 7 If no water leaks quartz sleeve has been properly installed Proceed to connection to the electrici...

Page 11: ...lift the evoUV as this may cause damage WARNING A Residual Current Device RCD also known as the Residual Current Circuit Breaker RCCB with a tripping current not exceeding 30mA must be installed in th...

Page 12: ...e UV bulb pins You may need to hold the other end of the UV bulb to help you fit the socket 6 Ensure the UV bulb socket is firmly connected to the UV bulb 7 Repeat steps 3 to 6 at the other end of the...

Page 13: ...s out of the way carefully slide out the UV bulb WARNING If the end caps electrical connections get wet during this procedure please ensure that they are thoroughly dried before re connecting TO INSTA...

Page 14: ...water 7 Clean the sleeve and polish with a soft cloth or paper towel If you live in a hard water area you may get limescale on the quartz sleeve this can be easily removed by using vinegar or a cold...

Page 15: ...the end caps Please see the troubleshooting section Thermal Overload Protection This will automatically switch off the unit should the temperature exceed the maximum operating temperature limits Auto...

Page 16: ...age caused by improper fitting of the quartz sleeve o rings and locking nuts are not covered under warranty Since fitting the evoUV my pump flow is restricted In order to be an effective steriliser th...

Page 17: ...ogens and helping to prevent the spread of pathogens from tank to tank on centralised fish systems if set up correctly It can only ever be effective on pathogens which pass inside the unit and are dir...

Page 18: ...rantee does not cover the evoUV bulb or quartz sleeve The manufacturer or supplier shall not be responsible or held liable for any damages caused by defective components or materials of this product o...

Page 19: ...19...

Page 20: ...s manufacturer who put innovation research and development at the top of their agenda With a proven track record for delivering the latest technology to the aquatics and fish farming markets we are th...

Reviews:

Related manuals for evoUV