background image

12

www.evolutionpowertools.com

Causes and operator 
prevention of kickback:

Kickback is a sudden reaction to a pinched, 
bound or misaligned saw blade, causing an 
uncontrolled saw to lift up and out of the 
workpiece toward the operator:

1. when the blade is pinched or bound 
tightly, the blade stalls and the motor 
reaction drives the unit rapidly back 
toward the operator.

2. If the blade becomes twisted or 
misaligned in the cut, the teeth at the 
back edge of the blade can dig into the top 
surface of the workpiece causing the blade 
to close in around the material and jump 
back towards the operator.

Kickback is the result of saw misuse and/
or incorrect operating procedures or 
conditions and can be avoided by taking 
proper precautions as given below.

a) Maintain a firm grip with both hands 
on the saw and position your arms to 
resist kickback forces. 

Position your body 

to either side of the blade, but not in line 
with the blade. Kickback could cause the 
saw to jump backwards, but kickback forces 
can be controlled by the operator, if proper 
precautions are taken.

b) If the blade is binding, or when 
interrupting a cut for any reason, release 
the trigger and hold the saw motionless 
in the material until the blades come to a 
complete stop. 

Never attempt to remove the 

saw from the work or pull the saw backward 
while the blades are in motion or kickback may 
occur. Investigate and take corrective actions 
to eliminate the cause of blade binding.

c) when restarting a saw in the workpiece, 
centre the saw blade in the cutting groove 
and check that saw teeth are not engaged 
into the material. 

If saw blade is binding, it 

may walk up or kickback from the workpiece 
as the saw is restarted.

d) Support large panels to minimise the 
risk of blade pinching and kickback. 

Large 

panels tend to sag under their own weight. 
Supports must be placed under the panel on 
both sides, near the line of cut and near the 
edge of the panel.

e) Blade depth and bevel adjusting locking 
levers must be tight and secure before 
making a cut.

 If the blade adjustment shifts 

while cutting it may cause binding and kickback.

f) do not use dull or damaged blades. 

Unsharpened or improperly set blades 
produce a narrow cutting groove causing 
excessive friction, blade binding and kickback.

g) use extra caution when making a 
“plunge cut” into existing walls or other 
blind areas. 

The protruding blade may cut 

objects that can cause kickback.

Further Safety Instructions  

Caution: 

Unplug the power tool before 

making these checks. 

a) Check lower guard for proper closing 
before each use. 

Do not operate the saw if 

lower guard does not move freely and close 
instantly. Never clamp or tie the lower guard 
into the open position. If saw is accidentally 
dropped, lower guard may be bent. Raise the 
lower guard and make sure it moves freely and 
does not touch the blade or any other part, in 
all angles and depths of cut.

b) Check the operation of the lower 
guard spring. 

If the guard and the spring 

are not operating properly, they must be 
serviced before use. Lower guard may operate 
sluggishly due to damaged parts, gummy 
deposits, or a build-up of debris.

c) Lower guard may be retracted manually 
only for special cuts such as “plunge cuts” 
and “compound cuts.” 

Raise lower guard 

by retracting handle and as soon as blade 
enters the material, the lower guard must be 
released. For all other sawing, the lower guard 
should operate automatically.

Summary of Contents for EvoSaw 230

Page 1: ...Date Published 01 02 2014 Written in UK English V1 Original Instructions EN ES FR SAW230 ...

Page 2: ......

Page 3: ...EN ES FR EN ENGLISH Original Instructions ...

Page 4: ...ower Tool Page 8 SAFETY PRECAUTIONS Electrical Safety Page 9 Outdoor Use Page 9 General Power Tool Safety Instructions Page 9 Additional Safety Instructions Page 11 GETTING STARTED Unpacking Page 13 Machine Overview Page 14 Assembly and Preparation Page 15 Operating Instructions Page 15 MAINTENANCE Environmental Protection Page 21 DECLARATION of CONFORMITY Page 22 English Page 2 Español Página 24 ...

Page 5: ...n Power Tools will within the guarantee period and from the original date of purchase repair or replace any goods found to be defective in materials or workmanship This guarantee is void if the tool being returned has been used beyond the recommendations in the Instruction Manual or if the machine has been damaged by accident neglect or improper service This guarantee does not apply to machines an...

Page 6: ...ric Imperial Motor USA 120v 60Hz 1750W 15A Motor UK EU 230v 50 60Hz 1750W 8A Motor UK 110v 50 60Hz 1750W 15A Speed No Load 2700min 1 2700rpm Weight 8 6kg 19lbs BLADE Mild Steel Blade Metric Imperial Diameter 230mm 9 Bore 25 4mm 1 Number of Teeth Supplied Blade 48 48 Kerf 2mm 078 Speed 3000min 1 3000rpm Noise Vibration Data Sound Pressure LPA Under Load 108 7dB A K 3dB A Sound Power Level LWA Under...

Page 7: ...ring operation e g the work surfaces condition and orientation and the type and condition of the machine being used Before each use such factors should be assessed and where possible appropriate working practices adopted Managing these factors can help reduce the effects of vibration Handling Handle the machine with care allowing the machine to do the work Avoid using excessive physical effort on ...

Page 8: ...Aluminium blade change recommended StainlessSteel bladechangerecommended Lumber blade change recommended PROHIBITED USE OF THIS POWER TOOL WARNING This product is a Steel Cutting Hand Held Circular Saw and must only be used as such It must not be modified in any way or used to power any other equipment or drive any other accessories other than those mentioned in this Instruction Manual WARNING Thi...

Page 9: ...or battery operated cordless power tool 1 General Power Tool Safety Warnings Work area safety a Keep work area clean and well lit Cluttered or dark areas invite accidents b Do not operate power tools in explosive atmospheres such as in the presence of flammable liquids gasses or dust Power tools create sparks which may ignite the dust or fumes c Keep children and bystanders away while operating po...

Page 10: ...at these are connected and properly used Use of dust collection can reduce dust related hazards 4 General Power Tool Safety Warnings Power tool use and care a Do not force the power tool Use the correct power tool for your application The correct power tool will do the job better and safer at a rate for which it was designed b Do not use the power tool if the switch does not turn it on or off Any ...

Page 11: ...bjects being thrown towards your eyes which could result in severe eye damage Before beginning power tool operation always wear safety goggles or safety glasses with side shield or a full face shield where needed ADDITIONAL SAFETY INSTRUCTIONS a DANGER Keep hands away from cutting area and the blade Keep your second hand on auxiliary handle or motor housing If both hands are holding the saw they c...

Page 12: ... If saw blade is binding it may walk up or kickback from the workpiece as the saw is restarted d Support large panels to minimise the risk of blade pinching and kickback Large panels tend to sag under their own weight Supports must be placed under the panel on both sides near the line of cut and near the edge of the panel e Blade depth and bevel adjusting locking levers must be tight and secure be...

Page 13: ...ake care when unpacking Remove the machine together with the accessories supplied from the packaging Check carefully to ensure that the machine is in good condition and account for all the accessories listed in this manual Also make sure that all the accessories are complete If any parts are found to be missing the machine and its accessories should be returned together in their original packaging...

Page 14: ...14 www evolutionpowertools com MACHINE OVERVIEW 1 ON OFF TRIGGER SWITCH 2 AUXILIARY FRONT HANDLE 3 LASER ON OFF SWITCH 4 LASER BATTERY COMPARTMENT 5 LOWER BLADE GUARD 6 FITTED BLADE IN SITU 1 2 3 4 5 6 ...

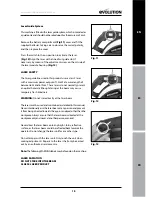
Page 15: ...tion with the machine disconnected from the power supply Note It is recommended that the operator considers wearing protective gloves when handling the blade during installation or when changing the machine s blade Place saw on a level secure surface Remove the chip collector from the machine by undoing the large thumb screw Fig 1 Note The chip collector thumb screw is captive and cannot be remove...

Page 16: ...ecurelytighten thethumb screw Check that the arbor lock is fully released by manually rotating the blade Replace the wrench and secure it into the base plate using the thumb screw Replace the parallel edge guide if required Parallel Edge Guide A parallel guide for help when rip cutting can be fitted to the base plate of the machine The guide s arms should be inserted into the rectangular slots in ...

Page 17: ...to lock in the required position Adjustment of the Cutting Angle Loosen the bevel locking screw found at the front of the saw Loosen the rear bevel locking screw found at the rear of the machine s base plate Tilt the blade to the required angle Fig 9 Tighten both bevel locking screws securely Note An angle scale 0 450 is incorporated into the bevel locking quadrant to aid setting OPERATING ADVICE ...

Page 18: ...r intervals When cutting steel the chip collector can become hot Care must be taken when handling the chip collector To remove and empty the chip collector Loosen the chip collector thumb screw Ease the chip collector from the machine Empty the contents of the chip collector by tipping the collector and machine upside down over a suitable waste container allowing the contents to fall out Note To m...

Page 19: ...present an optical hazard although staring at the beam may cause temporary flash blindness WARNING Do not stare directly at the laser beam The laser must be used and maintained as detailed in this manual Never intentionally aim the laser beam at any person and prevent it from being directed towards the eye or an object other than the workpiece Always ensure that the laser beam is directed at the w...

Page 20: ... a complete halt Do not apply lateral pressure to the blade in an attempt to slow it down more quickly WARNING If the motor should stop or stall whilst a cut is being attempted release the trigger switch immediately and disconnect the machine from the power supply Remove the machine from the workpiece before investigating the cause and attempting to restart the motor Note This saw is fitted with a...

Page 21: ... brushes Fit the new brushes Refit the brush retaining caps Run the machine without load for several minutes after brush replacement This will aid the bedding in process Note If upon checking the brushes are found to be still serviceable they can be returned to their original position It is important that they are replaced in the same position as they were removed from the machine ENVIRONMENTAL PR...

Page 22: ... the Use of certain Hazardous Substances in Electrical Equipment RoHS Directive 2002 96 EC as The Waste Electrical and Electronic Equipment WEEE Directive amended by 2003 108 EC And is in conformity with the applicable requirements of the following documents EN55014 1 2006 EN55014 2 AA1 2001 EN61000 3 2 2006 EN61000 3 11 20000 EN60745 1 2009 EN60745 2 5 2007 Product Details Description EVOSAW230 2...

Page 23: ...23 www evolutionpowertools com EN ES FR NOTES ...

Page 24: ... Research Drive Davenport Iowa 52806 866 EVO TOOL EU Evolution Power Tools Ltd 61 Avenue Lafontaine 33560 Carbon Blanc Bordeaux 33 0 5 57 30 61 89 JP エボリューション パワーツール株式会社 544 0031 大阪府大阪市生野区 鶴橋5丁目21 19 0120 051 415 Discover Evolution Power Tools Visit www evolutionpowertools com or download the QR Reader App on your smart phone and scan the QR code Right ...

Reviews: