17
www.evolutionpowertools.com
EN
that the blade does not foul on any part of the machine castings or
guards.
(8.5)
PREPARING TO MAKE A CUT
WARNING: Do not over-reach.
Keep good footing and balance. Stand to one side so that your face
and body are out of line of a possible kickback.
Freehand cutting is a major cause of accidents and should not
be attempted.
• Ensure that the workpiece is always firmly resting against the
fence, and where practical is clamped with the
top hold down clamp to the table.
• The saw table should be clean and free from any sawdust, etc,
before the workpiece is clamped into position.
• Ensure that the ‘cut-off’ material is free to move sideways away
from the blade when the cut is completed. Ensure that the ‘cut-off’
piece cannot become ‘jammed’ in any other part of the machine.
• Do not use this saw to cut small pieces. If the workpiece being
cut would cause your hand or fingers to be within 150mm of the
blade, the workpiece is too small.
(8.6)
RELEASING THE CUTTING HEAD
The Cutting Head will automatically rise to the upper position once
it is released from the locked down position.
It will automatically lock in the upper position.
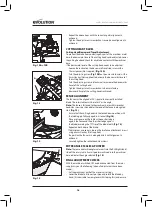
To release the cutting head from the locked down position:
• Gently press down on the cutting handle.
• Pull out the head latching pin
(Fig. 16)
and allow
the cutting head to rise to its upper position.
If release is difficult:
• Gently rock the cutting head up and down.
• At the same time twist the head latching pin clockwise and pull
outwards.
Note:
We recommend that when the machine is not in use the
cutting head is locked in its down position with the latching pin
fully engaged in its socket.
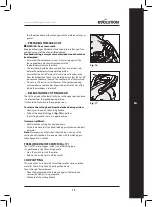
THE MOTOR ON/OFF SWITCH (Fig. 17)
The ON/OFF motor trigger switch is a non-latching type.
It is positioned inside the cutting handle.
• Press the switch to start the motor.
• Release the switch to turn off the motor.
CHOP CUTTING
This type of cut is used mainly for cutting small or narrow section
material. The cutting head is gently pushed down
to cut through the workpiece.
• Place the workpiece on the table and against the fence and
secure with clamp(s) as appropriate.
• Take hold of the cutting handle.
Fig. 16
Fig. 17

