background image

Howard Installation Guide

16

Cable Connection 

and Wiring

Use following wire and torque force when connecting to the input terminal 
block, using conductor type other than RHH, RHW and RHW-2 with outer 
covering.

1. If the cable comes in from the back, just put the cover back on 
and screw it closed. 
2. If the cable comes in from the bottom, cut the plate off the cover 
as shown to the left before you replace the cover.

Caution: To reduce the risk of the fire, connect only to a circuit provided with 100 amperes maximum 

branch circuit overcurrent protection in accordance with the National Electrical Code, ANSI/NFPA 70, 

and the Canadian Electrical Code, Part 1, C22.2.

NOTE: If necessary, apply proper cable ties 
or clamps to secure the cables and to relieve 
cable strain added on the terminals.

If the cable comes from the back

If the cable comes from the bottom

R-install the cabinet cover

The cable will enter straight into the cable terminal cabinet. Secure 

the 3 wires to the corresponding terminals as shown on the left.

NOTE: The cable hole needs to be sealed properly to keep the 

terminal cabinet watertight.

Summary of Contents for CCS-E80A

Page 1: ...Howard 19kW EV Charger Installation Guide COPYRIGHT 2021 EVPassport Inc...

Page 2: ...Howard Installation Guide 2 Contents Important Safety Instructions Specification Introduction Unpacking Preparation Installation 3 9 11 12 12 15...

Page 3: ...installed adjusted and serviced by qualified electrica personnel Isolate the product from any electrical source before wiring or servic ing it Failure to follow this may lead to severe bodily injury...

Page 4: ...ith wet hands Be sure to use standard regulation fuses for switches and do not use copper steel wire Do not use faulty or malfunctioning cables or breakers on this product The cables and wires used to...

Page 5: ...able explosive harsh or combustible materials chemicals or vapors Isolate the product from any power source before installing or servicing it Do not use the product if it is found defective cracked fr...

Page 6: ...cable is positioned so it will not be stepped on tripped over or subjected to damage or stress This product shall be connected to and form a dedicated circuit with a proper circuit breaker that satis...

Page 7: ...ent This equipment generates uses and can radiate radio fre quency energy and if not installed and used in accordance with the instruction manual may cause harmful interference to radio communications...

Page 8: ...ger that cannot easily be fixed contact your local dealer If the problem requires return for service please follow the dealer s instructions for return of the product The purpose of this manual is to...

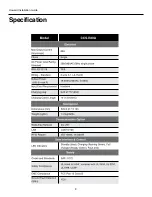
Page 9: ...Howard Installation Guide 9 Specification...

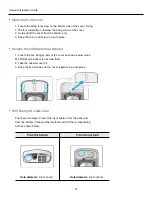
Page 10: ...Howard Installation Guide 10 Specification...

Page 11: ...two legs called phase to phase or line to line is 240V and the phase to neutral voltage is 120V Some list the phase to phase voltage first so it may also be called 240 120 single phase 2 For 3 Phase W...

Page 12: ...asy to understand LED indicators show charger status Unpacking Preparation Tools and parts required for installation 1 Verify the components according to the following list 2 Keep the packaging materi...

Page 13: ...over from the bottom end 3 Keep the cover and screw in a safe place 1 Locate the five fixing screws of the cover as shown below Use a M4 Philips screwdriver to unscrew them 2 Take the cabinet cover of...

Page 14: ...or how to access to the back panel area please see page 20 1 There are 4 holes which need to be drilled to mount your EV Charger to the wall The 4 holes can be found as shown on the right 2 Drill the...

Page 15: ...Drill the input cable hole and the mounting holes on your charger The installation height is at least 60cm as shown on the left 2 Use the mounting layout template provided to drill the holes on the wa...

Page 16: ...e connect only to a circuit provided with 100 amperes maximum branch circuit overcurrent protection in accordance with the National Electrical Code ANSI NFPA 70 and the Canadian Electrical Code Part 1...

Page 17: ...e gland 1 Using a Torx screwdriver unscrew the eight philips screws as shown below 3 Using a M4 philips screwdriver unscrew the four philips screws as shown below to release the electrical box Raise t...

Page 18: ...Howard Installation Guide 18 Insert a RJ45 cable...

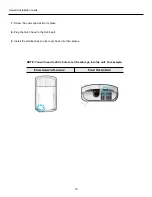
Page 19: ...19 7 Screw the outer cap back to its place 8 Plug the RJ45 head to the RJ45 port 9 Install the elctrical box and its cover back into their places NOTE You will need to drill a hole to let the cable go...

Page 20: ...Howard Installation Guide 20 install evpassport com 19 Morris Avenue Brooklyn Navy Yard Building 128 Brooklyn NY 11205...

Reviews: