background image

28

CL S M

10.0  Dismantling  

Personnel

•  The dismantling may only be carried out by qualified per-

sonnel.

•  Work on the electric system may only be performed by 

professional electricians.

WARNING

Risk of injury due to incorrect dismantling
Stored residual power, sharp-edged components, pins and 

corners on the individual components or at the required 

tools can cause serious injuries.
Therefore:

•  Ensure there is ample space for dismantling prior to starting with 

the work.

•  Use caution when working with open, sharp-edged structural 

components.

•  Ensure order and cleanliness at the dismantling site! Loosely 

stacked structural components or tools on the floor may present 

a source for accidents.

•  Dismantle structural components professionally pursuant to ap-

plicable local regulations.

•  Secure structural components in a way so they will not be able to 

fall or tip over.

•  Contact the manufacturer if you have any questions or concerns.


10.1  Dismantling of the 
CLSM linear module

1.  Secure elements of the application in such a fashion that 

no loads can impact the parts.

2.  Loosen and remove fastening bolts.
3.  Separate the linear module from application elements.
4.  Clean device.
5.  Carefully package for shipment to the manufacturer.
6.  For disposal, disassemble device according to applica-

ble local occupational health and environmental 

regulations.

10.2  Disposal

To the extent that no take-back or disposal agreement has 

been put in place, disassembled components should be 

recycled.
•  Dispose of metals and plastic components at an appropri-

ate recycling center.

•  Sort remaining components based on the respective ma-

terial and dispose of according to applicable local occupa-

tional health and environment regulations. 

NOTICE

Damage can be caused to the environment due to incorrect 

disposal

Electric waste, electronic components, lubricants and other 

additives are subject to special waste treatment regulations and 

may only be disposed of by approved specialized companies. 

The local municipal authorities or specialized waste man-

agement companies can provide information concerning en-

vironmentally appropriate disposal.

Summary of Contents for CLSM-150-B A Series

Page 1: ...CATEGORY MAX 2 LINES Linear Modules CLSM INSTALLATION OPERATION AND MAINTENANCE MANUAL ...

Page 2: ......

Page 3: ...or transporting 15 5 2 Delivery inspection 15 5 3 Returning module to the manufacturer 16 5 4 Packaging 16 5 5 Storage 16 6 0 Installation 17 6 1 Installation location 17 6 2 Inspections prior to initial operation 17 6 3 Installation 17 6 4 Turning device on and off 18 WARNING Read this manual before installing operating or maintaining this actuator Failure to follow safety precautions and instruc...

Page 4: ...evicedevice 1 2 Explanation of symbols and signal words Safety precautions Safety precautions are identified by symbols and signal words as shown on the right side in this chapter The signal words indicate the severity of the hazard and the chance it could occur Follow these safety precautions and act cautiously in order to avoid accidents resulting in personal injury and damage to property DANGER...

Page 5: ...ts without the written consent of the manufacturer is not permitted Ewellix reserves the right to seek compensation for viola tions of these restrictions 1 5 Spare parts The CLSM linear module is not meant to be repaired by cus tomer personnel All warranty and service claims become void without notice if any screws on the linear module have been loosened or removed WARNING Safety hazard caused by ...

Page 6: ...k vibration electromag netic magnetic fields An error or defect in the design Failure of power supply Inability to gain control of the machine by the operator 2 0 Safety DANGER The CLSM linear module series has been designed and constructed in compliance with state of the art technology They are safe to use under the conditions tested by us Nevertheless they can pose potential hazards to the life ...

Page 7: ...e are indicated in Appendix 1 technical data DANGER Risk of injury and harmful results of failure of essential performance The CLSM linear module must maintain essential performance in both operation and during the failure of any one component of the device 2 4 Responsibility of the owner and processor The device is designed for personal use and is also used in commercial applications by owners or...

Page 8: ...odule is completely discharged and that unauthorized or unintended switching on of a supply voltage by third party is not possible According to 2006 42 EC machine directive the CLSM linear module is partly completed machinery Operation of the axis is only permissible with suitable mechanical and electrical protective devices These must comply with the laws and regulations of the respective country...

Page 9: ...servo amplifier used and the connected load and can be gathered from the relevant documentation As a rule a discharging period of 5 minutes can be considered sufficient 2 9 Disclaimer of liability When the safety advice in this manual is not observed this can endanger persons the environment and machinery The manufacturer assumes no liability for unauthorized modifications to the CLSM Linear modul...

Page 10: ... 55 C Relative atmospheric humidity maximum no build up of condensation 95 3 2 Product label The Product label provides the following information 1 Identification of Type 2 Serial Number 3 Code Number 4 Address 5 Lead 6 Stroke 1 2 3 5 3 6 3 3 Safety sign labels attached on the device WARNING The outside temperature of the module should not exceed 70 C Exceeding this temperature will decrease the l...

Page 11: ...he motor 3 The coupling 5 is used to transfer power between the motor and the ball screw When ball screw rotates the carriage 7 starts to run back and forth according to the direction of motor rotation CLSM 150 B P and CLSM 150 B S have the same mechanism 2 3 6 2 Linear motor type The figure above is CLSM 150 L A Unlike ball screw type of module this module is powered by a linear motor mover 4 If ...

Page 12: ...5 8 CLSM 150 B A 1 Upper cover 2 End plate 3 Motor option 4 Motor adapter 5 Coupling 6 Coupling housing 7 Carriage 8 Ball screw CLSM 150 B P 1 Upper cover 2 View window 3 Motor option 4 Motor adapter 5 Coupling housing 6 Coupling 7 Carriage 8 Ball screw 9 PU strip 1 2 3 6 4 7 5 8 9 ...

Page 13: ... 150 L A CLSM 150 L A 1 Carriage 2 Upper cover 3 End plate 4 Linear motor mover 5 Sensor bracket and photosensor Omron EE SX674 6 Cable and cable chain 7 Linear motor stator 1 2 3 4 5 6 7 3 CLSM 150 L A 3 Encoder RSF Elecktronik MS15MK ...

Page 14: ...ter disassembling the end plates and tightening the sensor brackets with fixing screws Note The technical data dimensions weight output connection value etc can be found in the drawings and data sheets at the end of this manual see Appendix 1 Counterclockwise CCW Clockwise CW Counterclockwise CCW Clockwise CW 1 Clockwise CW The carriage moves backward 2 Counterclockwise CCW The carriage moves forw...

Page 15: ...ative to prevent significant material damage Therefore Proceed carefully during the loading unloading and delivery of the package items to its final destination and comply with the in formation shown on the packaging Only remove the module from its packaging right before installa tion Note storage requirements if the linear module needs to be re turned to the manufacturer see 5 5 5 2 Delivery insp...

Page 16: ...ce in its original packaging Follow storage conditions see 5 5 storage 3 Send to manufacturer The address is listed on the back cover of this manual 5 4 Packaging For packaging The individual packaged pieces have been packaged appro priately according to the expected transport conditions Only environmentally friendly materials were used for the packaging The packaging is supposed to protect agains...

Page 17: ...eatures Note See additional information concerning inspection and readings see 8 Maintenance 6 3 Installation DANGER Hazard of installation by unauthorized personnel To prevent injury and damage to the property installation has to be performed by trained personnel The CLSM linear module is attached to the application by fixing bolts on the bottom plate of the module Note To check the dimensions of...

Page 18: ...forces Affix prohibition and warning labels for the application onto the linear module if necessary WARNING Risk of injury and material damage due to loosening or removal of the screws on the device Removal or loosening of the screws on the linear unit may lead to injuries and material damage during operation Therefore Never loosen or remove screws on the linear unit 6 4 Turning device on and off ...

Page 19: ...le operating WARNING If liquids or dusts penetrate the linear module during operation it can be damaged or will not operate properly Keep liquid and dust away 7 2 Normal operation The CLSM linear module can be operated by a controller such as PC and PLC The user gives a command to the pro gram to send signals to the motor drive and operate the motor Before use the device users may need to set the ...

Page 20: ...power of the motors does not exceed the permitted value Ewellix recommends the following servo motors Linear unit CLSM 92 T CLSM 92 B CLSM 150 B A CLSM 150 B P CLSM 150 B S Screw Lead Screw Ball Screw Ball Screw Ball Screw Ball Screw 14x03 12x05 10 20 20x05 10 20 20x05 10 20 20x05 10 20 Motor 1FK7015 1FK7022 1F7034 1FK7044 0 035 Nm 0 85 Nm 1 60 Nm 4 00 Nm 6000 r min 6000 r min 6000 r min 4500 r mi...

Page 21: ...5 4 0 N m M5x15 8 0 N m CLSM 150 B P M4x14 4 0 N m M4x15 4 0 N m M5x15 8 0 N m CLSM 150 B S CLSM 150 P A CLSM 150 L A Linear unit Upper cover End plate Sensor bracket Screw Torque MA Screw Torque MA Screw Torque MA CLSM 92 T M4x8 3 0 N m M4x20 4 0 N m CLSM 92 B M4x8 3 0 N m M4x20 4 0 N m CLSM 150 B A M4x6 3 0 N m M4x20 4 0 N m M5x8 2 0 N m CLSM 150 B P M4x30 4 0 N m M4x20 4 0 N m M5x8 2 0 N m CLSM...

Page 22: ...oupling hubs onto the motor shaft and the screw trun nion of the linear unit Note Do not tighten the screws of the coupling before aligning the coupling hubs Note Tighten the screws to the torque specified in the table above Unit mm 24 6 11 5 ...

Page 23: ... correct if necessary Check connection for tight fit Qualified personnel Annually Check labels and warning notices for legibility and Replace if necessary Qualified personnel Semi annualy Check options for visible damage Qualified personnel CLSM linear module maintenance plan NOTICE If the linear module is used outside of the environment conditions specified earlier in this manual check such compo...

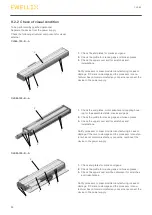
Page 24: ...tes for cracks and gaps 2 Check the profile for cracks gaps and broken pieces 3 Check the upper cover and the cableveyor for scratches and indentations Notify processor or linear module manufacturing in case of damage If there is no damage and the processor manu facturer has not communicated any concerns reconnect the device to the power supply 3 1 2 3 1 CLSM 150 B A 1 Check the end plates motor a...

Page 25: ... amount of grease No foreign substance Quarterly Coupling Visual confirmation Slip during rotation Coupling clamp bolt tightening Quarterly WARNING Crush hazard Do not operate the system when the cover or a component of the module is removed 8 4 1 Grease lubrication The lubrication of the ball screw and the LM Block must be considered in quantity and quality See below Grease quantity Maintenance t...

Page 26: ...fessional electricians DANGER Risk of injury and material damage due to incorrect repair of malfunctions The CLSM linear module is not designed to be repaired by the customer in most situations Incorrect repair of a malfunction may lead to personal injury or material damage Therefore Never loosen the screws on the linear module or try to open In the event of a malfunction that cannot be fixed by a...

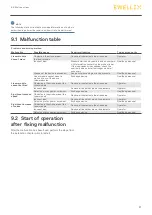
Page 27: ...sures Exchange device Qualified personnel Linear module cannot be lifted Obstacles in the stroke area of the linear module Remove all obstacles in the stroke area Operator Incorrect load Remove all loads that are on the elements Operator Defective motor gear or screw nut Exchange device Qualified personnel Significant reduced speed Obstacles in the stroke area of the linear module Remove all obsta...

Page 28: ...inear module 1 Secure elements of the application in such a fashion that no loads can impact the parts 2 Loosen and remove fastening bolts 3 Separate the linear module from application elements 4 Clean device 5 Carefully package for shipment to the manufacturer 6 For disposal disassemble device according to applica ble local occupational health and environmental regulations 10 2 Disposal To the ex...

Page 29: ...29 11 0 Appendix 11 0 Appendix Technical data sheets IL 06018 EN September 2020 Linear module CLSM catalogue For further technical information please contact Ewellix ...

Page 30: ...taken in the production of this catalog Ewellix does not take any responsibility for damage or other loss resulting from omissions or typographical errors The photo may differ slightly in appearance from the actual product Due to continuous improvements being made in our products the product s appearance and specifications are subject to change without notice PUB NUM TC 08040 EN September 2020 ...

Reviews: