background image

Maintenance, care and disposal 

General 


36 

099-005593-EW501 

10.01.2022


Maintenance, care and disposal 

6.1  General 


 DANGER 


Risk of injury due to electrical voltage after switching off! 

Working on an open machine can lead to fatal injuries! 

Capacitors are loaded with electrical voltage during operation. Voltage remains present 

for up to four minutes after the mains plug is removed. 

1.  Switch off machine. 

2.  Remove the mains plug. 

3.  Wait for at last 4 minutes until the capacitors have discharged! 


 WARNING 


Incorrect maintenance, testing and repair! 

Maintenance, testing and repair of the machine may only be carried out by skilled and 

qualified personnel. A qualified person is one who, because of his or her training, know-

ledge and experience, is able to recognise the dangers that can occur while testing 

welding power sources as well as possible subsequent damage, and who is able to im-

plement the required safety procedures. 

  Observe the maintenance instructions

 > see 6.2 chapter

•  In the event that the provisions of one of the below-stated tests are not met, the machine 

must not be operated again until it has been repaired and a new test has been carried out! 


Repair and maintenance work may only be performed by qualified authorised personnel; otherwise the 

right to claim under warranty is void. In all service matters, always consult the dealer who supplied the 

machine. Return deliveries of defective equipment subject to warranty may only be made through your 

dealer. When replacing parts, use only original spare parts. When ordering spare parts, please quote the 

machine type, serial number and item number of the machine, as well as the type designation and item 

number of the spare part. 
Under the specified ambient conditions and normal working conditions this machine is essentially mainte-

nance-free and requires just a minimum of care. 
Contamination of the machine may impair service life and duty cycle. The cleaning intervals depend on 

the ambient conditions and the resulting contamination of the machine. The minimum interval is every six 

months. 


6.1.1  Cleaning 

•  Clean the outer surfaces with a moist cloth (no aggressive cleaning agents). 
•  Purge the machine venting channel and cooling fins (if present) with oil- and water-free compressed 

air. Compressed air may overspeed and destroy the machine fans. Never direct the compressed air 

directly at the machine fans. Mechanically block the fans, if required. 

•  Check the coolant for contaminants and replace, if necessary. 

6.1.2  Dirt filter 

When using a dirt filter, the cooling air throughput is reduced and the duty cycle of the machine is reduced 

as a result. The duty cycle decreases with the increasing contamination of the filter. The dirt filter must be 

remove at regular intervals and cleaned by blowing out with compressed air (depending on the level of 

soiling). 


Summary of Contents for Drive 4 Basic S

Page 1: ...Operating instructions EN Wire feed unit Drive 4 Basic S Drive 4X Steel Synergic S Drive 4X Steel puls S 099 005593 EW501 Observe additional system documents 10 01 2022 ...

Page 2: ... to the operation of this equipment is restricted solely to the function of the equipment No other form of liability regardless of type shall be accepted This exclusion of liability shall be deemed ac cepted by the user on commissioning the equipment The manufacturer is unable to monitor whether or not these instructions or the conditions and methods are observed during installation operation usag...

Page 3: ...ing current leads 21 5 1 4 Stray welding currents 22 5 2 Intermediate hose package connection 22 5 2 1 Shielding gas supply shielding gas cylinder for welding machine 24 5 2 2 Pressure regulator connection 24 5 2 2 1 Gas test 25 5 2 2 2 Purge hose package 25 5 2 3 Protective flap welding machine control 25 5 3 MIG MAG welding 26 5 3 1 Assemble the wire guide 26 5 3 2 Welding torch connection 27 5 ...

Page 4: ...S 47 9 Accessories 48 9 1 General accessories 48 9 1 1 Welding torch cooling system 48 9 1 1 1 Coolant type blueCool 48 9 1 1 2 Coolant type KF 48 9 2 19 pole remote control 48 9 2 1 Connection cables 48 9 2 2 Extension cable 48 9 3 Options 49 10 Replaceable parts 50 10 1 Wire feed rollers 50 10 1 1 Wire feed rollers for steel wire 50 10 1 2 Wire feed rollers for aluminium wire 50 10 1 3 Wire feed...

Page 5: ...us and even fatal injuries Safety notes include the WARNING keyword in the heading with a general warning sym bol The hazard is also highlighted using a symbol in the page margin CAUTION Working or operating procedures which must be closely observed to prevent possible minor personal injury The safety information includes the CAUTION keyword in its heading with a general warn ing symbol The risk i...

Page 6: ...itch off machine Release Switch on machine Press and hold Switch Incorrect Invalid Turn Correct Valid Numerical value adjustable Input Signal light lights up in green Navigation Signal light flashes green Output Signal light lights up in red Time representation e g wait 4 s ac tuate Signal light flashes red Interruption in the menu display other setting options possible Tool not required do not us...

Page 7: ... cal specialist may interconnect the sources as per standard IEC 60974 9 2010 Installa tion and use and German Accident Prevention Regulation BVG D1 formerly VBG 15 or country specific regulations Before commencing arc welding a test must verify that the equipment cannot exceed the maximum permitted open circuit voltage Only qualified personnel may connect the machine When taking individual power ...

Page 8: ...t temperatures of 100 C or higher and arcing and work on live components Hearing protection against harming noise Explosion risk Apparently harmless substances in closed containers may generate excessive pressure when heated Move containers with inflammable or explosive liquids away from the working area Never heat explosive liquids dusts or gases by welding or cutting Fire hazard Due to the high ...

Page 9: ...s specified in the standard The user is responsible for any interference caused by welding In order to evaluate any possible problems with electromagnetic compatibility in the surrounding area the user must consider the following see also EN 60974 10 Appendix A Mains control signal and telecommunication lines Radios and televisions Computers and other control systems Safety equipment The health of...

Page 10: ...eplacement parts etc from our range of products Only insert and lock accessory components into the relevant connection socket when the ma chine is switched off Requirements for connection to the public mains network High performance machines can influence the mains quality by taking current from the mains network For some types of machines connection restrictions or requirements relating to the ma...

Page 11: ...ion or connection points can heat up significantly during operation water cooled version When opening the coolant circuit escaping coolant may cause scalding Open the coolant circuit only when the power source or cooling unit is switched off Wear proper protective equipment protective gloves Seal open connections of the hose leads with suitable plugs The units are designed for operation in an upri...

Page 12: ...nly be used in line with its designated purpose and by trained or expert personnel Do not improperly modify or convert the equipment 3 1 Applications MMA welding system for GMAW pulse and standard welding as a MMA welding secondary process It may be possible to expand the range of functions by using accessories see the documentation in the relevant chapter 3 2 Use and operation solely with the fol...

Page 13: ...ccording to national and in ternational standards and guidelines every 12 months 3 3 3 Service documents spare parts and circuit diagrams WARNING Do not carry out any unauthorised repairs or modifications To avoid injury and equipment damage the unit must only be repaired or modified by specialist skilled persons The warranty becomes null and void in the event of unauthorised interference Appoint ...

Page 14: ...s of these instructions Read and observe the operating instructions for all system components especially the safety instructions The illustration shows a general example of a welding system Figure 3 1 Item Documentation A 1 Wire feeder A 2 Conversion instructions A 3 Power source A 4 Cooling unit voltage converter tool box etc A 5 Trolley A 6 Welding torch A 7 Remote control A 8 Control A Complete...

Page 15: ...Machine description quick overview Front view side view from the right 099 005593 EW501 10 01 2022 15 4 Machine description quick overview 4 1 Front view side view from the right Figure 4 1 ...

Page 16: ...andrel using this support to enable horizontal pivoting of the machine 5 Sliding rails 6 Intermediate hose package strain relief see 5 2 chapter 7 Slide latch lock for the protective cap 8 Welding current connection socket depending on variant Welding current potential of the torch connector for MMA welding or gouging 9 19 pole connection socket analogue For connecting analogue accessory component...

Page 17: ...Machine description quick overview Rear view side view from left 099 005593 EW501 10 01 2022 17 4 2 Rear view side view from left Figure 4 2 ...

Page 18: ... wire feed unit 4 Quick connect coupling red coolant return 5 Quick connect coupling blue coolant supply 6 Wire spool protective cap 7 Wire spool holder 8 Wire feed unit 9 Lighting inside 10 Push button gas test rinse hose package see 5 2 1 chapter 11 Wire inching push button For potential and gas free inching of the wire electrode through the hose package to the welding torch 12 Protective cap wi...

Page 19: ...ne can drop and cause injuries The handles straps or brackets are suitable for transport by hand only The machine must not be suspended or lifted using a crane Depending on machine type equipment for lifting by crane or use while suspended is available as a retrofitting option see 9 chapter 5 1 1 Ambient conditions The machine must not be operated in the open air and must only be set up and operat...

Page 20: ...and the material safety data sheets 5 1 2 1 Permitted torch coolant Coolant Temperature range blueCool 10 10 C to 40 C 14 F to 104 F KF 23E Standard 10 C to 40 C 14 F to 104 F KF 37E 20 C to 30 C 4 F to 86 F blueCool 30 30 C to 40 C 22 F to 104 F 5 1 2 2 Maximal hose package length All information relates to the total hose package length of the complete welding system and presents exemplary config...

Page 21: ...with HF igniter TIG for as long as pos sible in parallel with a distance of 20 cm to avoid HF sparkover Always keep a distance of at least 20 cm to leads of other power sources to avoid interferences Always keep leads as short as possible For optimum welding results max 30 m welding lead inter mediate hose package torch lead Figure 5 1 Use an individual welding lead to the workpiece for each weldi...

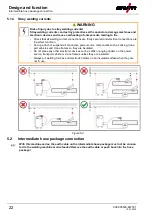
Page 22: ...n Set up attach or suspend all conductive power source components such as casing trans port vehicles and crane frames so they are insulated Do not place any other electronic devices such as drills or angle grinders on the power source transport vehicle or crane frames unless they are insulated Always put welding torches and electrode holders on an insulated surface when they are not in use Figure ...

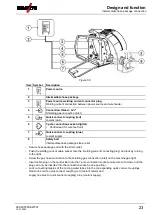
Page 23: ...y belt Intermediate hose package strain relief Secure hose package end with the strain relief Push the welding current cable socket onto the welding current connecting plug and lock by turning to the right Screw the gas hose connection to the shielding gas connection inlet on the machine gas tight Insert cable plug on the control lead into the 7 pole connection socket and secure with crown nut the...

Page 24: ...ng gas supply from the shielding gas cylinder to the welding torch is a fundamental requirement for optimum welding results In addition a blocked shielding gas supply may result in the welding torch being destroyed Always re fit the yellow protective cap when not using the shielding gas connection All shielding gas connections must be gas tight 5 2 2 Pressure regulator connection Figure 5 6 Item S...

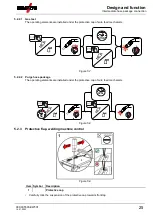
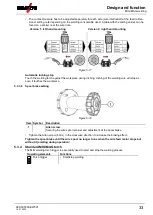
Page 25: ...otective cap of wire feed mechanism 25s 0 Figure 5 7 5 2 2 2 Purge hose package The operating elements are installed under the protective cap of wire feed mechanism 5s 0 300s Figure 5 8 5 2 3 Protective flap welding machine control Figure 5 9 Item Symbol Description 0 1 Protective cap Carefully click the suspension of the protective cap towards front top ...

Page 26: ...rNi Use a plastic or teflon liner when welding or brazing soft wire electrodes high alloy wire electrodes or aluminium materials Preparation for connecting welding torches with a spiral guide Check that the capillary tube is correctly positioned in relation to the central connector Figure 5 10 Preparation for connecting welding torches with a liner Push forward the capillary tube on the wire feed ...

Page 27: ...h 2 Welding torch hose package 3 Welding torch connection Euro torch connector Welding current shielding gas and torch trigger integrated 4 Quick connect coupling blue coolant supply 5 Quick connect coupling red coolant return 6 19 pole connection socket analogue For connecting analogue accessory components remote control welding torch control lead etc Insert the central plug for the welding torch...

Page 28: ...ervals Keep all casing covers or protective caps closed during operation 5 3 3 1 Inserting the wire spool CAUTION Risk of injury due to incorrectly secured wire spool If the wire spool is not secured properly it may come loose from the wire spool support and fall to the ground causing damage to the machine and injuries Make sure to correctly fasten the wire spool to the wire spool support Before y...

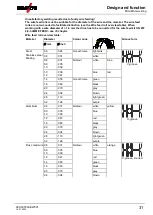
Page 29: ...eed rollers Figure 5 15 Item Symbol Description 0 1 Tommy The tommy is used to secure the closure brackets of the wire feed rollers 2 Closure bracket The closure brackets are used to secure the wire feed rollers 3 Feed roll tensioner Fixing the clamping unit and setting the pressure 4 Clamping unit 5 Wire feed roller see the Wire feed roller overview table ...

Page 30: ...lace Fold the closure brackets outwards by 90 Unfasten pressure units and fold out clamping units and pressure rollers will automatically flip up wards Remove the wire feed rollers from the roller support Select new wire feed rollers accoridng to the Wire feed roller overview table and reassemble the wire feed mechanism in reverse order ...

Page 31: ... Wire feed roll overview table Material Diameter Colour code Groove form mm inch Steel Stainless steel Brazing 0 6 024 monochrome light pink V groove 0 8 031 white 0 8 0 9 1 0 031 035 039 bicolour white blue 1 0 1 2 039 047 blue red 1 4 055 monochrome green 1 6 063 black 2 0 079 grey 2 4 094 brown 2 8 110 light green 3 2 126 purple Aluminium 0 8 031 bicolour white yellow U groove 0 9 1 0 035 039 b...

Page 32: ...The inching speed is infinitely adjustable by simultaneously pressing the wire inching push button and turning the wire speed rotary knob The left display shows the wire feed speed selected the right display shows the current motor current of the wire feed mechanism Depending on the design of the device the wire feed mechanism may be reversed Figure 5 16 Item Symbol Description 0 1 Welding wire 2 ...

Page 33: ... workpiece during inching Inching of the welding wire will stop as soon it touches the workpiece 5 3 3 4 Spool brake setting Figure 5 18 Item Symbol Description 0 1 Allen screw Securing the wire spool retainer and adjustment of the spool brake Tighten the Allen screw 8 mm in the clockwise direction to increase the braking effect Tighten the spool brake until the wire spool no longer turns when the...

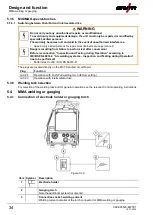
Page 34: ...sting during Operation according to IEC BS EN 60974 4 Arc welding systems Inspection and Testing during Operation has to be performed Perform test to IEC DIN EN 60974 4 The plugs are located directly on the M3 7X printed circuit board Plug Function on X24 Operation with Push Pull welding torch factory setting on X23 Operation with intermediate drive 5 3 6 Welding task selection For selection of th...

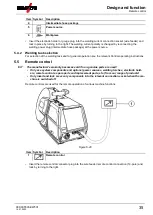
Page 35: ...operation see the relevant Control operating instructions 5 5 Remote control The manufacturer s warranty becomes void if non genuine parts are used Only use system components and options power sources welding torches electrode hold ers remote controls spare parts and replacement parts etc from our range of products Only insert and lock accessory components into the relevant connection socket when ...

Page 36: ...ice matters always consult the dealer who supplied the machine Return deliveries of defective equipment subject to warranty may only be made through your dealer When replacing parts use only original spare parts When ordering spare parts please quote the machine type serial number and item number of the machine as well as the type designation and item number of the spare part Under the specified a...

Page 37: ... rollers on a regular basis depending on the degree of soiling 6 2 2 Monthly maintenance tasks Visual inspection Casing damage front rear and side walls Wheels and their securing elements Transport elements strap lifting lugs handle Check coolant tubes and their connections for impurities Functional test Selector switches command devices emergency stop devices voltage reducing devices message and ...

Page 38: ...s tem separate from unsorted municipal waste The public waste management utilities communities have created collection points at which used equipment from private households can be disposed of free of charge The deletion of personal data is the responsibility of the end user Lamps batteries or accumulators must be removed and disposed of separately before disposing of the device The type of batter...

Page 39: ...yed in succession Document machine warning and inform service personnel if required If there are several errors in a control system the error with the lowest error number Err is displayed If this error is corrected the next higher error number appears This process is repeated until all errors have been resolved Reset error category legend A The error message disappears when the error is eliminated...

Page 40: ...moving the logical signal ro bot ready during the process Eliminate errors on the higher level control 16 A General pilot arc Emergency stop circuit error Check emergency stop circuit Temperature error See description of error 4 Short circuit on welding torch Check welding torch Request service 17 B Cold wire error See description of error 3 See description of error 3 18 B Plasma gas error Low gas...

Page 41: ...tart au tomated machines Check wire feeding Check load cable connections in welding current circuit clean corroded surfaces on work piece before welding if necessary 49 B Arc interruption An arc interruption occurred during welding with an automa ted system Check wire feeding Adjust welding speed 50 B Program number Internal error Request service 51 A Emergency stop The emergency stop circuit of t...

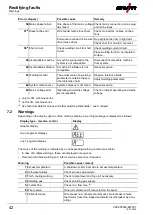
Page 42: ... 63 Mains voltage error Operating and mains voltage are incompatible Check or adjust operating and mains voltage 1 only for XQ machine series 2 not for XQ machine series 3 See technical data for values and other switching thresholds see 8 chapter 7 2 Warnings Depending on the display options of the machine display a warning message is displayed as follows Display type machine control Display Graph...

Page 43: ... gas supply 19 Gas warning 4 reserved 20 Coolant temperature warning Check coolant level and top up if necessary 21 Excess temperature 2 reserved 22 Excess temperature 3 reserved 23 Excess temperature 4 reserved 24 Coolant flow warning Check coolant supply Check coolant level and top up if necessary Check flow and switching thresholds 2 25 Flow 2 reserved 26 Flow 3 reserved 27 Flow 4 reserved 28 W...

Page 44: ...ontrol signal lights are illuminated after switching on No machine control signal light is illuminated after switching on No welding power Phase failure check mains connection fuses Machine restarts continuously Wire feeder without function System does not start up Make control lead connections and check that they are fitted correctly Loose welding current connections Tighten power connections on ...

Page 45: ...092 002960 E0000 see 10 1 4 chapter Contact tip blocked Clean and if necessary replace Setting the spool brake see 5 3 3 4 chapter Check settings and correct if necessary Setting pressure units see 5 3 3 3 chapter Check settings and correct if necessary Worn wire rolls Check and replace if necessary Wire feed motor without supply voltage automatic cutout triggered by overloading Reset triggered fu...

Page 46: ...g with a suitable tool connection open To vent the cooling system always use the blue coolant connection which is located as deep as possible inside the system close to the coolant tank Figure 7 2 Position a suitable collection container for collecting the escaping coolant at the quick connect coup ling and switch on the machine for approx 5s Lock the quick connect coupling by pushing back the loc...

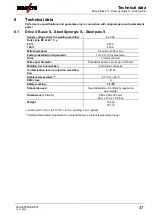
Page 47: ...min Factory installed roll equipment 1 0 1 2 mm for steel wire Drive 4 rollers 37 mm Wire spool diameter Standardised wire spools up to 300 mm Welding torch connection Euro torch connector Contamination level protection classifica tion 3 IP 23 Ambient temperature 2 25 C to 40 C EMC class A Safety marking Standards used See declaration of conformity appliance documents Dimensions l x b x h 660 x 28...

Page 48: ...4 024142 00025 FSP blueCool Frost protection tester 094 026477 00000 9 1 1 2 Coolant type KF Type Designation Item no KF 23E 5 Coolant up to 10 C 14 F 5 l 094 000530 00005 KF 23E 200 Coolant 10 C 200 litres 094 000530 00001 KF 37E 5 Coolant up to 20 C 4 F 5 l 094 006256 00005 KF 37E 200 Coolant 20 C 200 l 094 006256 00001 TYP1 Frost protection tester 094 014499 00000 9 2 19 pole remote control Typ...

Page 49: ...th wheel kit ON WAK D01 092 002871 00000 ON RFAK D01 Rubber feet 092 002845 00000 ON CC D01 Transparent cover cap for protection of device con trol 092 002834 00000 ON TS D01 D02 Torch holder 092 002836 00000 ON CMF D01 Crane suspension 092 002833 00000 ON TCC D01 Set comprised of crane suspension and protective plate for use of the wire feeder in lateral position 092 002835 00000 ON CONNECTOR D01...

Page 50: ...stainless steel and brazing 092 002770 00020 FE 4R 2 4 MM 0 095 INCH BROWN Drive roll set 37 mm 4 rolls V groove for steel stainless steel and brazing 092 002770 00024 FE 4R 2 8 MM 0 11 INCH LIGHT GREEN Drive roll set 37 mm 4 rolls V groove for steel stainless steel and brazing 092 002770 00028 FE 4R 3 2 MM 0 12 INCH VIOLET Drive roll set 37 mm 4 rolls V groove for steel stainless steel and brazin...

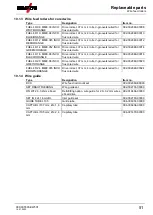
Page 51: ... FUEL 4R 1 6 MM 0 06 INCH BLACK ORANGE Drive roll set 37 mm 4 rolls V groove knurled for flux cored wire 092 002848 00016 FUEL 4R 2 0 MM 0 08 INCH GREY ORANGE Drive roll set 37 mm 4 rolls V groove knurled for flux cored wire 092 002848 00020 FUEL 4R 2 4 MM 0 095 INCH BROWN ORANGE Drive roll set 37 mm 4 rolls V groove knurled for flux cored wire 092 002848 00024 10 1 4 Wire guide Type Designation I...

Page 52: ...endix Searching for a dealer 52 099 005593 EW501 10 01 2022 11 Appendix 11 1 Searching for a dealer Sales service partners www ewm group com en specialist dealers More than 400 EWM sales partners worldwide ...

Reviews: