Hardware Description
12 (20)
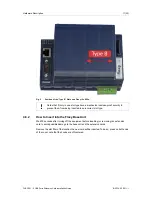
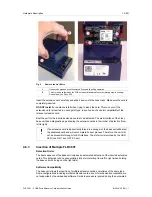
Fig. 6
Remove the slot fillers
1
Hooks to be pressed are off-centered. Press while pulling upwards
2
This metal tag soldered on the PCB acts as mistake-proof security (mating stop in housing).
Doesn’t apply on Flexy 205.
Insert the extension card carefully and slide it down until the hook clicks. Make sure the card is
completely inserted.
DO NOT insist
if a resistance is felt when trying to insert the card. This can occur if the
extension card is inserted in a wrong slot type. In such case, check slot compatibility of the
relevant extension card.
Boot the unit for the inserted extension cards to be detected. The web interface of the Flexy
base unit has a diagnostic page showing the extension cards in their order of detection (from
left to right).
If an extension card is inadvertently forced in a wrong slot, the base unit will detect
the misplaced card and will not complete its boot process. Therefore, the unit will
not be accessible through its LAN interface. The slot error is returned by the USR
LED. (red ON 1 sec, OFF 0.5 sec).
4.6.3
Insertion of Multiple FLB 3601
Detection Order
The boot sequence of the base unit includes an automated detection of the inserted extension
cards. This detection is done sequentially, slot per slot starting from left to right (when holding
the base unit with its logo on the right side).
Software Compatibility
The base unit allows the insertion of multiple extension cards, sometimes of the same type.
Some configurations including multiple extension cards, even if mechanically acceptable, are
not supported by the embedded software. Cards in excess are ignored during the automated
FLB 3601 – 3 USB Ports Extension Card Installation Guide
IG-0024-00 EN 1.1

