background image

3

Introduction

  Congratulations for choosing one of the most versatile, fully-featured vehicle secu-

rity and convenience systems available today� Omega Research & Development has 

been a leader in vehicle security products for nearly 4 decades� Please take the time 

to read this manual thoroughly so you can fully enjoy the benefits and features this 

system offers�

  In this manual, you will primarily learn about 5 user interface components and how 

they work together in alerting you to system changes as well as how you can control 

system operations� Keep in mind that the operations described in this manual are writ-

ten to only reflect the default system settings. Be sure to discuss any customization 

with your installer so you can remember any variations from this guide�


Controllers:

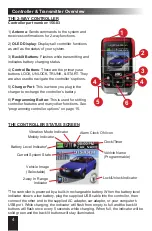
 The system has a 2-way controller that, in addition to controlling the 

system, it will give you confirmations on system operations as well as violation alerts. 

A 1-way transmitter is also included� It is a standard remote control that still gives 

you control over all features but without confirmations. The next section covers the 

controllers’ operations in detail�


The Status Lights:

 These lights are built into the system’s window-mounted 

antenna� They give you a visual indication of the system’s current state and provide 

troubleshooting indicators� The operations of the status lights are covered later in this 

manual�


The Valet Switch:

 This push button gives you access to system programming, 

transmitter/controller programming, and valet functions� It is also built into the sys-

tem’s window-mounted antenna� The valet switch’s operations are also covered later 

in this manual�


Flashing Lights:

 The system is connected to your vehicle’s parking lights to 

provide a 360 degree visual confirmation, warning, & deterrence in almost all system 

operations� Each operation described in this manual also includes the corresponding 

indicator from the flashing lights. The flashing lights primarily provide visual deter

-

rence when the system is violated� 


Siren and/or Horn Sounding:

 The system includes an electronic siren that offers 

confirmation chirps during daily operations and programming. It is also the primary 

means of alerting anyone near your vehicle that the system has been violated� The 

system is capable of sounding the vehicle’s horn in addition to, or in place of, the 

electronic siren� Most system functions have a corresponding audible alert that is 

described throughout this manual� Becoming familiar with these alerts will help you to 

instantly understand any changes in the system’s status�

Summary of Contents for AL-2060-EDPB

Page 1: ...AL 2060 EDPB OLED Color 2 way Alarm Remote Start April 23 2015 Operation Guide Temporary cover Color cover is in a separate file...

Page 2: ...g The Valet Switch 12 Emergency Override 12 Valet Mode 12 The Status Light 13 Multi Car Operation Vehicle Profiles 14 Multi car Operation 14 Programming The Vehicle Image Name 14 Selecting Vehicle 1 o...

Page 3: ...into the system s window mounted antenna They give you a visual indication of the system s current state and provide troubleshooting indicators The operations of the status lights are covered later in...

Page 4: ...r features and many other functions See programming controller options on page 15 Battery Level Indicator Clock Timer Current System State Vehicle Image Selectable Alarm Clock ON icon Vehicle Name Pro...

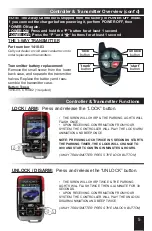
Page 5: ...THE CONTROLLER WILL PLAY THE LOCK ARM ANIMATION AND BEEP ONCE NOTE PRESSING LOCK TWICE IN 5 SECONDS STARTS THE PARKING TIMER THE CLOCK WILL CHANGE TO 0 00 AND START COUNTING IN MINUTES HOURS 1 WAY TR...

Page 6: ...S 1 WAY TRANSMITTER PRESS THE START BUTTON TWICE IN 5 SECONDS If the engine stalls the system will make up to 3 more attempts Each time you park your vehicle set the climate controls to give you the d...

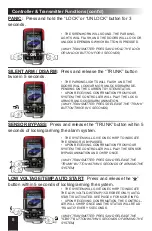
Page 7: ...CHANNEL 4 OUTPUT THERE IS NO 2 WAY CONFIRMATION FOR THIS FUNCTION 1 WAY TRANSMITTER PRESS AND HOLD THE LOCK TRUNK BUTTONS FOR 3 SECONDS CHANNEL 5 Press and hold the UNLOCK buttons for 3 seconds YOUR...

Page 8: ...TTON TWICE IN 5 SECONDS SENSOR BYPASS Press and release the TRUNK button within 5 seconds of locking arming the alarm system THE SYSTEM WILL GIVE ONE CHIRP TO INDICATE THE SENSOR IS BYPASSED UPON RECE...

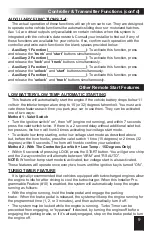
Page 9: ...engage the parking brake When the brake pedal is released the system will keep the engine running for the programmed time 1 2 or 3 minutes and then automatically turn it off The system may be locked...

Page 10: ...is system can be configured to arm automatically when all the vehicle s doors are closed see user feature 9 When this feature is utilized the siren horn will chirp once when all of the doors are close...

Page 11: ...but will leave the doors locked This function is use ful if you have a false triggering situation due to violent weather ZONE VIOLATION RECALL The system is capable of telling you which zones were tr...

Page 12: ...will turn on EXITING VALET MODE Press and release the valet switch once The status light will turn off EMERGENCY OVERRIDE If you were to lose or break your controller you d need to perform an emergenc...

Page 13: ...indicate exactly which zone s has been violated It will store the last 2 violated circuits and continually repeat the flash pattern until the vehicle s ignition key is turned ON 2 FLASHES Hood trigge...

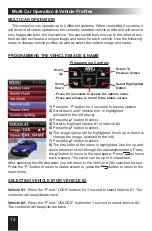
Page 14: ...up or down to change the image pictured to the left 7 Press the button to select 8 The first letter of the name is highlighted Use the up and down arrows to scroll through the alphabet numbers Press t...

Page 15: ...ghlighted by default 3 Press the button to select All function buttons are now locked 3 To unlock the buttons press then UNLOCK SETTING THE ALARM CLOCK 1 Press the P button to access the options menu...

Page 16: ...ress the button to select When Power Save mode is ON you will not receive any 2 way confirmations Additionally there will be a red X over the in range indicator in the lower left corner of the status...

Page 17: ...ler will beep to con firm each button press The default setting is OFF To turn ON OFF use the following procedure 1 Press the P button for 3 seconds to access options 2 Scroll down until Button Beep i...

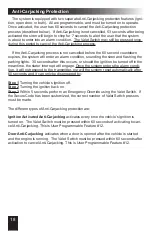
Page 18: ...nition be turned off in the meantime the stater interrupt will engage Once the system enters the alarm condi tion it will not respond to the transmitter nor will the system reset automatically after 6...

Page 19: ...siren horn will chirp to correspond with the chosen setting Programming Features Standard Programming Use this method to program additional or replacement transmitters Before you begin have all trans...

Page 20: ...oudest press start button to program This feature allows the choice different chirp volume levels and when programming it each selection will be confirmed in the chosen volume making it easy to choose...

Page 21: ...r trunk release in which case the alarm should also disarm This feature when on configures the system to unlock disarm when the 2nd channel is activated Feature 8 Remote Start Activation From The Remo...

Page 22: ...conds press trunk button to program 45 Seconds press start button to program This selects how long the alarm waits to monitor trigger zones after arming Feature 17 Open Door Warning Upon Arming On pre...

Page 23: ...etermine if the engine is running This setting looks for a voltage increase of 0 3v after cranking Tachless Lo sensitivity mode operates like the Tachless Hi setting but looks for a voltage increase o...

Page 24: ...ock button to program Double Pulse Unlock Output press trunk button to program Total Closure Lock Output press start button to program This changes the system s doorlocking outputs to suite different...

Page 25: ...tem by eliminating all antitheft alarm oriented operations and features Feature 14 Pulse Ignition On Disarm On press lock button to program Off press unlock button to program DEFAULT This feature will...

Page 26: ...the 2nd channel and 3rd channel outputs As shown in the programming assignment the arm disarm channel 4 and channel 5 are programmable as various combinations For example if the disarm output is neede...

Page 27: ...Door Warning Upon Arming On Off Installer Feature Programming Ignition on off press valet 10 times 1 RS Activation WHITE BLUE wire 1 Pulse 2 pulses 3 pulses 4 pulses 2 PINK WHITE Wire Ignition Access...

Page 28: ...Back Cover Color cover is in a separate file...

Reviews: